Showing posts with label Tutorials. Show all posts

Saturday, March 15, 2025

Block Party Block #56 - Birthday Cake Tutorial Part 1 Flock of Birds


Block Party Block #56—Birthday Cake is a delightful project to create. This block requires the Studio 180 Design Tucker Trimmer, Wing Clipper, and Square Squared tools. Additionally, it uses the Flock of Birds Technique Sheet for the corner pieces.

In this blog, I will provide a tutorial on the Flock of Birds Technique. Part 2 will include the Flying Geese and Block Construction. 

The fabric I used is leftovers from my February Blog Hop Collection. The block is made from Jackie Kunkel’s Canton Village Quilt Works “Cosmic” fabric collection for Island Batik by Lumin Fabrics. This collection is perfect for this quilt, as I aim to create a bright and bold block that lives up to its name. Feel free to mix and match fabrics for your version of the block!

Download your block: https://bit.ly/BPB56-BirthdayCake

First, you need to determine your block and unit sizes. Then, refer to your tool or technique sheet cutting charts to find the starting shape size for each unit you make.

Flock of Birds


The Flock of Birds is among the newest and most sought-after Studio 180 Design Technique Sheets. This unit is a variation of the Shaded Four Patch unit and is easy to create using pieced squares and rectangles. You can use the Tucker Trimmer II and Tucker Trimmer III for this project. 


I recommend looking at the unit diagram on the Flock of Birds Technique Sheet before cutting out your squares and rectangles. This will help you understand where each square and rectangle should go in the unit. To make two units, you will need two small rectangles, two Starting Squares, and one large rectangle.


To begin, you need to determine the size of the finished unit you are making. Next, cut out your Starter Squares pieces. These Starter Squares will be used to create Half Square Triangles. Start by marking the stitching lines on the back of one of the squares with your Quilter’s Magic Wand. 


Place the two starting squares right sides together and stitch along the marked lines. Cut down the middle and press the units open or to one side. The triangle will be centered in the pieced unit. I prefer to open these units to avoid confusion.
Right-Handed


Left-Handed

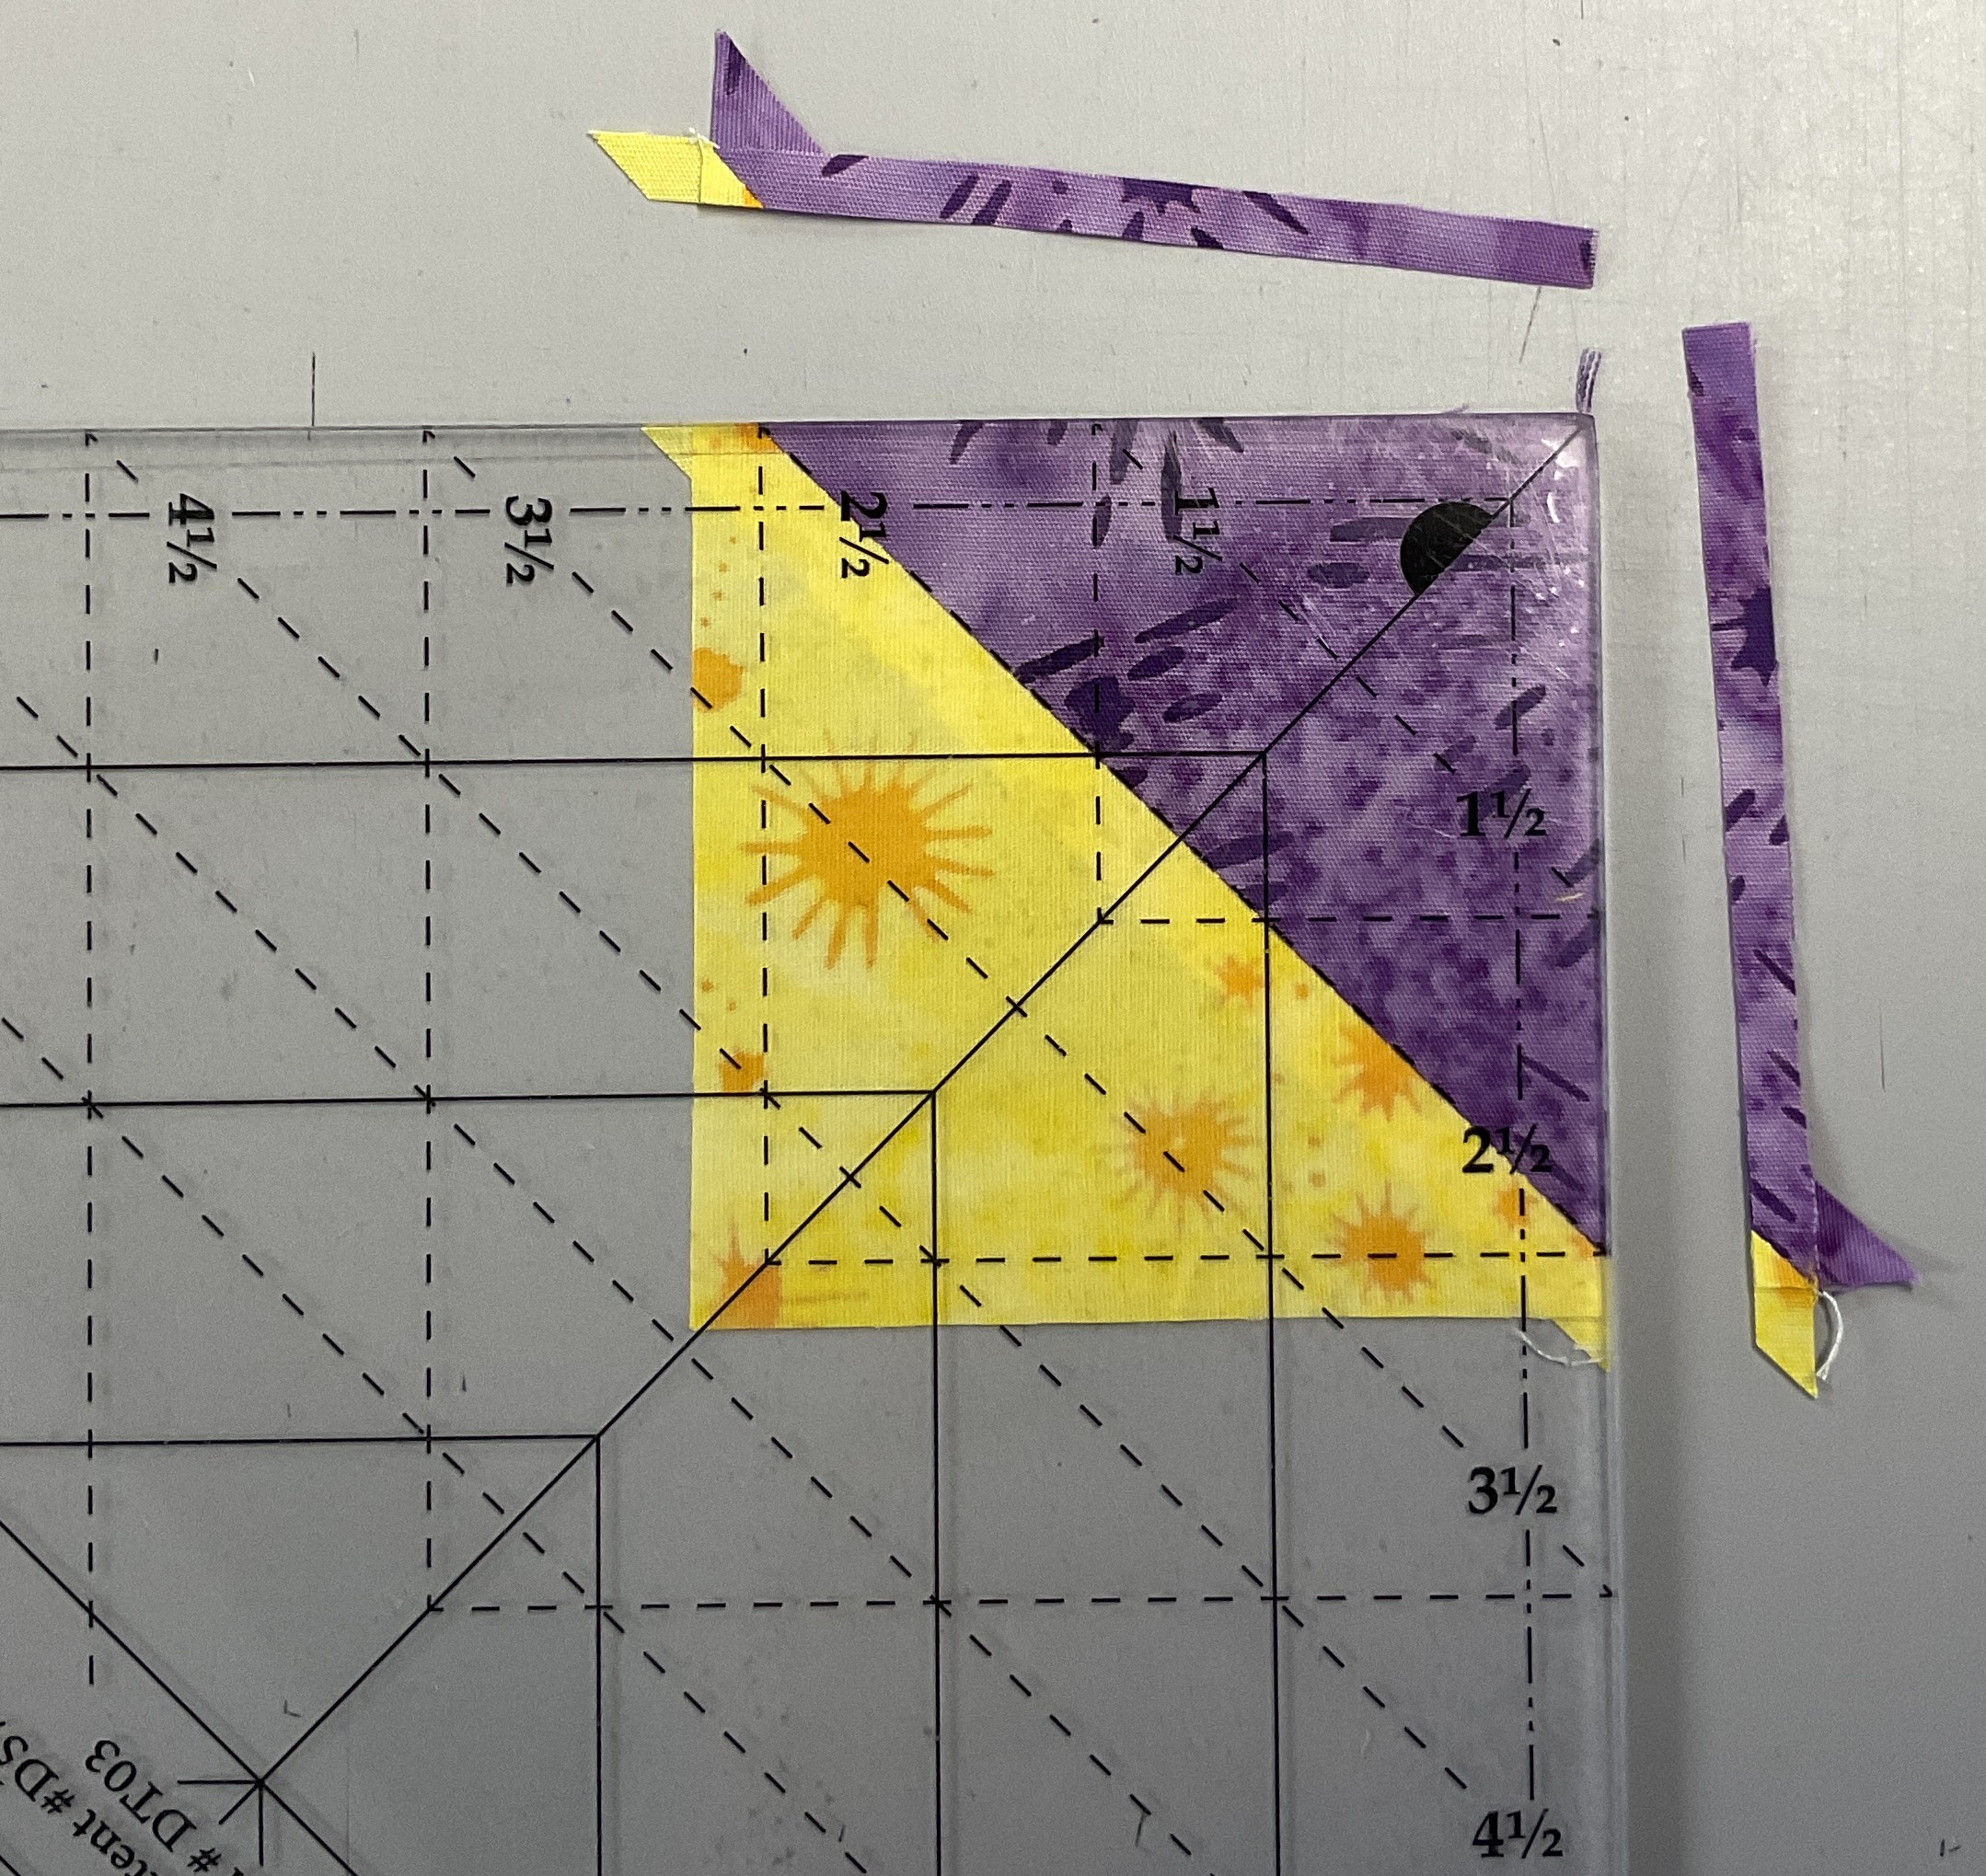
Next, find the Pieced Square Trim Size on the Cutting Chart in the Technique Sheet. Position the unit on the cutting mat to trim the center triangle side of the pieced square. Using your Tucker Trimmer, align the Pieced Square Trim Size with the seam of the pieced square unit. Trim up and across the unit and repeat for the other piece square. Do not rotate the unit; you only need to trim the center triangle size.


Gather your two small rectangles. Position the pieced square so that the center triangle aligns with the inside short end of the rectangle, as shown in the image above. Stitch along the short side of the rectangle and then press it toward the rectangle. Repeat these steps for the other rectangle and pieced square squares.


Position the two stitched rectangles so the center triangles are aligned toward the center and opposite each other, as shown in the image above. Place the right sides of the unit together and sew along the long edge.


Locate the halfway point between the pieced squares and the stitching size, then snip to the seam at that halfway mark, pressing the seams away from each other.

Right-Handed

Left-Handed

Position the pieced unit on the large rectangle with the right sides facing each other. Locate the 45-degree angle lines using your ruler to create stitching lines on the pieced unit. Align the 45-degree angle line with the last stitch seam and ensure the ruler is positioned correctly at the seam intersection. The new First Choice Ruler is ideal for marking these lines. Draw one line along the longer edge and repeat the process on the other side.


Sew along the drawn lines and trim ¼” away from the two seams. Press toward the larger triangle.

Right-Handed

Left-Handed

Using your Tucker Trimmer, align the Sizing Diagonal line with the sewn seam and the common diagonal down the center along the other seam. Trim up and across the unit.

Right-Handed

Left-Handed

Rotate your unit 180 degrees, replace the Tucker Trimmer, realign the sizing and clean-up lines on the previously trimmed edges, and cut the final two sides of the unit both up and across.

For this block, you will need four flocks of bird units. We will cover the remaining units next week.


Sunday, April 7, 2013

Rail Fence Tutorial

The Rail Fence Quilt Pattern, it is a fast and easy pattern for beginners.  My Quilt top measures at 58 7/8" x 58 7/8" unfinished. I wanted a nice big lap quilt for the youngster getting the quilt to grow into so I added an extra row on the side and bottom, now it has 5 rows instead of 4. 

To create this quilt, you need 3 different rail fabrics. A picture or floral pattern fabric that will be your wide rail (rail 2), a light rail fabric (rail 1) and a dark fabric (rail 3). All these fabrics should blend together.  In my quilt I used a Star Wars picture fabric, a blue and a burgundy solid fabrics. 


First cut rails 1 and 3 into 2 1/2" strips, for this quilt you need approximately 7 strips of each color. Then for the rail 2, the wider rail you will cut them into 4" strips, you will need 7 of these also.  Make sure you cut them selvage to selvage.


Now you are going to sew all the fabric into 7 strips. Start by taking a rail 3 fabric and a rail 2 with right sides together and sew them together, do this for all 7 rails.  Once done, press them open.  Now take rail 1 and sew it on the opposite side of rail 2, again do this for all 7 and press open. So you will have a strip set that looks like this above.


Next measure the width of the strip set that has been pressed open. This measurement will be the size you cut the strips sets down to. Mine measured out to be 9 7/8", yours could be that size or 10", depends on your 1/4" seam allowance on your machine.

Pinwheel
Rail fence


Now that you cut them all down to size, you can lay them out into two different patterns, in a pinwheel affect or the traditional rail fence.  I choose the rail fence for my quilt.


After you have them all laid out you will sew them by rows.  If you look across the the layout, you will see I have 5 rows, I have labeled them A thru E.  You will start with laying  row B on top of row A, then sewing them together.  Sew all row A and B together and press open.  You may want to alternate the direction you press them open to make sure so your seams are going in the opposite directions. This will make it easier to sew the next part.  


Now you will notice in the diagram above I have put number on each rows.  You will now take the sets from rows A and B you just sewed together and you will sew them together.  Start with Row 1 and 2, making sure the seams line up and sew them together into a block, continue down with  Row 3 and 4. Press open.  Now with rows 3 and 4 together sew row 5 on the bottom of them, so you have grouping of 3 sets.  Then take 1&2 set and sew together with the 3,4 &5, so all 5 rows will be on one section. Press open

Now that you have all of Row A and B sew into one long section, you can now do the next two rows C and D.  Just repeat what you did for A & B all the way down, to make a long section.  Once that section is done. you will sew Row E together into a small section.

Once all sections are done, all you have to do is sew them together. Lay C&D on top of A&B so right side are together, sew together and press open.  Then you will have 4 rows sewn together, finally sew E on the right side of D and press open.  You quilt top is done!  

You can now leave it as is with no borders or you can add borders.  I have added a 2 1/2" and a 4" border to finish this quilt top.  Then all you have to do is quilt, and bind it and you are done.

Enjoy,

Tina


Rail Fence Tutorial

The Rail Fence Quilt Pattern, it is a fast and easy pattern for beginners.  My Quilt top measures at 58 7/8" x 58 7/8" unfinished. I wanted a nice big lap quilt for the youngster getting the quilt to grow into so I added an extra row on the side and bottom, now it has 5 rows instead of 4. 

To create this quilt, you need 3 different rail fabrics. A picture or floral pattern fabric that will be your wide rail (rail 2), a light rail fabric (rail 1) and a dark fabric (rail 3). All these fabrics should blend together.  In my quilt I used a Star Wars picture fabric, a blue and a burgundy solid fabrics. 


First cut rails 1 and 3 into 2 1/2" strips, for this quilt you need approximately 7 strips of each color. Then for the rail 2, the wider rail you will cut them into 4" strips, you will need 7 of these also.  Make sure you cut them selvage to selvage.


Now you are going to sew all the fabric into 7 strips. Start by taking a rail 3 fabric and a rail 2 with right sides together and sew them together, do this for all 7 rails.  Once done, press them open.  Now take rail 1 and sew it on the opposite side of rail 2, again do this for all 7 and press open. So you will have a strip set that looks like this above.


Next measure the width of the strip set that has been pressed open. This measurement will be the size you cut the strips sets down to. Mine measured out to be 9 7/8", yours could be that size or 10", depends on your 1/4" seam allowance on your machine.

Pinwheel
Rail fence


Now that you cut them all down to size, you can lay them out into two different patterns, in a pinwheel affect or the traditional rail fence.  I choose the rail fence for my quilt.


After you have them all laid out you will sew them by rows.  If you look across the the layout, you will see I have 5 rows, I have labeled them A thru E.  You will start with laying  row B on top of row A, then sewing them together.  Sew all row A and B together and press open.  You may want to alternate the direction you press them open to make sure so your seams are going in the opposite directions. This will make it easier to sew the next part.  


Now you will notice in the diagram above I have put number on each rows.  You will now take the sets from rows A and B you just sewed together and you will sew them together.  Start with Row 1 and 2, making sure the seams line up and sew them together into a block, continue down with  Row 3 and 4. Press open.  Now with rows 3 and 4 together sew row 5 on the bottom of them, so you have grouping of 3 sets.  Then take 1&2 set and sew together with the 3,4 &5, so all 5 rows will be on one section. Press open

Now that you have all of Row A and B sew into one long section, you can now do the next two rows C and D.  Just repeat what you did for A & B all the way down, to make a long section.  Once that section is done. you will sew Row E together into a small section.

Once all sections are done, all you have to do is sew them together. Lay C&D on top of A&B so right side are together, sew together and press open.  Then you will have 4 rows sewn together, finally sew E on the right side of D and press open.  You quilt top is done!  

You can now leave it as is with no borders or you can add borders.  I have added a 2 1/2" and a 4" border to finish this quilt top.  Then all you have to do is quilt, and bind it and you are done.

Enjoy,

Tina


Sunday, February 10, 2013

Four X Block Tutorial

Today, I was working on a new pattern I have designed, it is a basic pattern with half squares blocks and Four X Blocks.  I would like to show you how to put together the four X block, which is simple to put together.

This Block will be a 6 1/2" block when finished.


 You start with a 7 1/8" square block of two different colors. 


Next you need to cut the squares into four parts, to make a X, this makes four triangles and you need do this for both colors.

Take to piece out the left and right side triangles and replace them with the other color blocks you are using.


Now pin together the top and right side blocks makes sure that the right side are together and the edges match up. 

Then sew the a 1/4" seam along the edges and press to the darker color fabric.


After pressed opened place one side on top of other with right side matching.  Making sure to the seams and edges match up.


Sew together with a 1/4" seam and press open to one side. 


Then,  trim down to size.


Once you have it all trim, you have a nice Four X Block.


Tina

Four X Block Tutorial

Today, I was working on a new pattern I have designed, it is a basic pattern with half squares blocks and Four X Blocks.  I would like to show you how to put together the four X block, which is simple to put together.

This Block will be a 6 1/2" block when finished.


 You start with a 7 1/8" square block of two different colors. 


Next you need to cut the squares into four parts, to make a X, this makes four triangles and you need do this for both colors.

Take to piece out the left and right side triangles and replace them with the other color blocks you are using.


Now pin together the top and right side blocks makes sure that the right side are together and the edges match up. 

Then sew the a 1/4" seam along the edges and press to the darker color fabric.


After pressed opened place one side on top of other with right side matching.  Making sure to the seams and edges match up.


Sew together with a 1/4" seam and press open to one side. 


Then,  trim down to size.


Once you have it all trim, you have a nice Four X Block.


Tina