Pages

Monday, December 30, 2013

Celtic Solstice Mystery Part 2

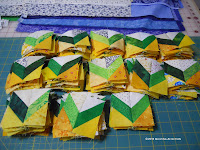
Hope everyone had a great Holiday and is ready to start to bring in the New Year.  Over the holiday week I spent most of my time working on Part 2 of the Celtic Solstice Mystery.  Making 244 chevrons.

You start by cutting:


488 2” X 3 1/2” green rectangles
488 2” neutral squares
488 2" yellow/gold squares

Divided the group up.  Sew all the neutral to one corner of the green rectangles, then sew the yellow/gold to the opposite side of the green rectangles. Trim leaving 1/4" seam allowance on neutral and yellow/golds and press one direction.  Then do the same for the other group but you will be reversing the direction you sew on the neutrals and yellow/gold squares. After trimming the seam allowance press the seams to the opposite direction. 

Then with the two different sides sew them together and press the seams open.  They will measure 3 1/2" square. 

Once I complete each part I put them in Ziploc bags to keep them together and clean. 

I think I'm going to catch up on a few block of months and quilting I have put on hold, then I will work on Part 3.


Tina


Friday, December 20, 2013

Celtic Solstice Mystery Part 1

Bonnie Hunter of Quiltville Started her yearly mystery quilt the day after Thanksgiving.  I was planning to start when we got home from Minnesota trip, but I have a customer waiting for 2 Kings Size T-shirt Quilts by December 16th.  So, now that the quilts are done and mailed.  I was able to get started on trying to catch up on the parts.  They started part 4 today, and I just finished part 1.  This year, the quilt is called Celtic Solstice and the colors are very Irish indeed.  We are using blues, greens, oranges, yellow and neutrals as the colors.  Also she gave you to different size choices, a large which is a (king) and small (full/double),  my choice was the King size.  Not sure that was a good choice!
 
Part 1 was made up of making 380 Triangle
units for the large quilt.  140 of the units are blue and orange and 240 are blue and neutrals.  
 
After you cut all the pieces out using the Tri- Rectangle rulers.  You start by sewing all the right side wing pieces on all the triangles.  That was lot of chain piecing.  Once all the right were on I then sewed all the left wing pieces on the opposite site of the triangles.  After cutting all the chains apart I then pressed all 380 open.  All measure unfinished at 3 1/2" square.

Now, I'm moving on to Part 2 which is making 244 chevron units.

Hope you all are enjoying preparing for your  Holiday's.

Sunday, December 15, 2013

T-shirt Quilt #2 Finished!

After 5 long days of sewing I have finished the 2nd king size T-shirt Quilt for my customer.  

The last couple day have been long days due to I spent one full day of finishing sewing all the 36 blocks together with the borders.  Another day was just preparing the backing and Quilting the T-shirt Quilt. 

The quilting was done like the first T-shirt quilt with double batting as the customer requested, and quilted with the Inkbot pantograph. 


The backing looks good with the Shirts on the backing,  great added touch to the quilt backing. 


Tomorrow, I will get these in the mail back to the customer.  And Start or finish one of my many other projects.

Tuesday, December 10, 2013

More T-shirt Progress!

Yesterday, was a challenging day to get some sewing and quilting in due to we had power outages most of the morning. the power outages were from the freezing rain we got the night before. But I was determine to make some progress on the shirt quilts.  So I cut all the pieces to the binding of T-shirt Quilt #1. Once I got the binding cut out, the power came on long enough for me to get the binding done.   

Since that we had no power again after the binding was done, I could not use the long-arm to quilt T-shirt #1 yet.  So I worked on layout  of T-shirt #2 and getting completed by late afternoon.

After the layout was completed on the design wall and the power had been stable for a good 4-5 hours.  I decide to go ahead and get the quilting done on T-shirt #1 (Brown and Tan).   

By the mid-evening, I had the 106" x 110" quilt done.  My customer asked for double batting on the quilt so I used Quilter Dream Midnight Dream Poly Batting on the quilt.  The quilt will be a nice warm quilt, but the only bad thing about the double batting it makes the quilt real heavy when finished.  

The pantograph was called "Inkblot", from Willow Leaf Studios.


The back came out beautifully, I used a few extra T-shirts in the back toward the top middle.  Also in the backing I used the Tan Marble fabric in the middle and the Dark Saddle Fabric on the each of the sides of the Tan fabric.  


The quilt came out beautiful, so today I was able to the binding on the front of the quilt with help from a friend, thanks Lynn.   Now I get to start sewing the binding on the back while the hockey game is on.


Also, Today, I finished resizing T-shirt  #2 quilt and the cutting all the pieces of sashing, so tomorrow I can sew and hope to get the quilt almost done.  


But now, it is time for binding!

Tina

Sunday, December 8, 2013

T-shirt Quilt Top #1 Finished!

After 7 days of sewing I have finally finished my customers T-shirt Quilt Top.  Yesterday I finished adding the last row and started sewing the borders on the top.  Today, I prepared the backing for the longarm.

Before the Borders,


After Borders,


Tomorrow, I will quilt it and prepare the binding for the quilt top.  I still have another quilt to make after that one is quilted.  

Tina

Friday, December 6, 2013

T-Shirt Quilt #1 Progress!

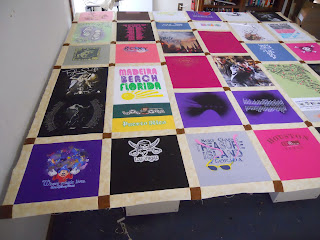
Yesterday and Today,  I have spent working hard on getting my customers T-shirt quilt #1 sewn together.  I was combining the sashing and t-shirt blocks, which is making this whole quilt top look completely different from the layout.  


Tomorrow, I will be adding the last row of shirts and the borders.

Thursday, December 5, 2013

T-Shirt Quilt Order #2!

The second of the two quilts is will be the easier of the two.  Tuesday, I spent the day preparing all the 36 shirts, plus a baby quilt for the quilt top.

All the shirts are fit in the normal size 14" x 14", there was no real out of size decals like Quilt #1.  


The biggest fun with this quilt will be working in the baby quilt into the quilt design.  I took the seam ripper and remove the quilt top from the batting and backing.  It now is ready work in the quilt.


All most all the T-shirt are ready for the layout for the quilt top.  


    Tina