Pages

Friday, May 31, 2013

Tulip Update!

I can't believe today is Friday, the week went really fast.  I think the Memorial Holiday was what through me off.  Any way, I spent the first part of the week, practicing on my longarm and trying to develop my feathers.  I feel they are coming along but not good enough for me, they will come just need to keep practicing.

The last couple days, I have been back in the studio working on the long process of machine applique the leaves and stem on the background.  Which today, I finally finished finished them this morning.  So I then moved on to lighter color of tulips sewing them on the backgrounds. I got three blocks of the lighter pink done.  

I started to get a little board sewing them on so, I decide to make one of  the center blocks just to give me something else to work on plus what to see what the block looks like when finished.  The block is very simple to make compared to the tulip blocks.  So far, I  really liking how this looks and how well it is going.  

Tomorrow, My husband and I are going to a quilt show at the Dulles Expo Center, in Chantilly, Va.  So I probably wont get much done on the quilt this weekend, but I sure hoping I can get more done on this quilt top.

Tina

Wednesday, May 22, 2013

Next step has began


Today, I finished ironing on all the tulips on all the 9 blocks and began the long process of adding the blanket stitches around all stems, leaves and tulips.  Adding the blanket stitch takes a few hours to finish each block.


Tina


Next step has began


Today, I finished ironing on all the tulips on all the 9 blocks and began the long process of adding the blanket stitches around all stems, leaves and tulips.  Adding the blanket stitch takes a few hours to finish each block.


Tina


Tuesday, May 21, 2013

Tulip Quilt Progress has started!

Today, I spent between 4-5 hours working on the Tulip Quilt and made a lot of progress.  Started the day out with ironing the fusible web on the back of the two pink fabrics. Now I have to cut them all out, great evening project while watching TV, just like when I was tracing the pattern on the fusible web.  

After all the fusible web was on the fabrics, I cut the 9 white backing blocks and ironed and starched them until they were stiff.  This makes it much easier to machine sew on the applique pieces.  After I had the blocks ready, I marked the centers and marked them with alignment marks to help with placement of the pieces.

Then I began, placing all the stems and leaves on the background blocks.  I just have a 2 more blocks for leave and stem and then I will starting adding the tulips.

Tina

Sunday, May 19, 2013

Playing with a new toy!

I realized this morning that I need to get a blog post in since I have not done one in a couple days.  Well I have been pretty busy since Friday with my youngest home from the Air Force technical school before he leave for his next duty station in Colorado and my father in law is also in town from California. So we have been having fun catching up.

My highlight is that I received a nice present from the UPS man.  I got my new Quilt Path Computer for my APQS Millennium.  So Friday morning my husband and I spent the morning installing it on my Millie.  Now, I have been learning how to use it and there is a learning curve, but each day I have mastered a couple of new things. The first thing I sewed out was a pantograph, that was so cool to watch.  Then I did some simple blocks. 

Yesterday I learned how to how to set up for borders, and sew them out.  Today, I hope to learn how to add new designs and use them.  So far I love my Quilt Path.

Hope you all having a great weekend!

Tina


Wednesday, May 15, 2013

Tulip Test Block Complete

Today, I worked on developing my Tulip test block to see what I liked and what needs to be improved before I started building more for the quilt top.  

The block came out out beautiful, and I love the bright colors.  When I started to make the stems and the leaves, instead of cutting 73 leaves and 36 stems by hand, I choose to use my Sue Pelland Ruler templates to make them, sure beats cutting the pieces by hand.  

I think the only thing I will be changing is that I need to center everything and I think I will be making the background squares a 17" and then cutting them down to 16 1/2" blocks unfinished.  

Once I had the block finished, I started to cut out the rest of the stems and leaves, and this evening I will be starting to cut out fusible web for the tulips.  

Not sure what time I will have to work on these over the next couple of days, due to I have my father-in-law and son home for the next week.  


Tina

Tuesday, May 14, 2013

New Project in works

The past couple days have been busy, with me getting my first customer who want a small quilt finished, and working on another quilt top for my mother-in-law who is developing quilt patterns to sell.  

So now I have time to work on a designed this Queen size Tulip Quilt in EQ7!  The tulips will be machined appliqued on 16" blocks with 4 patch chains blocks in the middle all set on point. 

The background color will be a white, with 2 different pinks and a green.  I will be using Robert Kaufman Fusions and P&B Textiles Suede all 100% cotton fabrics.

I have the layout template ready and have cut out the templates, now I just have to cut out all the soft shade fusible.

When I finish this quilt, I will be selling it, the Price will be set later after I calculate the cost of materials and the time it takes to make it.


I will be posting the complete progress of this quilt as I go,  I will be making a new tab at the top of the page that will display the complete progress of this Tulip Quilt.

Tina

Saturday, May 11, 2013

Happy Mother's Day!

 I would like to wish all the mom out there a Happy Mother's Day.  In honor of my mom I'm going to re-post this blog I wrote a while back about My Inspiration, my mom.

My Inspiration

My mom, sister and me summer 2012

My mom is my biggest inspiration for my sewing. She would make my sister and I clothes and my dads shirts. I can remember watching her lay out patterns out of fabric, and then sew them into nice clothes. Also I remember going with her to the sew and vac store in downtown Coeur d' Alene, Idaho and watching test drive sewing machines. She still is using that New Home sewing machine that she purchased to this day. My mom first taught me to sew on a Holly Hobie sewing machine, that I received one Christmas as a gift. When I was in middle and high schools and I took several home economics classes and we always had a semester or two in learning to sew. I was always ahead of the class due what my mom had shown me before I even had the class. I remember making pair of sweatpants with her supervision for high school home economics class project. The teacher was so pleased with how fast and nicely I did the work. I own it all my to my fantastic mom. 

Also while I was little, I remember my mom going to a quilt class in Spokane, Washington and watching her put the log cabin blocks together for a quilt. It was very scrappy, and I still have that quilt. I think that was when I fell in love with quilts now I think about it. I have a lot of her quilts that she made over the years and have used them for our bed and throught out our house. That what I love about quilts they will last forever, due to the loved that is put into them.

Another inspiration in my sewing is my aunt. She is a gifted seamstress, she would make clothes for people in her sewing room in her house. She would make prom, and wedding dresses also for people. In fact she made my prom dresses for two different years, and then she made my beautiful wedding gown.

This summer, when I was home on vacation my mom gave me a box of quilting patterns. These patterns belonged to my great-grandma Evers. These patterns came by mail from Farmers Magazine. Some of the patterns templates were cut from old cereal boxes. Also  in the box was an old quilt block she had sewn together. You turn it over you can see the her hand stitching. I will be sharing more about these patterns in a later blog.

As you can tell, sewing and quilting runs in the family. But my biggest inspiration in my life, sewing and quilting is my mom. Plus, she along with my dad have always been my number one fans. I thank them for always being there for me and my sister. I love you!

Tina

Thursday, May 9, 2013

Quilt Top Finished

The last couple days, I spent quilting the "Smorgasbord", Quilt Top.  I spent half of one day just in auditioning several quilt designs, and making templates with tissue paper and Golden Threads Quilting Paper.  Using QuiltMaker Design's I found several different designs I used for the quilting on the quilt top.  


For the top borders I used a nice wavy lines all the way around.   In each of the blocks I put a heart ring around the middle wording and black points.


On all the points I added 3 echoing lines spaced out evenly.  In the sashing I added "e" designs.  


The designs pull the top together making it a really beautiful wall hanging.  Now to work on my next project.


Tina

Monday, May 6, 2013

Wallhanging Quilt Top Complete

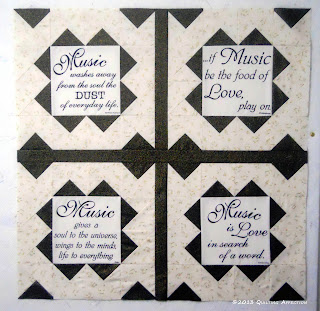
I have completed the Smorgasbord Quilt top I started late yesterday afternoon.   First, I had to finish 3 of the 4 blocks. I already had one put together yesterday. 


Once I had all of the blocks, It was easy to put together.  I added 2" sashing with the black fabric in the middle of the block.


Next, I added the 4 1/2" borders with a nice red and black musical fabric. After adding the borders the quilt top was finished at 42" x 42" making a nice size for a small wall-hanging.


Now, I just got to put it on the longarm and decide how to I'm going to quilt this one.


Tina