Pages

Tuesday, February 27, 2018

Island Batik Ambassador: February Mini Love Project!


This month has been a busy month for the Island Batik Ambassadors, with receiving our first ambassador box, making our little Galentine Project and now we are finishing up the month with a Mini Love project.

Galentine Project
I just finished my Mini project. The goal was to make something that measured under 24" x 24" in size.  So I designed a little project I call "Love Swirls."  I normally don't design blocks that measure  1 1/2" when finished. This was kind of fun to make and put together.


I decided to use the fabric that came in my box that was labeled for my Galentine project since I had completed my Galentine project already.  These Island Batik fabric come from the Basic, Neutrals, and Blender Collections.


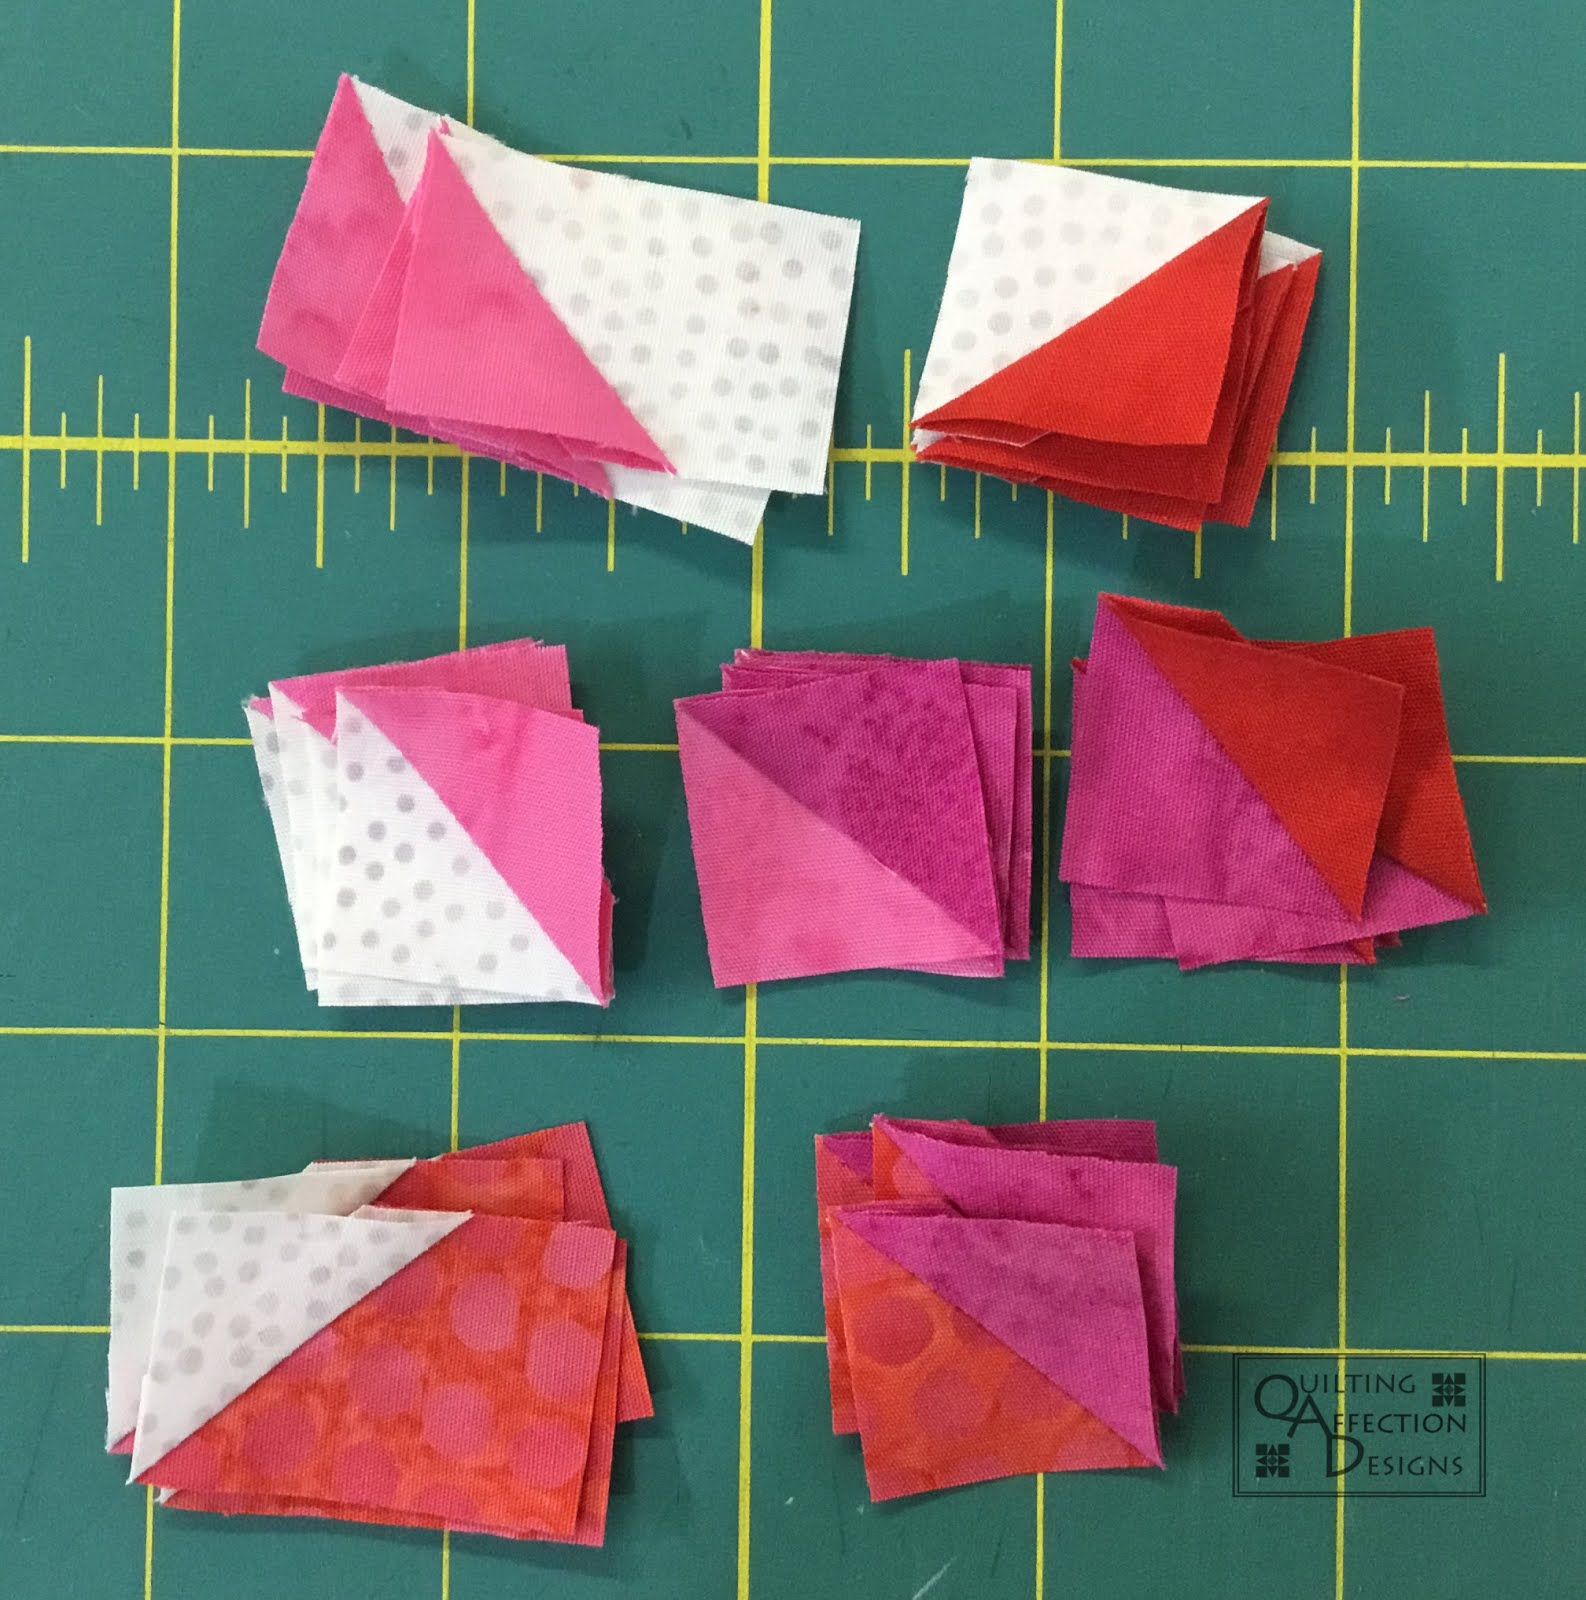
In my project designed, it called for making half square triangles and picket fence units.  I started with cutting out my squares and rectangles that all measured under 2".   


Once I got my half square triangles, and picket fences units stitched together and pressed, I began to trim them to size. So I brought out my favorite tool the Tucker TrimmerⓇ 1 and the WingClipper® 1 rulers.  They worked great for trimming these units, I was so glad I didn't make the units any smaller.


Once I had the units trimmed, I then laid them out and began stitching them together to make my 1 1/2" finished blocks.


Once the blocks were completed, it was time to sew them together to make one 3" finished block.  Then I repeated to make a total of four 3" blocks.


Then I stitched all the four blocks together to make one 9 1/2" unfinished block.


I then add two small borders around the quilt center.  One measured 1/2," and the other was 1". 


Then I quilted together with some stippling and finished it with some pink binding.


This cute mini quilt was a fun weekend project.

Now that this project is complete it is time to get started on my next Island Batik Ambassador project for March.


If you haven't seen the other Island Batik Ambassador Mini Projects be sure to check them out. 


Tina

"Designing to Inspire"


Friday, February 23, 2018

2018 Master the Rulers: Studio 180 Design Blockbuster 7

As you are reading this blog post I'm down in Hampton, Virginia enjoy some time with my husband at the Mid-Atlantic Quilt Show.  I love going to this show, it is one of the biggest shows in this area.

Blockbuster #7 -Whimsy Turndash is a fun block and I learned new tricks using the Square SquaredⓇ this week.  The Whimsy Turndash uses the Tucker TrimmerⓇ 1, Square SquaredⓇ, and the Little House technique sheet.

The block size I will be using this week is a 9" Block, we are making three units: the square in a square, little house, and half square triangles.  The little house technique is a fun unit and was a new technique for me.


So let's get started with making the Square in a Square unit.  They are just like the ones I showed you in last week’s blog post on Blockbuster #6. If you missed you can check it out Here.

The next unit requires the Little House Technique Sheet by Studio 180 Design and is a companion sheet for the Square SquaredⓇ ruler.  This technique was new to me but overall, it was straightforward and fun to make.  The technique sheet walks you through the cutting instructions and how to make the units.


You start with two small and one large square, cut to size for the unit you will be making.


You need to draw at least one line down the middle on the reverse side of the smaller squares.


Position one of the smaller squares on one of the corners of, the larger square making sure that right sides are together. 


Stitch on the marked lines down the middle of the smaller square. Trim away 1/4" away from the stitched line and press open.


Now, for the next side, I had a little fun and learned a cool trick to make some half square triangles at the same time.


On the remaining small squares for the other side of the house unit. I drew a secondary line 1/2" away from the center line, so we have two sewing lines.  


Place a small square in the corner next to the one you just stitched.  Stitch on the two drawn lines.


Trim down in the middle of the two stitched lines. Now press both of them open. 


You now have small half Square triangles to use for a something fun to create.  I needed to pick up the Tucker TrimmerⓇ II, this week at the Quilt Show to finish trimming my half square triangles.


Anyway, back to the house units you will then use the Square SquaredⓇ Ruler to trim the units to size.  The trimming is very similar to how you trim the Square in the Square units.


Now the units are made it is time to assemble the block.  Starting assembly of each of the rows first.


Now, the rows are stitched together it is time to sew the rows together.


Now Blockbuster #7 - Whimsey Turndash is now complete.  I love the colors in this block.  

Next week, I will be making Blockbuster # 8 - 54-50 or Fight block, which is using the V BlockⓇ Ruler.  I love making the V Block units so it will be fun.

Talk to you next week, and remember if you have missed the first six Blockbuster blocks you can catch up HERE.

Have a great weekend of Creating!

Tina
"Designing to Inspire"

Friday, February 16, 2018

2018 Master the Rulers: Studio 180 Design BlockBuster 6

Wow!  Today is blog post #6 in the Blockbuster Challenge Series.  I guess time does fly by when you are having fun making blocks and learning at the same time.


So let's get started on BlockBuster #6 Rolling Stone and starting with a new ruler, the Square Squared® Ruler.  The Rolling Stone block is much easier this week compared to last weeks, Whirligig block. 

I chose a 12" block, and I'm still using my Island Batik scraps. 

For this block, you make four Square in a Square unit, which will measure 4 1/2" unfinished.


When using the Square Squared® ruler, you will find the cutting measurements for the center square and the side triangles on the ruler.

Starting with the Center, I referred to the Center Square Section of the Square Squared® ruler to determine what size of the strip I need to cut to get the center squares. I found the 4" line and determined I needed a to cut a 3 1/2" strip for the center.


Once I had the strip cut, I lined up the Square Squared® ruler on top of the strip to the 4" mark and began sub cutting the strips until I had four squares.


Next, refer to the triangle cutting sizes on the other side of the ruler, and determined that I need to cut 8- 3 1/4" squares and then cut them in half to yield two triangles per square.


Now that everything was cut for the square in squares, I began stitching the top to the square, ensuring the triangle points match up with the center of the square. Repeating the same process with the bottom of the square. 


Once I was complete with the top and bottom, I then pressed the triangles away from the center square.


I repeated the same process of stitching the triangles the center square, but this time I was placing them on the sides.  Followed by pressing away from the center square again.


Once the unit was made, it was time to trim the unit to 4 1/2" using the Square Squared® ruler.  Placing the Trim down section of the ruler on the unit and assuring that you line up the 4" X's over the sewn seams. Once the ruler is aligned up, you will trim the side and top up.  


Rotating the unit, then line up the X's again and making sure the cleanup lines with the previously trimmed edges from the last step.  Trim up the remaining edges.


The 4 1/2" unfinished Square in a Square units are now complete; now it is time to cut out the remaining pieces for this block.


For the Green and Yellow, I need to cut out 6 - 2 1/2" square units of each color and 4  -  2 1/2" X 4 1/2" blue rectangles.


I then began stitching the green and yellow squares together, followed by pressing them to the side.


Now that all the squares were sewn together, I took two of the units and stitched them together to make a 4-patch unit.


With the remain units and the blue rectangles, I began stitching them together.


As I was stitching them together, I made sure that the green always on the top left side of the units. Pressing them open and toward blue when they were complete.


I was now time to lay all the completed units out to get ready to assemble the block.  Starting stitching all the units together in each row.


Then stitching all the row together to finish the block up.


This is my colorful Rolling Stone block is now complete.  

I'm now ready to start BlockBuster #7 next week.  

If you missed my first five blocks in this BlockBuster series make sure you check it out, HERE

Have a wonderful quilting weekend!

Tina
"Designing to Inspire"


Wednesday, February 14, 2018

Looking for that Ideal Customer!

This week, I have been participating in a 5-Day Get Your Art Out There Challenge through the Creative Passion to Project Facebook.

Today's is Day 3 of the challenge we need to tell about we think is our ideal customer. How old they were? Where they live? What else do they like to do?  

We also need to tell you where we can find this buyer, online or offline?  What are their needs and biggest problems?

Below is what I THINK is my ideal customer and how I can solve for this customers problem.
My Ideal customer will be Female age 50 – 60 with a high school diploma, she may be retired, married and children are out of the house and possibly lives in a small town. 
She enjoys sewing, quilting, cooking, home decor, grandchildren, camping, walking, and social gatherings. 
She is a bargain hunter, values excellent quality services, and goods. She shops mostly local but will shop for great deals online, such as Missouri Star Quilt Company, Etsy, and local quilt shows. 
She will not be buying Amazon, and eBay for her sewing goods. 
She watches her morning and evening news shows, and how to TV Shows. She likes to follow blogs, mostly follows to the blog hops where she can sign up for giveaways for quilting and sewing goods. 
She also loves to subscribe to quilting magazines, such as McCalls,QuiltMakers, and Fons and Porter. Social Media for her will be very limited to just Pinterest, YouTube and Facebook. 
She uses the internet very sparely but does shop, follow blogs and watches YouTube how to’s. 
She does attend small local quilt and church groups regularly. 
She likes to follow Jenny Doan, Alex Anderson, Pat Sloan and Bonnie Hunter. 
She loves to use excellent and high-quality rulers, Patterns and fabric. 
Her most significant influences are based on her past experiences, reviews, friends, and family. 

My solution for this person would be design patterns that will inspire her to quilt; I will produce a high-quality pattern that is easy to follow. I will provide them with blogs and videos on how to makes patterns and blocks. Show off my patterns at Quilt Guild Lectures and workshops, where I will sell my patterns also. Also Selling my patterns at Quilt Shows for her.
Does this describe you? 

Or 

you entirely different from this person, then please tell me a little more about you?  

If you can help me figure out who my ideal customer it would be much appreciated and would help me get closer to improving my business!  

Let me hear from you, just leave a comment below.

Thank you,

Tina
"Designing to Inspire"


Quilt Talk Tuesday, Episode 6 – Island Batik Ambassador Box Opening

Yesterdays "Quilt Talk Tuesday" video from Facebook Live was fun we opened my first Island Batik Ambassador Box for this years.


Check out my Galentine Project blog Here.

Announcement:
If you are looking for a great deal on Moda Fabrics, then check out my Etsy Shop (description) area has the link. I have all my fabrics on clearance 50% off and free shipping right now. So, check it out.  SHOP NOW!

Remember to subscribe to my YouTube Channel to get the lastest episode of Quilt Talk Tuesday.

Tina
"Designs to Inspire"


Tuesday, February 13, 2018

Island Batik Ambassador: Happy Galentine's Day!


Happy Galentine’s Day!  The Island Batik Ambassadors are celebrating this holiday with our projects of the year.
  

Galentine's Day was created on a TV series “Park and Recreation” by the Character Leslie Knope.  We are celebrating the love that we have for our girlfriends.  The best day of the year.

Old Picture of the Three of us! Love these Ladies!
I have two beautiful, caring and nurturing best friends in my life.  Lynn and Jean Marie, we characterize ourselves as three witches, because we are always up to something mischievous when seeing each other.
 

Several years ago, I developed two patterns called “Three Witches Brew” and “Road Trip.”  These patterns were inspired by my two best friends.  Each Witch represents us by our favorite colors.


So, when I received the assignment to make a Galentine’s Day project again this year.  I decided to bring the Girls back to celebrate the day.


My Galantine’s Day project measures 12” x12” and uses scraps of Island Batik fabrics from past years; since I still haven’t opened my Ambassador Box.  I plan to open it live on my Facebook page this afternoon (12 February).  Check out the box opening, HERE.


This project was so much fun and easy to make. It will hang on my bulletin board to remind me each day that I'm fortunate to have great friends in my life.  Love you Ladies!!

Happy Galentine's Day everyone!!!

Also please remember to check out the other great Island Batik Ambassador posts from the list below, plus we will be posting another great project this month so keep your eyes for our posts.


Tina

"Designing to Inspire"