Pages

Saturday, April 28, 2018

April Showers Mystery Quilt: Week 4 Borders and Corners

Well, 4th and final week of the April Showers Mystery Quilt is here, Kari Schell and I will conclude this projects collaboration of by showing you how to design and piece the final part of the April Shower Mystery Quilt.

If you have missed any of my blog posts on how to piece, you can catch up with the series here:


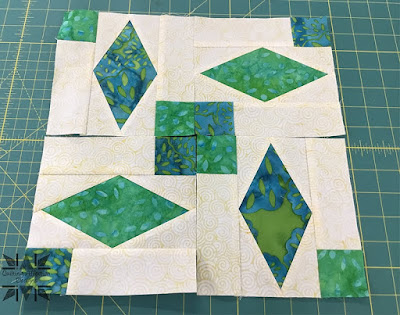
Today, we will be finishing by adding some borders and corners to our assembled quilt top.


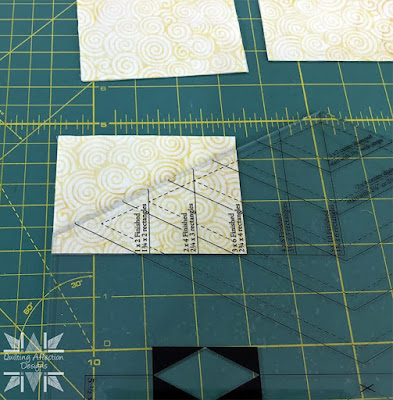
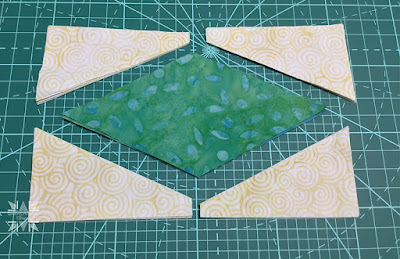
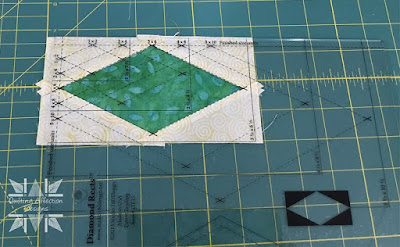
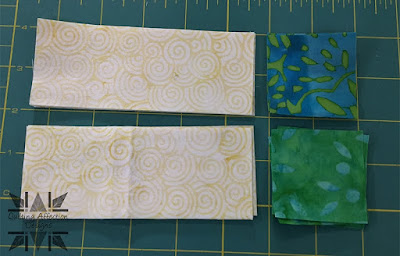
Over the past several weeks, we have been making some tricky blocks with our Studio 180 Design, Corner Beam® Tool.  With all the practice we have been doing with the tool you will find this week’s Corner Beams, that is used in the border corners, really easy. 


The borders consist of making green and red strip sets and trimmed to size. 

Be sure to check out how Kari designs the blocks in EQ8, Here. If you would like to learn how to develop these blocks in EQ8, visit her posts here, Week 1Week 2, and Week 3


Here is some sample of what others have made so far in this challenge.


Make sure you watch Week 4's video tutorial and download the pattern Here. The downloads will be available until May 15th!  After that, you will be able to purchase the patterns on my website.


Kari and Myself meeting for the first time at CABS

Thank you for joining myself and Kari Schell on this collaboration. It was a fun project to show you how to use the fantastic Studio 180 Design Tools and what they can do for you.  Be sure to check out my other patterns on my website also.

Don't forget to sign up for my newsletter and blog here, when you sign up you will get a Free Pattern.


For more Information, click HERE
                       
Join the Ramblin' Star Block of the Month Group! HERE

Friday, April 27, 2018

2018 Master the Rulers: Studio 180 Design Blockbuster #16

Well, today we return to start the Blockbuster series 2, blocks #15-25 that means we will be done with series 2 in ten weeks and I have a feeling they will go fast just like the first series did.

Blockbuster #16, Peaks & Valleys uses the combination of the Studio 180 Design Diamond Rect® tool and the SideKick/High-Low Technique Sheet to make this block.  I again used the same Island Batik Fabrics that were used in Blockbuster #15, just adding coordinating fabric to the mix.


I began with making the four diamond rectangles, by cutting out the centers and the side triangles with my Diamond Rect® tool. Once they were all cut out, I sew them together, just as I did in blockbuster #15.


My diamond rectangles were now complete.  Time to get started on the next step the High-Low Units. 


I have made the High-Low units in blockbuster #10 the twisted pinwheel block. Making the High-Low units are relatively simple, you just need to pay attention to the direction your slant must go. These units use the "V" Block® trimmer.  I need to make a total of four units that slanted to the right.


Finally, I completed the units by making some four sidekick units, followed by cutting some large and small squares for the corners and the center of the block. 


 Now I was ready to layout the units to begin the assembly.


I started with the center block assembly first.  To do this, I need to sew a partial seam using the small center square and one of the sides of the Diamond Rectangles. This is very similar to how we put the Shuriken blockbuster #14 together.


Then I continued to work, sewing the diamond rectangles together. The last step was to stitch the partial seam to the last diamond rectangle.


The center is complete, now I can finish it by stitching all the pieces together and assembling them to the center block.


Blockbuster #16, Peaks and Valleys is finished.  This was another fun, block to make due to it helped me reinforce everything I have learned in the first series of blocks fresh in my mind.  

Tina

"Designing to Inspire"

You can check out my completed Blockbuster blocks HERE.

Have a Great Week! Don't forget to sign up for my newsletter and blog here, when you sign up you will get a Free Pattern.


For more Information, click HERE 
                       
Join the Ramblin' Star Block of the Month Group! HERE


Saturday, April 21, 2018

April Showers Mystery Quilt: Week 3 Flowers

I think Spring and Summer have finally arrived here in the Maryland area.  Still many of you, especially in Minnesota, Mother Nature just wants you to stay in winter mode a little longer.  I hope the April Showers Mystery Quilt project is helping you out of those winter blues and help you start thinking about those spring flowers popping up everywhere.

Week 3 is here, Kari Schell and I continue the collaboration of showing you how to design and piece the April Shower Mystery Quilt.

If you have missed any of my blog posts on how to piece, you can catch up with the series here:


Week 1 Umbrellas
Week 2 Raindrops

Today, we will bring some color to your quilt top with some flowers and finish assembling our quilt top.

I have to omit that Kari Schell, On the Point Quilter, has been challenging me each week with all the blocks she has designed for this mystery quilt in EQ8.  Each of the blocks continues to work off the Studio 180 Design, Corner Beam® Tool.  You definitely will get lots of practice making the Corner Beam blocks.


Week 3 Flowers
The Flower blocks are very similar to last week's raindrop blocks, except how you make the center block for the Corner Beam, then the rest of the steps are identical.

Be sure to check out how Kari designs the blocks in EQ8, Here. If you would like to learn how to develop these blocks in EQ8, visit her posts here, Week 1 and Week 2.


Make sure you watch the video tutorial here and download the pattern Here.


Have a Great Week! Don't forget to sign up for my newsletter and blog here, when you sign up you will get a Free Pattern.

Tina

"Designing to Inspire"


For more Information, click HERE 
                       

Join the Ramblin' Star Block of the Month Group! HERE

Friday, April 20, 2018

Northern Woods Blog Hop!


Greetings everyone!  I'm so delighted that Nan Baker, asks me to part of this Northern Woods Blog Hop. I received Nan's Island Batik signature collection, Northern Woods in my Island Batik Ambassador box.  


I have been using the beautiful Northern Woods collection in my ambassador projects for the last couple months.  I love this collection and how it brings the colors of the forest to you. 

So, let me show you some of my projects that I have been using with this fun and exciting collection.

First, in March the ambassadors were tasked to try a new technique.  I chose the Studio 180 Rapid Fire Lemoyne Star Technique. I had never made one before and really need to start working with it since I had to make one for my Studio 180 Design Certified Instructor Application.  


Making the Lemoyne Star was so much fun and combining it with the Northern Woods Collection was the right decision.  The browns really popped in this small wallhanging/table runner.  I only used 5 Fat eights bundles and a little extra coordinating fabric for the borders and backing.  The binding was made from scrap pieces of the fabric. You can read a bit more about this project, HERE.


Next up is my latest Island Batik Ambassador project for April. We were challenged to make a 36" x 36" or larger quilt from a quilt block from the past.  I went back to the patterns that my mom gave me from my Great Grandmother for some inspiration.  


So, using the remaining Fat Eights and coordinating fabric from the Northern Woods collection, I decided to use the mail order pattern Design 907, she labeled Pinwheel and made it up and put a little twist on the pattern.  


With the stack of fabric remaining, I just had enough to finish this quilt that measured 36" x 36".  I used my Janome 7700 to do all the quilting on this stunning wall hanging. I usually would use my longarm, but I wanted to get some practice on machine quilting on my domestic, and boy did I need practice.  I love this colors and how the browns highlight the stars in the middle of the block.  I used the remaining coordinating fabric for the borders and binding.  You can read more about the project HERE.

Between the two projects I completely I finished off the Northern Woods Bundle I received in my ambassador project.

Thank you for joining me today, as I shared my Northern Woods Projects, be sure to check out the other blogs that were done this week, many of them have giveaways.

Schedule

April 16: Nan Baker  –  Purrfect Spots 
April 17: Margaret Willingham  –   Eye of the Beholder 
April 18: Maria Hrabovsky  –   Maria’s Quilt Scraps
April 19: Karen Overton  –   The Quilt Rambler
April 20: Tina Dillard  –  Quilting Affection Designs
April 21: Joan Kawano  –  MooseStash Quilting

Also, Check out the Island Batik Blog, to find out more about the Northern Woods Collection and register to win your own Northern Woods Bundle.


Have a Great Week! Don't forget to sign up for my newsletter and blog here, when you sign up you will get a Free Pattern.

Tina

"Designing to Inspire"

For more Information, click HERE 
                       
Join the Ramblin' Star Block of the Month Group! HERE

Thursday, April 19, 2018

Island Batik Ambassadors: Looking Back, Vintage Challenge


After I finished my march Island Batik challenge, I started working on ideas for the next one.  For April, we were tasked to do something a little different this time.  The goal was to dig into history and take a block from the past and bring it back to life with a bit of modern twist. The quilt is to measure 36" x 36" when finished.


So when I read the task, I thought about some patterns that my mom gave me that belonged to my Great Grandmas.  She ordered patterns that she saw from ads in the newspaper.  Many of the envelopes that I have were labeled that they came from The Washington Farmer Needlecraft Services, and list a PO Box at Old Chelsea Station in New York, New York.  By the date stamped on the envelope, I would say she ordered them in the late 1950's.


I have several of her patterns and a lot of pattern pieces that don't have the designs to go with them.  My Great Grandma made a lot of her templates from old cereal boxes, and a few were made from sandpaper.  My mom tells me she would use old clothing for the fabric for the quilts.


The pattern I chose for making my vintage quilt was called Design #907, and Great Grandma wrote "Pinwheel" below the picture of the quilt.  So I redesigned the pattern in my EQ8 program and started working on designs to modernize it.


Once I had the basic pattern, I decided to use the rest of my Northern Woods Collection to make it.  I only twelve Fat Eights left over, and a yard of the coordinating fabric left over from the March project.


I decided to start with the blocks cutting out the blocks first.  Now my Great Grandma would be tracing out all the template pieces and cutting them out with scissors and stitching them all by hand.  I would be cutting them out with my rotary cutter and using my sewing machine.


The blocks were reasonably easy to make.  I just need to be careful and not to make a mistake due to the lack of fabric I had.


I finished four blocks, now I need to figure out how to get this quilt to measure the 36" x 36" that was required for the challenge.


So after looking through my fabric left over, I had enough to make sashing around the blocks made out of strip sets. So after a lot of playing with the layout, I assembled the quilt.


I then add 3" borders from the Coordinating fabric, I finished the quilt top to 36" x 36", now it was time to get it quilted.  For this one, I went back quilted this one on my sewing machine instead of my longarm.  It was a lot of fun, but I could tell that I was out of practice.


My project is now complete!  I was quite pleased with how this one turned out.  Looking forward to the next Island Batik Project.

You may want to check out the new techniques projects that the other Island Batik Ambassador have made this month. 


Don't forget to sign up for my newsletter and blog here, when you sign up you will get a Free Pattern.

Tina

"Designing to Inspire"


For more Information, click HERE 
                       
Join the Ramblin' Star Block of the Month Group! HERE

2018 Master the Rulers: Studio 180 Design Blockbuster #15


This week, I have moved my Blockbuster Challenge blog up one day for an excellent reason.  Tomorrow, I'm participating in the Northern Woods Blog hop, so I had to move this blog post up one day.

Today, I have Diamonds in my eyes as I make Blockbuster #15 Floating Diamonds, the last one in Series One.

Floating Diamonds uses the Studio 180 Design, Diamond Rects® Tool and I used three colors from my Island Batik Fabric Stash from past years.


I started with making the 3" x 6" Diamonds. Referring to the chart that came with my ruler, I needed strips of fabric that measured 3 1/4" wide, to cut out the diamond centers.  Placing my Diamond Rects® tool on my stack of strips I made my first cut.


Rotating the strips around, I made my second cut using the Diamond Rects® tool.


I now had 4 perfectly cut diamonds, two of each color.


Next, I started to cut the side triangles from 2 3/4" x rectangles that I cut from a 4" strip of neutral fabric.


This would yield 2 side triangles per, one rectangle and  I need 4 side triangles per diamond.


Now that the diamond center and the side triangle were cut out. I positioned the side triangles around the diamond center, making sure the bias edge matched the center bias edges and the straight edges were facing outside.


I started stitching the two opposite sides together on the center of the diamond. Making sure the edges matched up, and pressing away from the diamond.


Then continuing with the remaining sides and pressing away from the diamond.


Now I was ready to trim the rectangles down to size.  Using the trim down side of the Diamond Rects® tool, I placed it on top of the rectangles and trimmed down to 3" x 6".


Now that the diamond rectangles were finished, it was time to cut out 8 - 2" x 5" rectangles of the neutral fabric and 4 of each color I used as the diamond centers.  I laid them out and stitched them together.


Now I have the long rectangle units made, I again laid the blocks out and stitched them together with the Diamond rectangles. I wanted the colors to be the opposite of the diamond rectangle fabric.


Once that was done, I began stitching the four blocks together.


Blockbuster #15 Floating Diamonds is now complete.  There is a lot of color combinations you could do with this block.  I'm looking forward to next week when we start series two. I think they will be challenging blocks, but rewarding at the same time. This is great practice as I prepare myself for the Studio 180 Design Certified Instructor Class in July.


You can check out my completed Blockbuster blocks HERE.

Have a Great Week! Don't forget to sign up for my newsletter and blog here, when you sign up you will get a Free Pattern.

Tina

"Designing to Inspire"

For more Information, click HERE 
                       
Join the Ramblin' Star Block of the Month Group! HERE