Pages

Friday, September 24, 2021

Studio 180 Design Challenge Block Reveal

Over the last couple of months, several of the Studio 180 Design Certificated Instructors, including myself, have been participating in a Block Exploration Challenge.  Each month we design a block using a Studio 180 Design tool or technique, and every week we reveal a piece of the block on our Instagram pages.  

This month's blocks challenge was to design and make a block around the Shaded Four Patch.  This is a fun little Technique by Studio 180 Design

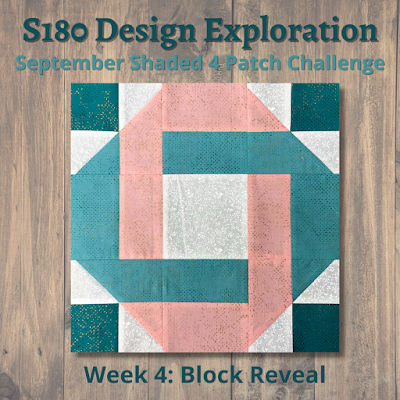
I decided to design my block, which I'm calling Entangled Octagon, to use this technique with a little kick. I chose to experiment a little with the large triangle to give it another look.

The fabrics I used in the project were from the Spotted Collect from Moda and white background color for a little background color. 

Started off making four rectangle blocks for the middle of the outside rows.  


Next, I made my shaded four patch units. Again, everything is the same when making the units, except the last stitching step. Where instead of one solid piece of background, I added a pieced rectangle.


I started by making a strip set and pressing to the wides strip. 


Folded the strip set in half and cut the folded end to make 2 strip sets.


I paired the two strip sets right sides with the narrow strips on opposite sides, so each narrow strip lays over the wide strip.  Subcut the pieces.


Stitched the layer pair sections down the long side and snipped in the middle to allow the seams to press naturally. 


Using a ruler, I marked two 45°  sewing lines that run through each of the corners of the squares.

Paired the pieced rectangle with the shaded patch rectangle and stitched on the lines.


Trimmed each side of the stitching lines a 1/4" and press the seams to the pieced triangle.  This makes blocks that are mirrored images on the pieced triangles. Fun right!

Trimmed the units to correct size using my Tucker Trimmer tools.

Layout out the block and stitched it together. Pressing the seams open. 


Once you are done your block will look like this.  This was a fun experimental block, thinking some patterns maybe coming soon.

Friday, September 17, 2021

Block Party Block #17 Diamonds and More tutorial


If you are looking for some fun blocks that will allow you to practice your Studio 180 Design tools and skills.  Then you will want to check out my Block Party Blocks.  

On the 15th of each month, I release a new block pattern that you can download.  These blocks allow you to practice your skills and allow you to play with the tools. 

I recently made to change to the Block Party Block.  I used to make these only available in my Quilting Affection Groupies Facebook Group.  I also made a slight change in how I write my blocks. I offered the blocks a free version, a $5 version with written instructions included in the pattern, and a Tabletopper version.  

After taking a hard looking at my sales, I have decided I will only be offering the free version from now on. I will also make this free block open to the public on my website, plus I will write a tutorial on these blocks starting with this month's block.

You can now find all these blocks on my website under the Free Downloads Section. No purchase is necessary. 

Diamonds and More Tutorial

Friday, September 10, 2021

Three Essential Steps Before Starting Any New Project!


This week I want to talk about some essential steps before you start any Studio 180 Design Project or just any sewing project at all.  Doing these steps will help you make your projects a success. 


Step 1: Read through the pattern


Understanding a pattern, I feel, is the first step when starting a new project. Read the pattern thoroughly and take note of the following.

Skill Level - Ask yourself, can I make this pattern? Is it at my current comfort or skill level?

Tools Required - Do you have the tools, and do you know how to use them if the pattern requires them?  If you are using the Studio 180 Design tools and haven’t used that tool in a while, you may want to read through the tool or technique instructions.  You can also refer to the Studio 180 Design YouTube page for more help in using the tools.

Fabric Yardage – The fabric yardage is usually on the back and on the first page of any pattern.  You also should look at the Width of Fabric the pattern is based on.  Many patterns these days use 40” – 42” width of fabric. This is important when you go shopping for fabric because if you buy 40” wide fabric and your pattern using a 42” width. You may want to add a little more yardage to that required amount, just to ensure you have enough.


Step 2: Prepare

Now that you have a grasp on making the project let's talk about preparing your sewing area, sewing machine, and fabric for cutting.


Sewing Area
– I recommend cleaning your sewing area if you have one. I know many of you out there just don’t have a dedicated sewing space, so you are just setting up a space to sew.  Now, if you have a dedicated space, let's put away those projects you are in the middle of.  Better yet, finish those projects first.  That way, you don’t have any UFOs sitting around.  Then once complete, clean your area and put everything away that you will not need for the next project.

Sewing Machine – prepare your sewing machine. Make sure it is in good working order before you start any new project. Ask yourself these questions as you prepare a sewing machine for a new project.

  •  When was the last time you cleaned it? You should be cleaning it every time you start a new project, or if you are in the middle of a couple of projects, clean every couple of weeks. Trust me, it will need it.


  •  When was it last serviced? My local quilting shop recommends getting your sewing machine serviced every year.  This also depends on how much you sew.  You want to take good care of those machines.


  • One more thing you need to do to your machines is to oil (if required) and change the needle. I change my needle when I clean my machine. The sharper the needle, the better the project will be.


Fabric
– The biggest debate is whether to pre-wash your new fabrics. Now, I will say that I pre-wash all my fabrics before starting any new project to remove any chemicals, dyes, and wax on the fabrics. I do this because I have seen quilts after the first washing, and some have bled.  The only fabric I do not pre-wash is the pre-cuts because I really don’t want to shrink this fabric too much. However, I feel the decision to pre-wash or not is up to you, the quilter; it is really your choice. 

One more thing you must do with your fabric, regardless if you pre-wash or not, is to make sure your fabric is pressed and all the wrinkles are removed. Ironing your fabric before you start will help with accuracy when you rotary cut your fabric.


Step 3: Gather your Essentials


Now that you have your fabrics ready, a clean sewing area, and the sewing machine prepared, here are a few more things you may need depending on your project.

Special Tools and Tool Instructions – Layout any special tools or tools, such as the Studio 180 Design tools that your pattern calls for.  Now I recommend that you have InvisiGrip™ on the back of any tool. InvisiGrip™ is a thin clear plastic that you place on the back of your tools to help prevent them from slipping on your cutting mat while you are cutting. The plastic adheres to your tool by static cling, so there is no adhesive element used. This makes the product easy to change out when it gets dirty and needs replacing.

Quilter Magic Wand - is a wonderful tool that provides you with an exact 1/2″ reference. In addition, this ruler has an etched line running down the middle that gives you an accurate 1/4″ on each side.

Marking Tools - When it comes to marking tools for your project, I recommend using fine lines mechanical pencils, such as Sewline Fabric Pencil, or a fine pen such as the Ultra-Fine Pigma Micron 01 pen. Make sure your marking tool is easy to see and will give you a nice fine line at the same time.

Rotary Rulers - These thick acrylic rulers are made primarily to be used with your Rotary Cutter and Cutting mat. In addition to the Studio 180 Design tools, it is recommended that you have standard rotary rulers that measure 6″ x 24″ and 6″ x 12″. The 6″ x 24″ ruler is great for cutting strips that are the Width of Fabric (WOF) and for large blocks. The 6″ x 12″ is excellent for sub cutting all your strips into squares. I also recommend having a 12″ x 12″ or larger square ruler for squaring up blocks.

Rotary Cutter and Mats - A good quality rotary cutter and mat are highly recommended for any quilting project you do. When I cut out my pieces for my project, I prefer to use a 45mm rotary cutter with a new blade. I recommend closing or retract the edge every time you set your cutter down on the mat. Safety first!

Iron and Ironing Surface - An excellent clean iron and ironing surface is key to getting a crisp seam and making the blocks lay flat. I use a lint roller periodically over my ironing surface to keep the loose threads from fusing to it. Each day before you start, check your iron before turning it on. Wipe off any excess dirt and lint. If your iron plates are dirty, refer to your iron instructions to clean the surface.

Additional tools and Accessories – Beyond the specific tools above, you’ll need some general quilting items such as a 100% Cotton 50 wt. Thread, needles, 1/4″ piecing foot, scissors/snips, pins, seam ripper, etc. Remember when buying your supplies to look for the best quality equipment you can afford. Doing this will make you happier with your final product.


Now that we have completed all the steps, we are ready to start our projects.  Please remember that organization is a critical element in making your projects a success.  I will be covering this topic soon.  

See you next Friday, with a new tutorial on the latest Block Party Block. 

Friday, September 3, 2021

Why Should I use the Studio 180 Design Tools?


When I started getting back into quilting about ten years ago, I found that I struggled with several areas. First, I was having problems with my points and corners not lining up. Then my finished quilt tops would have fullness in the centers and the borders. Second, I struggled to get my blocks to come out the right size and have everything line up for years. I tried various methods and different tools.


Then around five years ago, I attended one of the Schoolhouse sessions at Quilt Market (Quilt Industry Trade Show) and saw a demonstration of the Studio 180 design tools. I immediately realized that these were the tools I searched for to jump up my quilting game. So the next day, I stopped by the Studio 180 Design booth and watched Deb Tucker demonstrate how to make precision Flying Geese, Half Square Triangles, and many more units. So, when I returned home and tried the tools on a few projects that I was developing. Again, I have to say they were the game-changer.  I started getting perfect points every time using these tools, and I just fell in love with them.

The tools work so well for me. A year after I discovered them, I became a Studio 180 Design Certified Instructor. For the past several years, I have been teaching the tools showing students to enjoy the success that I have found.  Recently, I open the doors to my first online membership called Precision Block Academy.  This academy was designed to help students learn the Studio 180 Design tools and techniques but do not have a local quilt shop to teach the tools. Plus, gain confidence in their quilting abilities.


Now you may be asking yourself, “Why would I use the Studio 180 Design Tools?”


One of the critical elements that make the Studio 180 Design tools a big success to quilters is that you make all your units slightly oversized and trim them down to a precise size. In doing so, they will fit nicely together when you add them with other units, especially those more advanced ones. When combining precise units with other precise units with a good ¼” seam allowance, your points and corners will naturally line up. An additional bonus is that the fullness in the center of your quilts will go away. The reason is that the blocks will all end up being the correct size.

More Key Features


Each of the tools is designed for more than one size in mind. In addition, you will find each of the tools is designed with several thin diagonals that will allow you to trim multiple sizes for each type of unit.

The tools come with instructions and cutting charts to incorporate the units into other quilting patterns not written for the Studio 180 Design tools. First, you need to know the unit’s finished size, then locate that on the cutting chart for that tool. The chart will give you the square or strip size that is needed to make the unit. In each of the instructions, you will find cutting instructions for both Right and Left-Handed users.

Each of the tools has companion patterns for you to make. In addition, you can find companion patterns written by Studio 180 Design and a few of the Studio 180 Design Certified Instructors, like me

Studio 180 Design makes quilting more effortless for you by making quilting easier by avoiding bias as much as possible. In addition, they provide you with cutting charts and diagrams in their instructions. If you need more help in learning the tools, there are YouTube videos that demonstrate the tools. Plus, lot of Free Downloads for you to practice with. There are also Certified Instructors across the United States, Canada, Netherlands, and Sweden.


Studio 180 Design has also developed a way for you to expand your tools use through Technique Sheets. These single laminated hole punch sheets will expand your use of the tools and broaden your skills for more design creativity.  Each of the Technique Sheets will provide you written instructions and Illustrations, plus cutting charts.

Since using these Studio 180 Design tools, I have found that I have been the biggest game-changer in my quilting abilities.  

Have you used any of the Studio 180 Design tools?  If so, please comment below on why you love these tools and how they have changed your quilting abilities. Look forward to hearing from you.

Thursday, September 2, 2021

Reviving My Blog!


I’m so happy to announce that I’m bringing my blog back full-time starting this Friday, September 3rd.  I’m taking a new approach to this blog; instead of random topics. I have decided to dedicate my blog to educate you on the Deb Tucker Studio 180 Design tools.

To give you a little background on me, I have been a Pattern Designer for over eight years. Five years ago, I found the Studio 180 Design tools and discovered game-changer tools that take your abilities to the next level. A year later, I became a Studio 180 Design Certified Instructor and devoted my pattern Designs to companion patterns for the tools. I love watching my students see the delight in their faces when they have perfect-looking units and blocks.

I wanted to share my love for the tools and educate you on the Studio 180 Design tools via my blog.  So starting this Friday and every Friday, you will be introduced to new topics, tools or techniques, tutorials, and so much more on Studio 180 Design.

So if you have a love of the Studio 180 Design tools or are just curious about the tools, you will not want to miss each Friday's blog post. If you haven't signed up to receive your blog delivered to your email each week, then click on this link.

See you tomorrow for the first post.


Tina