If you are looking for some fun blocks that will allow you to practice your Studio 180 Design tools and skills. Then you will want to check out my Block Party Blocks. On the 15th of each month, I release a new block pattern that you can download. These blocks allow you to practice your skills and allow you to play with the tools.
I recently made to change to the Block Party Block. I used to make these only available in my Quilting Affection Groupies Facebook Group. I also made a slight change in how I write my blocks. I offered the blocks a free version, a $5 version with written instructions included in the pattern, and a Tabletopper version.
After taking a hard looking at my sales, I have decided I will only be offering the free version from now on. I will also make this free block open to the public on my website, plus I will write a tutorial on these blocks starting with this month's block.
You can now find all these blocks on my website under the Free Downloads Section. No purchase is necessary.
Diamonds and More Tutorial
So let me show you this month's Block Party Block #17, Diamonds and More. This block was part of the Studio 180 Design Certified Instructions September Block Challenge with the Split Rects® Tool. Download Now!When I designed this block, I decided on a block that worked with the Split Rects® tool and one of the newest technique sheets, Split Rects Bonus Units. When combining the Split Rect with the Elongated Combination and HourGlass Units, you can develop interesting blocks. Note: this block is more for the advanced quilter with a basic knowledge of the Split Rects and the Technique Sheet.
I chose four fabrics that were leftover from my Lucy Star Quilt. These fabrics are from the Island Batik Hearts to Heart Collection released in their Spring/Summer 2020 catalog.
First, you will need to determine the size of the block you will be making, 6", 12", or 18". Then you will need to pull out your tool and technique sheet instructions to gather your strips sizes for the size of block you will be making. Then I would read all your instructions on how to make the units.
Split Rects Units
Start with cutting out all your pieces; you will need to cut your Rectangle pieces for the Split Rect A & B units using your Split Rects Tools.
For Unit Type 1, you need to place your strip right sides up, then positioning your Split Rects® tool on the strip with the broad black line labeled "Place on Cut Edge of the Strip." Then trim along the slanted edge of the tool to make the first elongated triangle.
Rotate the Split Rects® tool half a turn to align the small second trim "nub" line on the bottom edge of the strip and the "Second Trim" guideline along the just-trimmed edge. Next, trimming along the straight edge of the tool to create the next pair of elongated triangles. Continue to rotate the tool to make all the elongated rectangles you need for the Unit Type #1 pieces.
Then you will continue the process with Unit Type #2 by placing your strip wrong sides up this time.
Once you have all your Split Rect units cut out, it is time to Layout and pairs your pieces for the Type 1 and Types 2 units.
Stitch the elongated triangle by placing them right sides together with the long bias edge of the pieces aligned and overlapping at the ends. Then, press the seams open on both Unit Type 1 and 2.
Position the units on a cutting mat. Place the Split Rect® tool on the unit, making sure to align either the "Common Diagonal" (Unit Type #1) or the correct "Size Diagonal" (Unit Type #2) with the seam you have sewn. Trim each unit to measure the size according to your block instructions using the trim down section of the tool.
Rotate the unit 180°, reposition the Split Rect® tool and trim the two remaining sides. Repeat for all the Type #1 and Type #2 units.
Elongated Combination Units
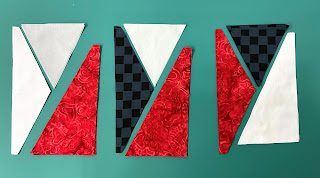
For the Elongated Combination and Hourglass unit, you will have to cut out 3 types of Triangles. So let's start by cutting these triangles out first. Triangle A
Fold the Selvage edge back approximately half the width of the strip. Position the dashed north and south line on your Split Rects® tool on the fold. Trim along the angled edge of the tool. Flip strip over from top to bottom.
Position the Option Line on your Split Rects® with the previously trimmed edge and trim along the angled edge of the tool.
Continue to flip the strips after each cut until you have completed all your cuts.
Triangle B
Fold the short raw edge to make the first fold. Refer to your Split Rects Bonus Unit Technique Sheet for that approximate fold depth. Next, position the bold solid line of your Split Rect® tool with the raw edge and align the cut strips line on the fold (fold depth size). Finally, trim along the edge of the tool.
Flip the strip left to right. Fold the trimmed edge over to the fold depth. Position the Split Rects® tool again with the cut strips line and Trim along the tool's edge. Continue alternating the cuts to make all your Triangle B pieces.
Triangle C
You will cut these triangles just like we did when we made the Split Rect Units Above. Next, you need to decide how many Type 1 and 2 you will need for these units.
Process
 |
| Type 1 |
 |
| Type 2 |
Gather and layout the oversized pieces for the Type 1 and 2 units.
 |
| Type 1 |
 |
| Type 2 |
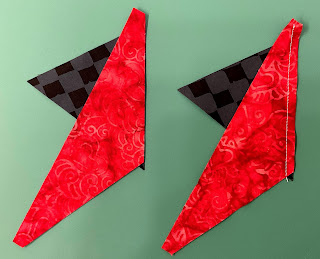
Align the A and B triangles and stagger the cut edges 1/4". Stitch along the edge. Press the seams open.
 |
| Type 2 shown |
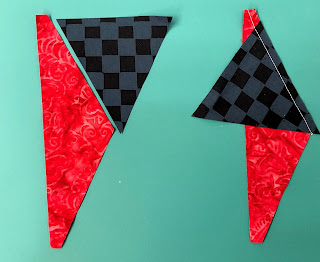
Place the A/B section right side up (Type 1) and wrong side up (Type 2) and position the option line on the Split Rects® tool with the sewn seam and trim the long diagonal.
 |
| Type 2 shown |
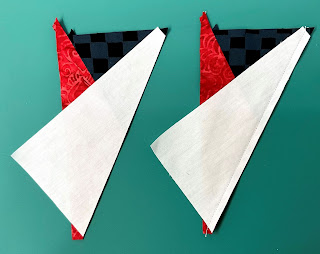
Match and Roughly center Triangle C Type 1 with the pieced A/B Type 1 section and stitch. Press the seams open. Repeat this process for the Type 1 Triangle C and A/B sections.
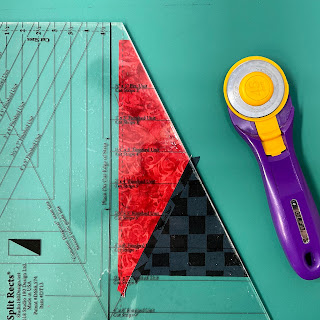
Position the units on the cutting mat. Place the Split Rect® tool on the unit, making sure to align with the "Finished Size Diagonal" with one seam line and the "Common Diagonal" with the other seam. Trim up and across the straight edge of the tool.
Rotate the unit 180, reposition the Split Rects® tool and trim the two remaining sides.
Hourglass Units
The process for these is done the same way, except you will not be adding a Triangle C to the units. Instead, you will just sew two A/B Sections together.
Start by making your A/B sections, like we did for our Elongated Combination units.
Mark a 1/4" matching point on the seams of both intersections and stitch. Press the seams open.
Trim the units to size, making sure to align with the "Finished Sized Diagonal" with one seam line and the "Common Diagonal" with the other seam using the trim down section of the Split Rects® tool. Then, rotate the unit, align and trim again.
Block Assembly
Layout each of the units to make up the blocks according to the block instructions. Carefully placing all your units in their proper place. Then, pressing all the seams open.


No comments:
Post a Comment