Showing posts with label V Block. Show all posts

Friday, December 17, 2021

Block Party Block #20 - Ice Flake


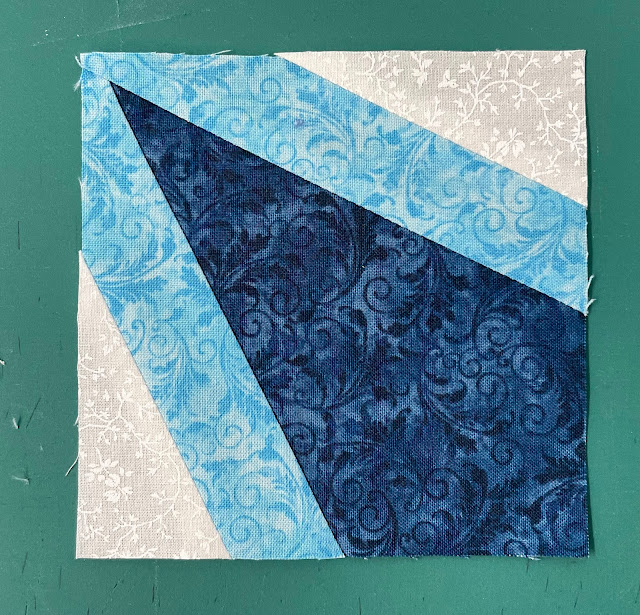
It was release week for another fun and exciting Block Party Block. With this month's block, Ice Flakes, we take the Studio 180 Design V Block and Corner Beam units and combine them with the Corner Pop tools. 

This tutorial will show you how to use the Studio 180 Design Corner Pop II to pop the side triangle corner on Corner Beam units.

If you're popping any corners, you need to trim your units to size first. Be sure to read your tool's instructions before you start.

The first thing you've got to do is cut the corner off the Corner Beam unit. To begin with, you'll need to determine which size to remove. This example uses a 2" finished cutaway.  


You will need to find the Cut Away Corner section on the tool, locate the label "Cut Away Corners." Each number represents the finished height of the cutaway line, so we are planning to use the 2" cutaway lines for this tutorial.  

We will begin with a Type 1 cutaway, which is a slant to the left. In Type 1, the units are put on the cutting mat right side up and trimmed down with their wrong sides up.

Now, let's place our Corner Beam unit with the right sides up on your cutting mat. Using the bottom left corner of the Corner Beam unit, align the 2" lines along the sides. Once you have the lines aligned, make a slanted cut. The slant cut will give the seam a proper 1/4" allowance.

Using the cutting chart in the tool instructions, we can find the replacement triangle strip width for a 2" finished unit, which is a 3" strip. To get replacement triangle pairs, fold your strip in half and place it on the cutting mat. Then trim the ends.  

Locate the Replacement Triangle Cut Line. It will be a bold line next to the Cut Away Corners. You will need to place the 3" line at the bottom of your strip as well as the Bold line at the trimmed end. You will need to trim up along the slant to make the first pair of triangles on each side.

Using the top edge of the tool, you will make the next cut for the replacement triangles. Position this top edge of the strip on top of the strip. The first 1/2" dashed line will align with the point of the slant side of the strip. Cut across to the top of the tool. Repeat until you have all the pairs of triangles. 


Placing the slanted left replacement triangle on the left side of the Corner Beam unit is the next step. To do this, flip the triangle over, center it, and stitch it. Then press the seams open.


Reposition the pressed unit on the cutting mat, and place the replacement triangle in the upper right-hand corner. Corner Trim Down Section: Position the corner trim down section and locate the 2" cutting line on the seam of the replacement triangle. Check that the unit is square by using the dashed lines on the tool, then cut the two sides. Leave the unit on the mat.


It is now time to create Type 2 which will slant to the right. The unit will be placed on the cutting mat with the wrong sides up, and the trim will be placed right side up.

Now that the unit is wrong sides up, we have to find the 2" cutaway line again, align the lines on the bottom left corner, and remove the corner. 

Place a slanting right replacement triangle on the side of the unit that you just cut off. Flip the replacement triangle over, right sides together. Then flip the unit and triangle so that the replacement is on the bottom and sew it together. Then press the seam open.


Put the unit down on the cutting mat one more time, right-side up, with the replacement triangle in the upper right-hand corner. Using the same technique as the opposite corner, align the 2" Corner Trim Down line on the seam line. Align the dashed lines to square up the unit. Make the final two cuts.


When you are finished, you will have a beautiful corner popped Corner Beam unit. Try out Studio 180 Design Corner Pop II and III, you will get addicted as I did. Download this pattern for free HERE. Additionally, you can sign up for my email newsletter to receive the Block Party Block every month on the 15th. 


Friday, May 10, 2019

Graceful Points QAL Block 8


Hello everyone, it's time for another block in our Graceful Points Quilt Along.  Today we are going to be working on Block 8, which marks the halfway mark in our quilt along. Before we begin, I want to see how everyone is doing so far.  Please comment below if you are all caught up or just getting started.  Don't worry if you have you haven't started yet, or you are behind, remember you can catch up at any time.


Block 8, which is Studio 180 Design Blockbuster #10 - Twisted Pinwheel, this block uses the V-Block tool, and the Sidekick & High/Low Technique Sheet, both are available on my website.

Before we start, you will need the following fabric colors, BG, C1, and C3, please refer to your color chart found in your general instructions. You will also want to download the Block #8 and the Blockbuster #10 Twisted Pinwheel Instructions, both are required to make your block.

Please remember that the pictures used in this tutorial are for the 6" block for the Wallhanging.  Be sure to read the Downloaded Block Instructions to get the correct cutting and trimming sizes for the 12" block, which are indicated in (Blue) parenthesis.

Since we are working with a new technique SideKick & High/Low please remember, along with the Technique Sheet there are two videos SideKick and the High/Low that will walk you through the steps of making the units.  

So let's get started making those High/Low Left units.  These units are similar to the V-Block units, they just have one side triangle and a folded corner.

High/Low (Left) Units

Start with cutting our base section units. First off we cut out squares for our based section and side triangles.  The side triangles should be easy with all the practice we had in Blocks 6 and 7.  Just remember to lay your fabric with the right sides facing up for the left side.

Right Handed

Left Handed
We start with our based section placing it on the cutting mat with the right side facing up, for the Left units.  That means we want to put the long angle of the Side triangle on the left.  Placing our V-Block Tool on the based section square, positioning the dashed line of your ruler on the edge of your square and the bottom with the finished unit size at the bottom.  Cutting along the slanted line.


Now lay out all your units as they will look in the final unit.  Position the side triangle and the based section with right sides facing together.  Align the edges, and stitch, just as we would for a V-Block unit.  Press toward the side triangle.  No need to trim at this point.


Tip: you may want to slide your side triangle about 1/8" to make sure you get enough room at the bottom of the unit for trimming later.

Next, we are going to draw a diagonal line on the wrong side of the small corner squares.  Place these small squares on the opposite corner of the based section with the line going across the corner.


Stitch on the line, trim seams 1/4" from the stitching line, and press away from the based unit.

Right Handed

Left Handed
Now we can trim the units to size.  Positioning the V-Block tool on the unit, lining up the side triangle seam with the guideline on the tool.  Positioning the intersection of the two seamlines where the guidelines on the tool intersect.  Please remember that the folded corner will not line up with the guideline on the tool. Trim the first two sides.
Right Handed 
Left Handed

Rotate the unit 180° and line up the V-Block tool with the cut size measurement with the previously trimmed edges and "X" with the sewn seam line intersections.  Trim the last two remaining sides.


SideKick (Right)

The SideKick is the same concept as the High/Low unit, the only difference in making the units is that you will not be placing a folded corner in the opposite corner, it will remain empty.


The SideKick which is the Side Triangle will be placed on the right side this time.  So when we remove the side piece from the base section and the cut the side triangles we need to make sure the wrong side is facing up on the cutting mat. 

Align the Side Triangles and based units with right sides together and press toward the Side Triangle as you did in the High/Low unit.  

Right Hand

Left Hand
Positioning the V-Block tool on the unit, lining up the side triangles seams with the guidelines.  Making sure the fabric extends beyond the cleanup lines.  Trim the first two sides.

Right Hand

Left Hand

Rotate the fabric unit 180° and line up the V-Block tool.  Align the cut size measurement with the previously trimmed edges and the "X" with the seam line intersect.  Trim the remaining sides.

Assembly


Next, you will need to make one Four-Patch unit to finish all your units for your block.  

When all your units are complete, the next step is to finish your block #8. Please follow Blockbuster page Download to make sure you lay out the units correctly.  Double checking you have the correct placement of all your units.


Block 8, "Twisted Pinwheel" is now complete, I look forward to seeing your Blocks, and I hope you will share your photos in the comments section below or on the Graceful Points Facebook Group.  Additionally, you can post your blocks on Facebook or Instagram making sure to use the #gracefulpointsqal and/or #quiltingaffection designs.  I can't wait to see your blocks.

On Friday, May 24th will be the release date for our next block. In our next block, we will be using the Corner Beam® tool.  You can purchase them on my website.

Tina 
"Designing to Inspire"

Friday, April 26, 2019

Graceful Points QAL Block 7


Welcome to another release day for the Graceful Points QAL. Today we will be continuing working with our V Block® Trimmer, and we are going to be using our Tucker Trimmer® I by making Combinations and Quarter Square units for our Block 7.  Both can be purchased on my website


Block 7 is called in the Studio 180 Design Blockbuster #9 "Three in One."  We will be making all three blocks.


Before we start, you will need all 5 different fabrics, and please refer to your color chart found in your general instructions. You will also want to download Block #7 and the Blockbuster #9 Three in One Instructions, both are required to make your blocks.


Please remember that the pictures used in this tutorial are for the 6" block for the Wallhanging.  Be sure to read the Downloaded Block Instructions to get the correct cutting and trimming sizes for the 12" block, which are indicated in (Blue) parenthesis.

Let's get started

Since these blocks are reviews of blocks that we have made in the past, this will be a brief overview of what we will be making.

Unit A - V Blocks

We covered how to cut the Center and Side Triangle and assembly for the V Blocks in Block 6, so if you need a quick refresher, you can read all about it HERE.


So you will follow Block 7 instructions to cut all your Side Triangles Pairs and Center Triangles.


Helpful Tip: Organization is vital when you are working on new patterns.  I suggest getting paper plates and labeling with color, unit size, or any method that you feel with help and then place pieces on the plates.  As you make each of the V Blocks, you can add to the labels as you go.

Trimming
Right Handed

Left Handed

Place the V Block® tool on the unit and aligning up the Finished size measurement with the seam lines.  Trim along the first two sides.

Right Handed

Left Handed
Rotate the unit 180° and line up the V Block® too over the unit again, aligning the units cut sizes with the previously trimmed edges and "X" with the sewn line intersections.  Trim the remaining two sides.


You will be making four Different V Block units. Suggest place the units on separate paper plates with the unit name used in the block instructions. 


 Unit B - Combination Units:

Now we are going to do a quick overview of Combination units.  We made these in Block 4.


We are going to start off like we are making half square triangles. Using the Quilter's Magic Wand Mark two stitching lines 1/4" on either side of the center diagonal line on the wrong side one of the squares. 

Layer the units Squares with right sides together. Stitch on the drawn lines, cut down the middle and Press to the dark side. Do not trim these units yet! 


Now we are going to add an additional couple of steps to this process. Position the HST and the additional square with right sides together.  Using your Quilter's Magic Wand mark two stitching lines on either side of the center diagonal line.


Stitch on the drawn lines and then cut down the middle.  Press seam in the direction of the new triangle.


Trim using your Tucker Trimmer, carefully aligning the common diagonal and the sizing diagonal lines for the size you are making, refer to you Block instructions.


Unit C - Quarter Square Triangles

Quarter Square Triangles are made the same way as the combination, except we are going to sew the two half squares together.  We have completed QST in several of our blocks already, Block 4 was the most recent one, so I'm going to just a quick overview of this unit also.


Start off by making your half square triangles using the fabric colors indicted in your Block Instructions.  Reminder, you do not need to trim them to size at this point.  On the reverse side of your fabric mark a 1/4" on each side of the center diagonal of one the HST unit.


Position the two half square triangles with right sides together and assuring to position the fabrics to they the opposite of each other.  Stitch on the drawn lines and cut down the middle.


Trim with your Tucker Trimmer, carefully aligning up the common diagonals and sizing diagonal lines.

Assembly of Blocks

When all your units are complete, all you have to do is finish your block #7. Please follow Blockbuster page Download to make sure you lay out the units correctly. 


Block #1


Block #2


Block #3 

Your "Three in One" block is now complete, I look forward to seeing your Blocks, and I hope you will share your photos in the comments section below or on the Graceful Points Facebook Group.  Additionally, you can post your blocks on Facebook or Instagram making sure to use the #gracefulpointsqal and/or #quiltingaffection designs.  I can't wait to see your blocks.


The next block will be released on May 10th, where we will be using new tools, the Corner Beam and the Sliver Technique Sheet.


Tina
"Designing to Inspire"