Showing posts with label Blockbusters. Show all posts

Friday, June 21, 2019

Graceful Points QAL Block 11

Today I'm releasing another block in the Graceful Points QAL, block 11.  We have just 4 more blocks before we finish up the QAL.  I can't wait to see all your finished quilts when we are done.  


Block 11 is also called in the Studio 180 Design Blockbuster #18, "A Popped V."  For this block, we will be using the BG, C1, C3, and C4 fabrics, so please refer to your color chart found in your general instructions. You will also want to download Block 11 and Blockbuster #18 "Salem Star" Instructions, both are required to make your blocks.

No new tools are being introduced this week for block 11. We are going to practice some of the techniques we have learned in previous weeks. With Block 11, we are going to make Popped V-Block, Sidekick Right, and Popped Center blocks.  So you will need your V-Block trimmer and Corner Pop® tool. 
 Please remember that you should read the tools instructions before starting if you are not familiar with this tool.  We will be making a 9" blocks for the Wallhanging and 12" for the King Size.  


Please remember that the pictures used in this tutorial are for the 9" block for the Wallhanging.  Be sure to read the Downloaded Block Instructions to get the correct cutting and trimming sizes for the 12" block, which are indicated in (Blue) parenthesis.

Unit A:  Popped V-Block


Let's do a quick review of the V-Block assembly and trimming of the V-Block.  First Layout your blocks as shown.  Making sure the long end of the side triangles match the short end of the center triangle and the bias edges lay next to each other.  


Then take the right side triangle and flip on top, so the right sides are together of the center triangle's slanted edges.  Stitch with 1/4" seam and press toward the side triangles.  Repeat for the other side triangle.


Right Handed

Left Handed
Position the V-Block® Trimmer on the unit and aligning the finished size measurement with the seam line.  Trim along the first two sides.

Rotate the unit 180° Position the V-Block® Trimmer again lining up the cut size measurement with the previously trimmed edges and "X" with the seam line intersections and trim.

Next, we are going to add the color pop to our V-Block units. This is what makes the Corner Pop® a fun tool.  


First, cut the small replacement squares diagonally once to yield two triangles.


Next, we are going to use the Cut Away section on the Corner pop® tool.  Find and Position the size line that is indicated in the pattern on the bottom right corner of the V-Block unit.  Trim along the slant.


Center the replacement corner along the long size on the trimmed corner.  Stitch with the unit on top using an accurate 1/4", press seams toward the small triangle. 

Right Handed

Left Handed

Using the appropriate, position the Corner Trim Down line of the Corner Pop® tool over the newly sewn seam.  Align the diagonal line with the seam and the edge of the unit with the edges of the tool. 


Repeat on the other side with the Cut Away, Replace, stitch, press the unit just as we did before.  


Make 4 Popped V-Block Units. 


Unit B:  Sidekick Right


Right Handed

Left Handed
We are now ready to start the Sidekick units, and we want the sidekick part to be on the right side.  So please remember when you cut out your base squares and side triangles with the rights sides face down on the cutting mat.

Layout the Base section and the side triangles just like the image above. 


Position a side triangle and base section with right sides together, aligning the edges and stitch.  Press seam away from the based section.


Position the V-Block® tool on the unit, lining up the side triangle with the guideline on the tool and trim.


Rotate the unit 180° and lining up the cut size measurement with the previously trimmed edges and "X" with the sewn seam line intersections.  Trim the remaining sizes.

Make 4 Sidekick Rights.

Unit C:  Center

For the Center, we are going to start with a base square and replacement triangles. Refer to your Block 11 instructions to get the sizes.


Find and Position the appropriate Cut Away Corner line on the Corner Pop® tool on the raw edge of the base square.  Trim away the corner.


Repeat for all four corners.  Tip: Place a pin in the fabric that needs a replacement triangle as a reminder for the corners that need to be replaced.


Position the replacement corners with the right sides together.  Assuring that the triangle long side is lined up on the trimmed corner.  Stitch with the base center is on top using a 1/4" seam allowance. Press away toward the small triangle. Repeat on all four corners

Using the appropriate mark, position the Corner Trim Down line of the Corner Pop® tool over the newly sewn seam.  Align the diagonal line with the seam and the edge of the unit with the edges of the tool.  Trim the corner, and repeat for all remaining corners.

Make 1 Center

Assembly

Once you have all your units complete, its time to lay out Block #11.  Please follow Blockbuster page Download to make sure you lay out the units correctly.  Double checking you have the correct placement of all your units.


That completes Block 11, the next block will be released on Friday, July 5th.  We will be adding the Rapid Fire Lemoyne Star® tool into our next block, can't wait. 

Tina 
"Designing to Inspire"

Friday, June 7, 2019

Graceful Points QAL Block 10


Time is passing by as we move into Block 10 of the Graceful Points QAL.  Before I start talking about the next block, I want to show you the blocks we have done so far in this fun QAL.


The above image shows all the blocks we have completed and where they will be placed in the QAL.  We have five more blocks and a few bonus blocks coming up.


Today release of Block 10 is called in the Studio 180 Design Blockbuster #17 "Salem Star."  For this block, we will be using the BG, C1, C2, and C4 fabrics, so please refer to your color chart found in your general instructions. You will also want to download Block 10 and Blockbuster #17 "Salem Star" Instructions, both are required to make your blocks.

For this block, we are going to introduce you to the Corner Pop® tool. By the time you are done, you will be familiar with the Corner Pop® tool.  Please remember that you should read the tools instructions before starting if you are not familiar with this tool.  Also,  I suggest checking out the Studio 180 Design Corner Pop Fundamentals YouTube Video.


Please remember that the pictures used in this tutorial are for the 9" block for the Wallhanging.  Be sure to read the Downloaded Block Instructions to get the correct cutting and trimming sizes for the 12" block, which are indicated in (Blue) parenthesis.

Let's start playing with our Corner Pop tool.

Unit A:  Popped Corner Square

We are going to start by removing the two opposite corners of our square. 


Start by finding the 1 1/2″ (2"Cut Away Corner Line on the Corner Pop tool.  Line up those marks on one of the corners of the square and trim.


Next, cut all the replacement corners diagonally once.  


Center one of the replacement triangle on one trimmed corners of the square.  Making sure that the square is on top and stitch with an accurate 1/4" square.  Press the seams open.

Repeat on the other corner the trimming and stitching process as indicated in the block instructions for the opposite corner.

Right Handed

Left Handed

Find the 1 1/2″ (2"Corner Trim Down line on the Corner Pop Tool.  Position the line on the newly sewn seam.  Align with the seam and the edges of the unit with the edges of the tool and trim.

Rotate the square 180°.  Repeat the trim process as you did for the opposite corner.

Make 4 Unit A.

Unit B:  Right Popped Rectangle

For units B and C, we are going to pop the corner for the rectangle units once again, using the same 1 1/2″ (2"Corner Trim Down numbers we used in the A units.

Right Handed
The B units we will pop the bottom left corner first.  

Once your first corner is trimmed away, the remaining process is the same as for the A units.  You are going to center your BG replacement corners along the edge that was just trimmed away.  Make sure your rectangle is on the top, stitch with a good 1/4" seam allowance.  Press the seams open.


Rotate your rectangle around 180° and trim away the opposite corner.  Align the replacement corner, stitch, and press.


Using the 1 1/2″ (2"Corner Trim Down line on the Corner Pop Tool.  Position the line on the newly sewn seam.  Align with the seam and the edges of the unit with the edges of the tool and trim.

Rotate the square 180°.  Repeat the trim process as you did for the opposite corner.

Make 4 Unit B.

Unit C:  Left Popped Rectangle

Unit C is made the exact way you did Unit B, except you will need to cut from the right side of the rectangle.
Right Handed

Left Hand
Once you have all your corners trimmed away, stitch the replacement triangles in place and press the seams open. 


Repeat for the opposite corner and trim to size.  

Make 4 Unit C.

Assembly


Now that all the units are completed it is time to stitch them together.  Starting with Units B and C first.


Stitch one unit B and one unit C together, making sure to match up the seams.  They should make a "V" when stitched together as in the above picture.  Press the seams open.  Make 4 of these units.


Now that you have all your units complete, its time to lay out Block #10.  Please follow Blockbuster page Download to make sure you lay out the units correctly.  Double checking you have the correct placement of all your units.


Block 10, "Salem Star" is now complete, I look forward to seeing your Blocks, and I hope you will share your photos in the comments section below or on the Graceful Points Facebook Group.  Additionally, you can post your blocks on Facebook or Instagram making sure to use the #gracefulpointsqal and/or #quiltingaffection designs.  I can't wait to see your blocks.

On Friday, June 21st will be the release date for Block 11. In our next block, we will be continuing to use the Corner Pop® tool, and plus a few tools we have used in the past blocks.  

Tina 
"Designing to Inspire"

Friday, May 24, 2019

Graceful Points QAL Block 9


Welcome back to the Graceful Points QAL it is amazing how time fly's by when we are having so much fun. Today we are releasing Block 9, which uses the Corner Beam® tool and introduces you to the Sliver Technique Sheet.


Block 9 is called in the Studio 180 Design Blockbuster #12 "Double Trek."  For this block, we will be using the BG, C3, and C4 fabrics, so please refer to your color chart found in your general instructions. You will also want to download Block 9 and Blockbuster #12 "Double Trek" Instructions, both are required to make your blocks.


Please remember that the pictures used in this tutorial are for the 6" block for the Wallhanging.  Be sure to read the Downloaded Block Instructions to get the correct cutting and trimming sizes for the 12" block, which are indicated in (Blue) parenthesis.

Let's get started by getting familiar with the Corner Beam tool.  

If you are new to the tool, I suggest checking out the Studio 180 Design Corner Beam Fundamentals YouTube Video, to get you started with the basic understanding of the Corner Beam® tool.

Unit A Corner Beam Unit

Center Beam

We are going to start off by cutting the center of our Corner Beam first. We will be using C4 fabric squares.  

Right Handed

Left Handed

Place your squares on your cutting mat.  Position the Corner Beam® tool so the dashed line labeled "Center Beam Trim #1" and the Finished Unit Line with the other edge of your fabric square.  Trim along the slanted edge of the tool.

Right Handed

Left Handed
Next, lift and Reposition the Corner Beam® tool, aligning the dashed line labeled "Center
Beam Trim #2" with the previously trimmed angle. 

Cut 2 Center Beams

Side Triangles


Right Handed


Left Handed
Gather your BG strips.  Position the 
Corner Beam® tool on the strip so that the Bold line labeled "Side Triangles Trim #1" aligns up against the trimmed end of the BG Strip and the Finished line against the bottom of the strip.  Trim along the slanted edge of the tool.

Right Handed

Left Handed
Rotate your tool, one quarter turn counterclockwise.  Positioning the line labeled Side Triangle Trim #2, against the slanted edge on the previously trimmed edge, making sure the bottom of your strim is lined up along the second trim line and Trim.

Cut 2 Side Triangle Pairs.


Arrange your Side Triangles and Center beam pieces. Assuring the short end and the angles align with the Center beam.


Position a side triangle onto the Center Beam placing them right sides together, assuring to offset the tip of the center beam about 1/4" above the side triangle.   Stitch the center beam on top of the sides triangle with a 1/4" seam allowance.  Press seams toward the side triangles.

Position the other side triangle on the other side.  Stitch with a 1/4" seam and Press seam toward the side triangles.  


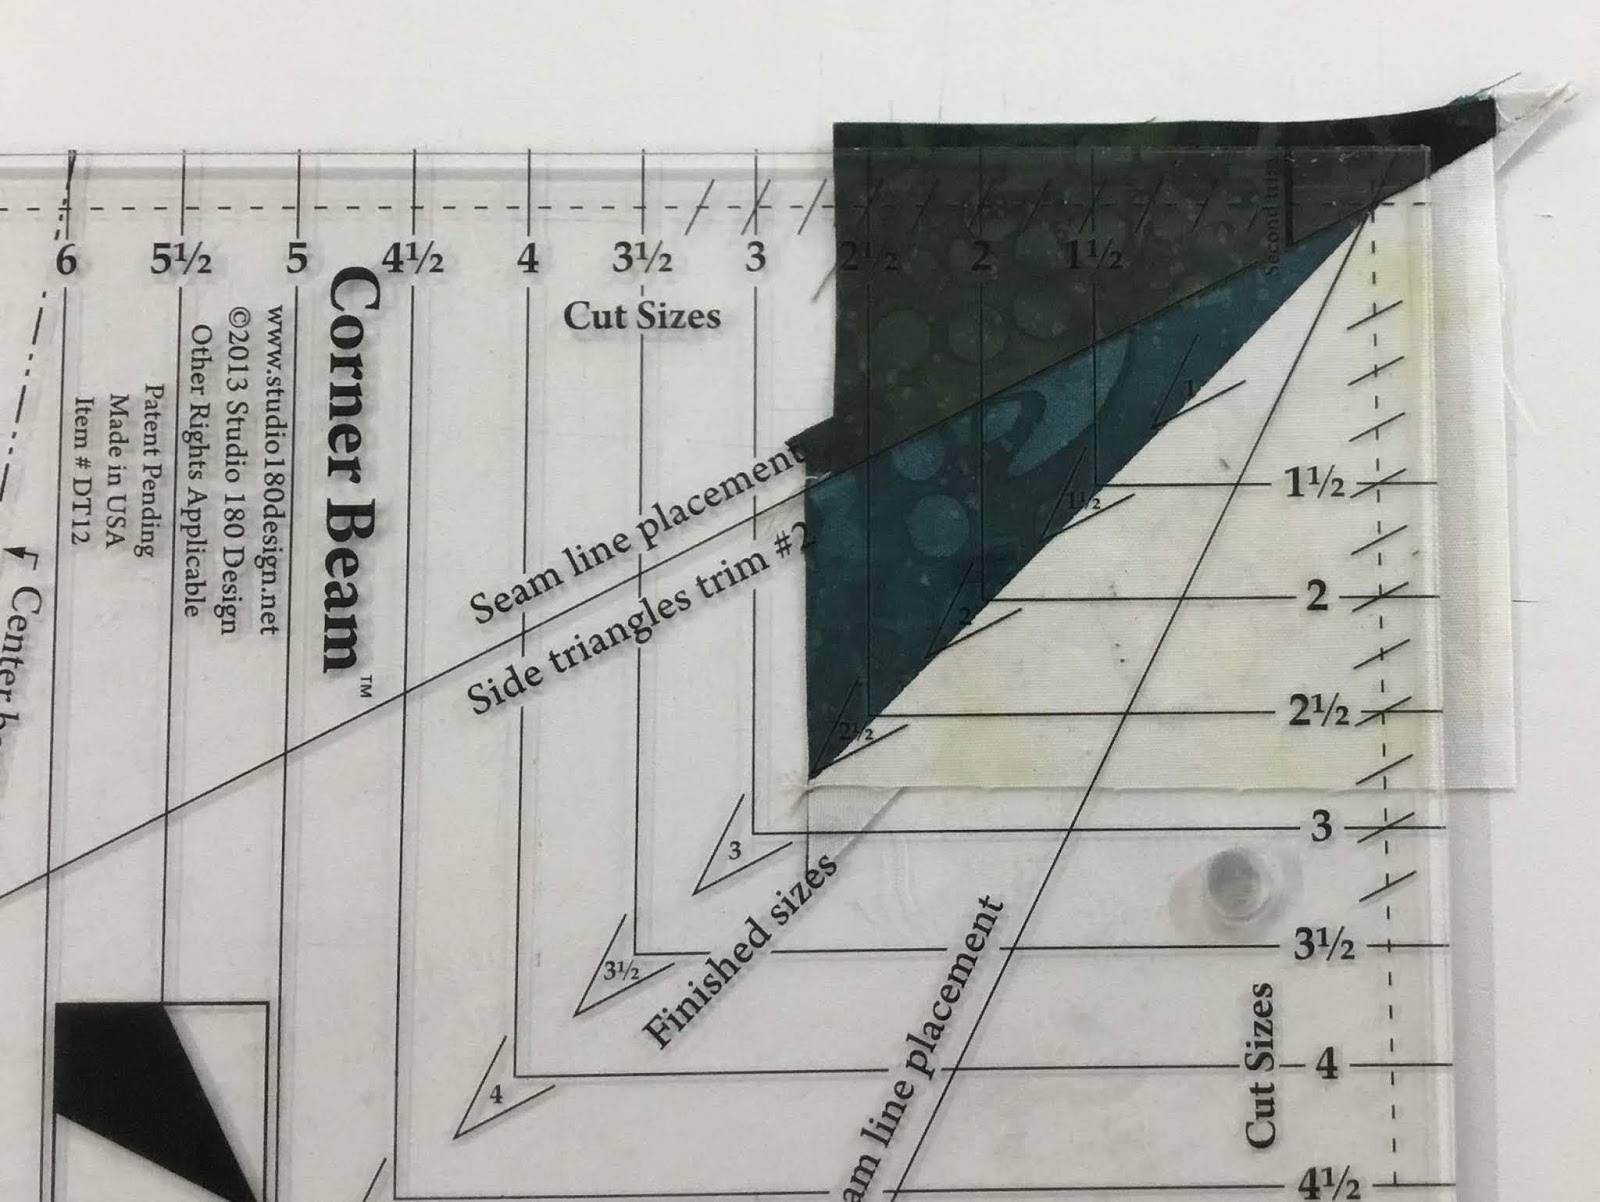
Position the unit on your cutting mat.  Right-hand cutters place your point of the corner beam right side (see above) and Left handed cutters place the point of your corner beam to the right side.  

Aligning the "Seam Line Placement" guidelines with the diagonal seams of your unit.  Trim the two sides.


Rotate your Corner Beam unit 180°.  Making sure to align up the Finished size guidelines and the seam intersection nests in the "V" and the corner to corner diagonal seams fall right along with the points of the "V"s.  Trim the remaining sides of the units.


Make 2 Coner Beam units.

Unit B Sliver, Slant Rights


The Sliver units start with making four Half Square Triangles, as we have done with other blocks in the past.  Press the seams toward the background fabric. This time you Do Not need to Trim the units.  


Next, you will cut the two Side Triangle pairs as you did with the Corner Beam units.

Slant Right


Place the HST Unit so the wrong side is facing up.  Position the Corner Beam® tool so that the Dashed line labeled "Center Beam Trim #1" aligns up against the cutaway corner of the C3 fabric of the HST unit and Finished Unit line on the other edge of the C3 fabric square.  Trim along the slanted edge of the ruler.


Stitch the Side Triangle into the cutaway corner, lining up the raw edges and matching them corner to corner.  Press seams toward the C4 along the slanted edge of the ruler.


Position the unit on your mat with right side facing up.  Place the Corner Beam® tool on the unit.  Align one of the "Seam Line Placement" guidelines with the sewn seam between the sliver and added a side of the triangle, the crosshairs at the seam intersection and the "V" on the other sewn seam.  Trim the first two sides of your pieced unit.


Rotate the unit 180° and trim the remaining side of the unit.  Make sure that you align up the guidelines and making sure the seam intersection nestles in the size "V" and the corner to corner diagonal seams falls right along with the points of the "V"s. 

Make 2 Slant Right units.

Unit B Sliver, Slant Left


Place the HST unit so the Right side is facing up.  Position the Corner Beam® tool so that the Dashed line labeled "Center Beam Trim #1" aligns up against the cutaway corner of the C3 fabric of the HST unit and Finished Unit line on the other edge of the C3 fabric square.  Trim along the slanted edge of the ruler.


Stitch the Side Triangles into the cutaway corner as done with the Slant Right.  Press seams toward the side triangles.


Position the unit on the mat. Align the Position the Corner Beam® tool "Seam Line Placement" guidelines with the sean seam between the sliver and added side of the triangle, the crosshairs at the seam intersection and the Finished size "V" on the other sewn seam.  Trim the first sides.

Rotate the unit 180° and trim the remaining sides of the unit.

Make 2 Slant Left units.

Assembly


Now that you have all your units complete, its time to lay out Block #9.  Please follow Blockbuster page Download to make sure you lay out the units correctly.  Double checking you have the correct placement of all your units.

Block 9, "Double Trek" is now complete, I look forward to seeing your Blocks, and I hope you will share your photos in the comments section below or on the Graceful Points Facebook Group.  Additionally, you can post your blocks on Facebook or Instagram making sure to use the #gracefulpointsqal and/or #quiltingaffection designs.  I can't wait to see your blocks.

On Friday, June 7th will be the release date for our next block. In our next block, we will be using the Corner Pop® tool.  You can purchase them on my website.

Tina 
"Designing to Inspire"