Showing posts with label Corner Beam Trimmer. Show all posts

Friday, May 24, 2019

Graceful Points QAL Block 9


Welcome back to the Graceful Points QAL it is amazing how time fly's by when we are having so much fun. Today we are releasing Block 9, which uses the Corner Beam® tool and introduces you to the Sliver Technique Sheet.


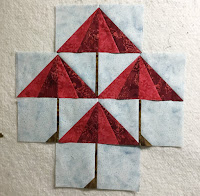
Block 9 is called in the Studio 180 Design Blockbuster #12 "Double Trek."  For this block, we will be using the BG, C3, and C4 fabrics, so please refer to your color chart found in your general instructions. You will also want to download Block 9 and Blockbuster #12 "Double Trek" Instructions, both are required to make your blocks.


Please remember that the pictures used in this tutorial are for the 6" block for the Wallhanging.  Be sure to read the Downloaded Block Instructions to get the correct cutting and trimming sizes for the 12" block, which are indicated in (Blue) parenthesis.

Let's get started by getting familiar with the Corner Beam tool.  

If you are new to the tool, I suggest checking out the Studio 180 Design Corner Beam Fundamentals YouTube Video, to get you started with the basic understanding of the Corner Beam® tool.

Unit A Corner Beam Unit

Center Beam

We are going to start off by cutting the center of our Corner Beam first. We will be using C4 fabric squares.  

Right Handed

Left Handed

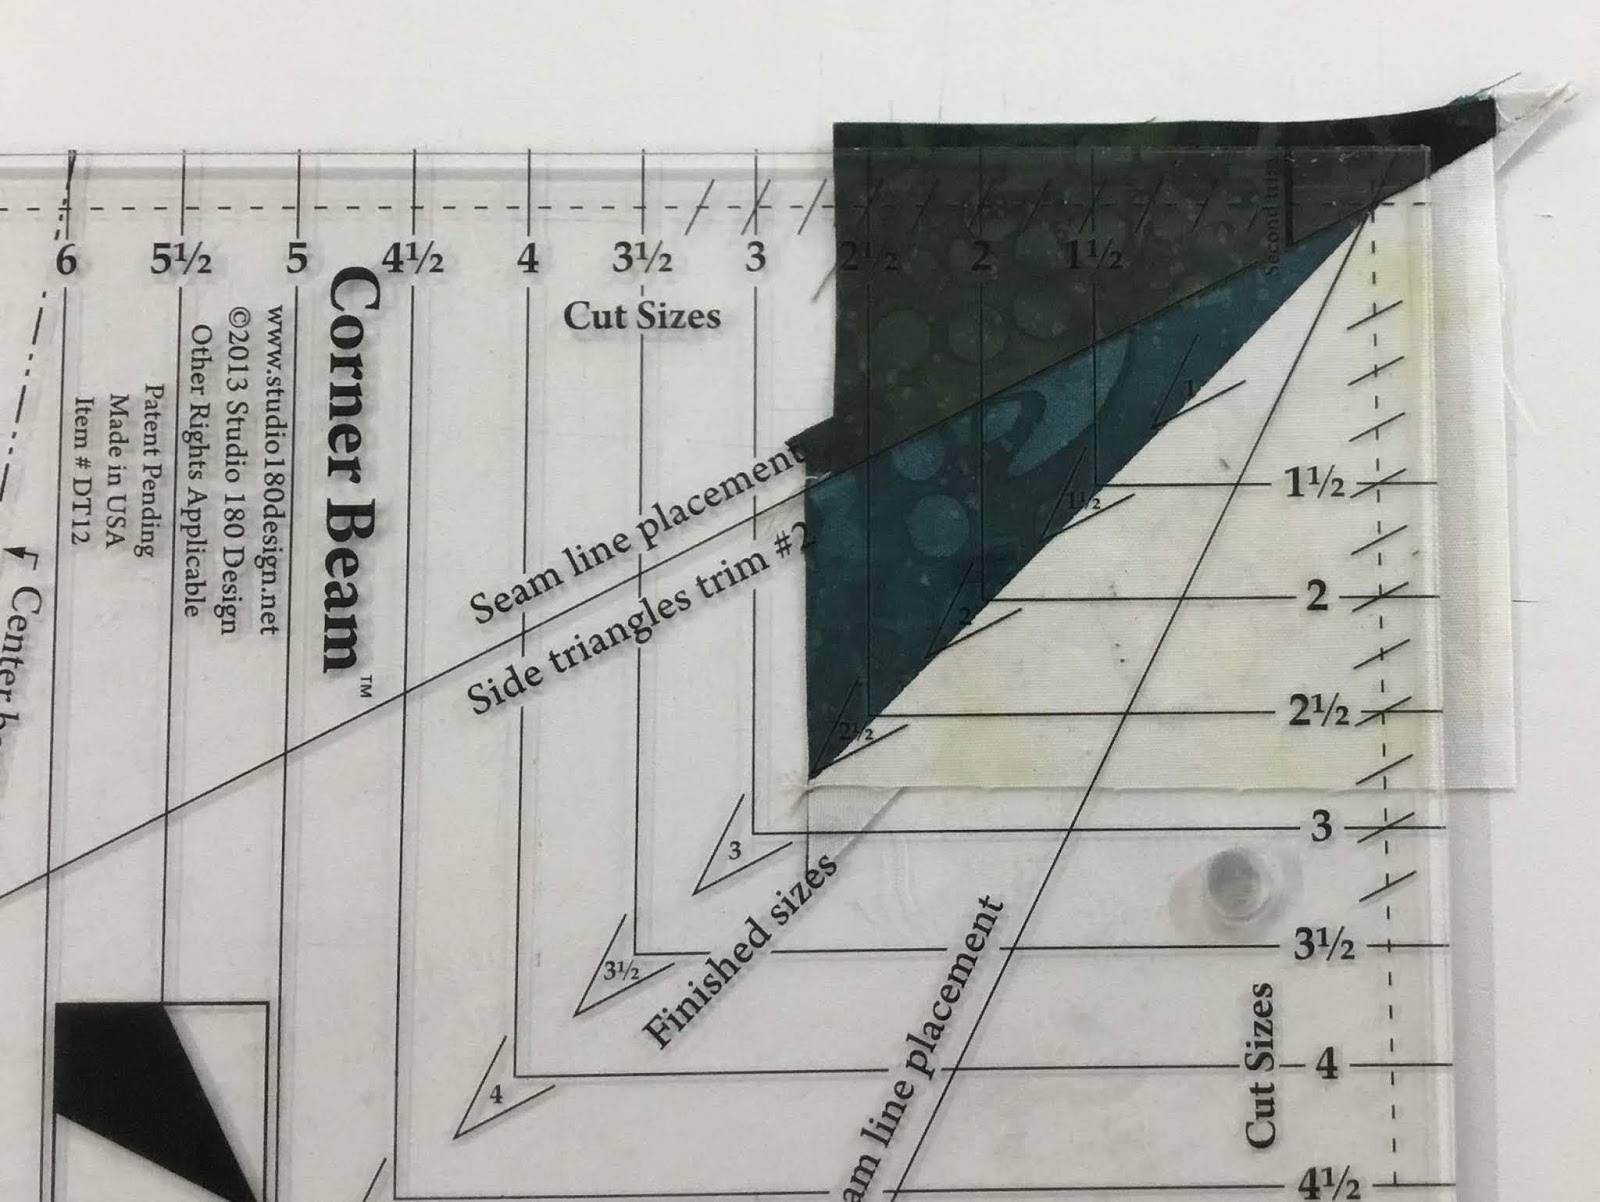
Place your squares on your cutting mat.  Position the Corner Beam® tool so the dashed line labeled "Center Beam Trim #1" and the Finished Unit Line with the other edge of your fabric square.  Trim along the slanted edge of the tool.

Right Handed

Left Handed
Next, lift and Reposition the Corner Beam® tool, aligning the dashed line labeled "Center
Beam Trim #2" with the previously trimmed angle. 

Cut 2 Center Beams

Side Triangles


Right Handed


Left Handed
Gather your BG strips.  Position the 
Corner Beam® tool on the strip so that the Bold line labeled "Side Triangles Trim #1" aligns up against the trimmed end of the BG Strip and the Finished line against the bottom of the strip.  Trim along the slanted edge of the tool.

Right Handed

Left Handed
Rotate your tool, one quarter turn counterclockwise.  Positioning the line labeled Side Triangle Trim #2, against the slanted edge on the previously trimmed edge, making sure the bottom of your strim is lined up along the second trim line and Trim.

Cut 2 Side Triangle Pairs.


Arrange your Side Triangles and Center beam pieces. Assuring the short end and the angles align with the Center beam.


Position a side triangle onto the Center Beam placing them right sides together, assuring to offset the tip of the center beam about 1/4" above the side triangle.   Stitch the center beam on top of the sides triangle with a 1/4" seam allowance.  Press seams toward the side triangles.

Position the other side triangle on the other side.  Stitch with a 1/4" seam and Press seam toward the side triangles.  


Position the unit on your cutting mat.  Right-hand cutters place your point of the corner beam right side (see above) and Left handed cutters place the point of your corner beam to the right side.  

Aligning the "Seam Line Placement" guidelines with the diagonal seams of your unit.  Trim the two sides.


Rotate your Corner Beam unit 180°.  Making sure to align up the Finished size guidelines and the seam intersection nests in the "V" and the corner to corner diagonal seams fall right along with the points of the "V"s.  Trim the remaining sides of the units.


Make 2 Coner Beam units.

Unit B Sliver, Slant Rights


The Sliver units start with making four Half Square Triangles, as we have done with other blocks in the past.  Press the seams toward the background fabric. This time you Do Not need to Trim the units.  


Next, you will cut the two Side Triangle pairs as you did with the Corner Beam units.

Slant Right


Place the HST Unit so the wrong side is facing up.  Position the Corner Beam® tool so that the Dashed line labeled "Center Beam Trim #1" aligns up against the cutaway corner of the C3 fabric of the HST unit and Finished Unit line on the other edge of the C3 fabric square.  Trim along the slanted edge of the ruler.


Stitch the Side Triangle into the cutaway corner, lining up the raw edges and matching them corner to corner.  Press seams toward the C4 along the slanted edge of the ruler.


Position the unit on your mat with right side facing up.  Place the Corner Beam® tool on the unit.  Align one of the "Seam Line Placement" guidelines with the sewn seam between the sliver and added a side of the triangle, the crosshairs at the seam intersection and the "V" on the other sewn seam.  Trim the first two sides of your pieced unit.


Rotate the unit 180° and trim the remaining side of the unit.  Make sure that you align up the guidelines and making sure the seam intersection nestles in the size "V" and the corner to corner diagonal seams falls right along with the points of the "V"s. 

Make 2 Slant Right units.

Unit B Sliver, Slant Left


Place the HST unit so the Right side is facing up.  Position the Corner Beam® tool so that the Dashed line labeled "Center Beam Trim #1" aligns up against the cutaway corner of the C3 fabric of the HST unit and Finished Unit line on the other edge of the C3 fabric square.  Trim along the slanted edge of the ruler.


Stitch the Side Triangles into the cutaway corner as done with the Slant Right.  Press seams toward the side triangles.


Position the unit on the mat. Align the Position the Corner Beam® tool "Seam Line Placement" guidelines with the sean seam between the sliver and added side of the triangle, the crosshairs at the seam intersection and the Finished size "V" on the other sewn seam.  Trim the first sides.

Rotate the unit 180° and trim the remaining sides of the unit.

Make 2 Slant Left units.

Assembly


Now that you have all your units complete, its time to lay out Block #9.  Please follow Blockbuster page Download to make sure you lay out the units correctly.  Double checking you have the correct placement of all your units.

Block 9, "Double Trek" is now complete, I look forward to seeing your Blocks, and I hope you will share your photos in the comments section below or on the Graceful Points Facebook Group.  Additionally, you can post your blocks on Facebook or Instagram making sure to use the #gracefulpointsqal and/or #quiltingaffection designs.  I can't wait to see your blocks.

On Friday, June 7th will be the release date for our next block. In our next block, we will be using the Corner Pop® tool.  You can purchase them on my website.

Tina 
"Designing to Inspire"

Saturday, April 28, 2018

April Showers Mystery Quilt: Week 4 Borders and Corners

Well, 4th and final week of the April Showers Mystery Quilt is here, Kari Schell and I will conclude this projects collaboration of by showing you how to design and piece the final part of the April Shower Mystery Quilt.

If you have missed any of my blog posts on how to piece, you can catch up with the series here:


Today, we will be finishing by adding some borders and corners to our assembled quilt top.


Over the past several weeks, we have been making some tricky blocks with our Studio 180 Design, Corner Beam® Tool.  With all the practice we have been doing with the tool you will find this week’s Corner Beams, that is used in the border corners, really easy. 


The borders consist of making green and red strip sets and trimmed to size. 

Be sure to check out how Kari designs the blocks in EQ8, Here. If you would like to learn how to develop these blocks in EQ8, visit her posts here, Week 1Week 2, and Week 3


Here is some sample of what others have made so far in this challenge.


Make sure you watch Week 4's video tutorial and download the pattern Here. The downloads will be available until May 15th!  After that, you will be able to purchase the patterns on my website.


Kari and Myself meeting for the first time at CABS

Thank you for joining myself and Kari Schell on this collaboration. It was a fun project to show you how to use the fantastic Studio 180 Design Tools and what they can do for you.  Be sure to check out my other patterns on my website also.

Don't forget to sign up for my newsletter and blog here, when you sign up you will get a Free Pattern.


For more Information, click HERE
                       
Join the Ramblin' Star Block of the Month Group! HERE

Saturday, April 21, 2018

April Showers Mystery Quilt: Week 3 Flowers

I think Spring and Summer have finally arrived here in the Maryland area.  Still many of you, especially in Minnesota, Mother Nature just wants you to stay in winter mode a little longer.  I hope the April Showers Mystery Quilt project is helping you out of those winter blues and help you start thinking about those spring flowers popping up everywhere.

Week 3 is here, Kari Schell and I continue the collaboration of showing you how to design and piece the April Shower Mystery Quilt.

If you have missed any of my blog posts on how to piece, you can catch up with the series here:


Week 1 Umbrellas
Week 2 Raindrops

Today, we will bring some color to your quilt top with some flowers and finish assembling our quilt top.

I have to omit that Kari Schell, On the Point Quilter, has been challenging me each week with all the blocks she has designed for this mystery quilt in EQ8.  Each of the blocks continues to work off the Studio 180 Design, Corner Beam® Tool.  You definitely will get lots of practice making the Corner Beam blocks.


Week 3 Flowers
The Flower blocks are very similar to last week's raindrop blocks, except how you make the center block for the Corner Beam, then the rest of the steps are identical.

Be sure to check out how Kari designs the blocks in EQ8, Here. If you would like to learn how to develop these blocks in EQ8, visit her posts here, Week 1 and Week 2.


Make sure you watch the video tutorial here and download the pattern Here.


Have a Great Week! Don't forget to sign up for my newsletter and blog here, when you sign up you will get a Free Pattern.

Tina

"Designing to Inspire"


For more Information, click HERE 
                       

Join the Ramblin' Star Block of the Month Group! HERE

Saturday, April 14, 2018

April Showers Mystery Quilt: Week 2 Raindrops

Welcome back for week 2 in the April Showers Mystery Quilt.  How are you doing on your umbrella blocks?  I know the Umbrella blocks were a little tricky, but this week, we are making easier blocks.

If you are new to the April Showers Mystery Quilt. Let me provide you with a quick background on this blog series. Kari Schell, On Point Quilter and myself, are collaborating on the April Showers Mystery blog series this month. Kari has developed the mystery quilt and will be providing the EQ8 (Electric Quilt) instructions and I will be providing the instructions on how to piece the quilt using the Studio 180 Design rulers. 

If you like to catch up on week one, then click on this link to the first week's post.


For week 2, we are making raindrop blocks and starting to put our blocks together. Did you read Kari's post on the how to design the blocks in EQ8? Check it out HERE.  

The blocks are a combination of the Corner Beam unit and set inside a square in a square unit.  The Studio 180 Design rulers used in this block are Corner Beam® and the Squared Square® 6" tools.  Again this week I have created a Video Tutorial and providing you a free pattern on how to make the blocks.

Watch the Week 2, tutorial now:


To get the Free Downloadable Pattern, click HERE!


Have a Great Week! Don't forget to sign up for my newsletter and blog here, when you sign up you will get a Free Pattern.


Tina

Saturday, April 7, 2018

April Showers Mystery Quilt: Week 1 Umbrella

Welcome to the month of April, and it supposes to be officially Spring, but I think mother nature has other plans right now for many of us in the United States.  

To help you all get ready for Spring, I'm teaming up with Kari Schell, the on-point quilter.  Kari Schell is an Electric Quilt educator and pattern designer.  She specializes in teaching quilters Electric Quilt the Easy Peasy way through online instruction.  You can learn more about her at www.onpointquilter.com.

Kari has developed a mystery project called April Showers. Every Saturday, in the month of April we will introduce you to a new block.


During the next couple weeks, Kari will show you how to design the blocks in Electic Quilt. Check out her blog here.  I am taking her design and developing it into a pattern for you using the amazing Studio 180 Design tools.  Additionally, I will be providing you with step-by-step videos that will show you how to make the blocks using the Studio 180 Design Tools. 


For the Fabric Requirements and list of Studio 180 Design Tools you will need for this Mystery Quilt, please Click (Here). You can pick any color you want to use, this quilt is a good way to use some of your Fabric stash.


Week 1, consists of making the Umbrella Blocks, and handles. The blocks consist of three units. You will need to use the Studio 180 Design Corner Beam® tool and the Sliver Technique Sheet.  If you don't have these you can purchase them at your local Quilting Store or on the Studio 180 Design Website.  

Note: this pattern is for more intermediate quilters.

The tutorial videos for Week 1 are split up into Part 1 and 2.
  
So let's get started with Part 1:


Part 2:


Here is the link to the Free Downloadable pattern.  

Have a Great Week! Don't forget to sign up for my newsletter and blog here, when you sign up you will get a Free Pattern.


Friday, March 23, 2018

2018 Master the Rulers: Studio 180 Design Blockbuster 11


This week’s master the ruler: Studio 180 Design Blockbuster 11 was a fun one to make.  Search Light uses the Deb Tucker Studio 180 Design Corner Beam® Trimmer.  This ruler is not new to me, I used it in my upcoming pattern, Ramblin' Star, in the Medallion Center Block.

The block was the highlight of my weekly Facebook Live Series, Quilt Talk Tuesday, Episode 11: Making Corner Beam units.  You can check out the video here:


This week’s master the ruler: Studio 180 Design Blockbuster 11 was a fun one to make.  Search Light uses the Deb Tucker Studio 180 Design Corner Beam® Trimmer.  

This ruler is not new to me, I used it in my upcoming pattern, Ramblin' Star, in the Medallion Center Block.


Next, you will cut your beams out using the Center Beam Trim lines. 


Now that the center beams are cut out, it’s time to cut out the side pieces.  Using the Side Triangle trim #1 line on the ruler. 


I used two different fabric colors, one on each side of the center beams.  Remember when you get ready to start to stitch the unit together, make sure that the longest edges of the side triangles are positioned to sew to the center beam.  Press away from the center beam.


Now it is time to trim the unit up. Place your Corner Beam® trimmer on the unit.  You will then line up the Seam Line Placement lines along the seams in the center of the unit.  The point at the top of the Seam Line Placement lines will line up with the very tip of the unit.  Then you will trim up and across.


Rotate the unit 180 degrees, not the ruler.  Again, align the Seam Line Placement lines just as before and assuring the 6 1/2" clean up edges are now on the nice clean, trimmed lines from the first trim. Once everything is lined up, you will trim up and across.


Now that all the blocks are trimmed, it’s time to assemble the units.


BlockBuster #11, Search Light is now complete.  I think this is a really cool block and it is easy to put together.  I now have 4 more blocks to finish before I complete Series 1.  Next Week, will be making something new with the Sliver Technique Sheet.  Looking forward to making this block.

Talk to you next week, and remember if you have missed the first 10 Blockbuster blocks you can catch up HERE.

Also, make sure to check out my "Live" Quilt Talk Tuesday, at 2:30pm on Quilting Affection Design Facebook page.  Also If you miss an episode, you can catch up on my YouTube Channel, while you are there remember to subscribe to my channel.


Have a great weekend of Creating!

Tina
"Designing to Inspire"