Showing posts with label Quilt Talk Tuesday. Show all posts

Thursday, July 12, 2018

Quilt Talk - Making Fast Easy Strip Binding!


Over the last 23 weeks, I have been doing a Facebook Live Series called "Quilt Talk Tuesday."  The show airs on the Quilting Affection Designs Facebook Page every Tuesdays at 2:30 pm.  In the last 13 episodes, I have been discussing Quilting Basics 101, starting from the beginning on terminology, pattern reading, seam allowances and we are coming to the end with making strip binding. You can catch up on all the episodes, Here.

So you can catch up on this week’s episode on Making Strip Binding.


This week talked about Continues Binding.  In the video, I demonstrated how easy it is to make the Continues Binding for your quilt.

The first step in making binding is to measure out your quilt.  Once you have the measurements, you can then use math, by adding the measurements of all four sides of your quilt top and adding 12" for seams, corners, and finishing.  After you have the total measurements, divide by 42" to determine the number of strips you will need.


Or you can use a fantastic Free tool called the Quilter’s Calculator, There are two ways you can access the Quilter’s Calculator. This handy tool helps you figure out your backing, batting, binding yardages and so much more.  I absolutely love this app and use it all the time.

First, through the Quilters Paradise Quilters calculator found Here, which you can access through your web browser.

If you prefer to have handy access like I do you can get the App through a download from the Apple Store, Google Play, or Amazon App Store. You can get more information by clicking Here

I use the Quilter’s Calculator to help me determine how much yardage and how many strips of 2 1/2" strips of fabric I need for my binding.


Once you have all your strips prepared it’s time to get ready to stitch them together.


Place one strip with the right sides facing up and then place another strip with the right side facing down, putting it on the other strip that is on the mat so they will make an "L" shape. On the mat.  You may want to overlap them about 1/4".
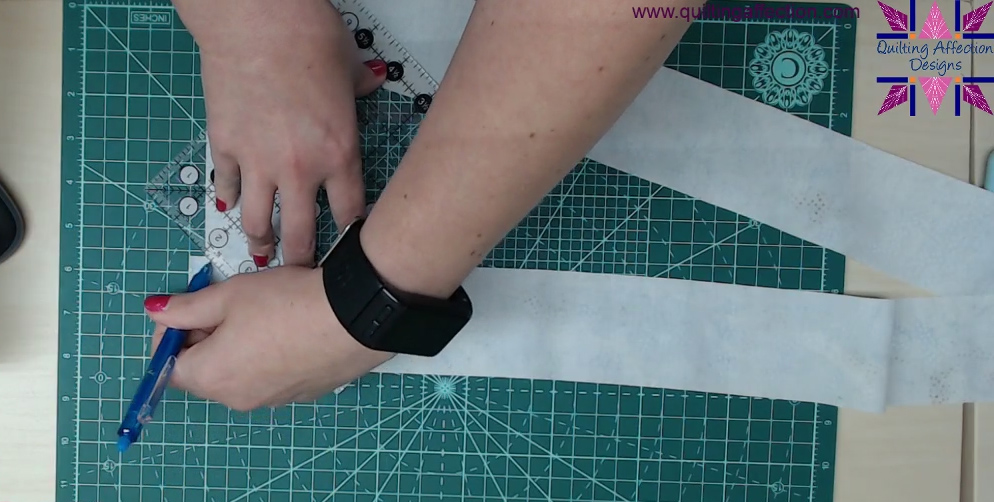


Taking a marking pencil and a ruler, you will want to draw a diagonal line.  To do this place the ruler on the strips, align the ruler so that it will match the points where the strips intersect, once the ruler is placed draw a diagonal line with your marking pencil.


Next, you will pin your intersection together, for sewing.


You will continue this process until you have all the strips pined together.  Then take your pinned strips to your sewing machine and stitch on the diagonal lines that you have drawn on your strips.


Next, lay one of your now stitched strips on your cutting mat and trim the excess fabric, leaving 1/4" seam allowance.


Remember to trim the dog ears also.


Now, you will need to press all the seam allowances open.


Finally, starting at the end of your binding you will fold it in half long ways and press until you get to the other end. 


You have now completed your binding, and it is ready to be sewn on your quilted quilt top, which we will be covering next week. 


Tina
"Designing to Inspire"


Get Your Rainbow Serenade Pattern and tools at www.quiltingaffection.com


Monday, April 2, 2018

Have you seen "Quilt Talk Tuesday!"?


Have you checked out Quilt Talk Tuesday, on Quilting Affection Design Facebook Page? If not, be sure to check out past episodes on Quilting Affection Designs, Facebook Page or my YouTube Channel.

Starting this coming week April 3rd, we are going back to the basics and learning to quilt for the next 14 weeks. Below is the Schedule of topics we will be covering in April. Click on the topics below to get more information, and get reminders of the upcoming event.
Future Topics will include:
  • Choosing Fabric
  • Cutting
  • Half Square Triangles
  • Assembly & Sewing
  • Borders
  • Quilt Sandwiches
  • The Walking Foot
  • Machine Quilting
  • How to make Binding
  • Sewing the Binding
Quilt Talk Tuesday, goes live every Tuesday at 2:30 pm EST, every week on the Quilt Affection Design Facebook Page.

I hope to see you there!
Tina

Friday, March 23, 2018

2018 Master the Rulers: Studio 180 Design Blockbuster 11


This week’s master the ruler: Studio 180 Design Blockbuster 11 was a fun one to make.  Search Light uses the Deb Tucker Studio 180 Design Corner Beam® Trimmer.  This ruler is not new to me, I used it in my upcoming pattern, Ramblin' Star, in the Medallion Center Block.

The block was the highlight of my weekly Facebook Live Series, Quilt Talk Tuesday, Episode 11: Making Corner Beam units.  You can check out the video here:


This week’s master the ruler: Studio 180 Design Blockbuster 11 was a fun one to make.  Search Light uses the Deb Tucker Studio 180 Design Corner Beam® Trimmer.  

This ruler is not new to me, I used it in my upcoming pattern, Ramblin' Star, in the Medallion Center Block.


Next, you will cut your beams out using the Center Beam Trim lines. 


Now that the center beams are cut out, it’s time to cut out the side pieces.  Using the Side Triangle trim #1 line on the ruler. 


I used two different fabric colors, one on each side of the center beams.  Remember when you get ready to start to stitch the unit together, make sure that the longest edges of the side triangles are positioned to sew to the center beam.  Press away from the center beam.


Now it is time to trim the unit up. Place your Corner Beam® trimmer on the unit.  You will then line up the Seam Line Placement lines along the seams in the center of the unit.  The point at the top of the Seam Line Placement lines will line up with the very tip of the unit.  Then you will trim up and across.


Rotate the unit 180 degrees, not the ruler.  Again, align the Seam Line Placement lines just as before and assuring the 6 1/2" clean up edges are now on the nice clean, trimmed lines from the first trim. Once everything is lined up, you will trim up and across.


Now that all the blocks are trimmed, it’s time to assemble the units.


BlockBuster #11, Search Light is now complete.  I think this is a really cool block and it is easy to put together.  I now have 4 more blocks to finish before I complete Series 1.  Next Week, will be making something new with the Sliver Technique Sheet.  Looking forward to making this block.

Talk to you next week, and remember if you have missed the first 10 Blockbuster blocks you can catch up HERE.

Also, make sure to check out my "Live" Quilt Talk Tuesday, at 2:30pm on Quilting Affection Design Facebook page.  Also If you miss an episode, you can catch up on my YouTube Channel, while you are there remember to subscribe to my channel.


Have a great weekend of Creating!

Tina
"Designing to Inspire"


Wednesday, February 14, 2018

Quilt Talk Tuesday, Episode 6 – Island Batik Ambassador Box Opening

Yesterdays "Quilt Talk Tuesday" video from Facebook Live was fun we opened my first Island Batik Ambassador Box for this years.


Check out my Galentine Project blog Here.

Announcement:
If you are looking for a great deal on Moda Fabrics, then check out my Etsy Shop (description) area has the link. I have all my fabrics on clearance 50% off and free shipping right now. So, check it out.  SHOP NOW!

Remember to subscribe to my YouTube Channel to get the lastest episode of Quilt Talk Tuesday.

Tina
"Designs to Inspire"


Tuesday, February 6, 2018

Quilt Talk Tuesday, Episode 5 – Drunkards Path using the Bloc_Loc Ruler


Here is today's "Quilt Talk Tuesday" video from Facebook Live.

Today we will talk about how to make accurate Drunkard’s Path Blocks using the Bloc_Loc® Ruler.

We also announced the winner of the Digital Copy of my "A-Mazed" Pattern, which was featured in last weeks, "Quilt Talk Tuesday".  

Congratulation Michele Tims.  Please contact me within the next 5 days via email to receive your prize.

Announcement:
If you are looking for a great deal on Moda Fabrics, then check out my Etsy Shop (description) area has the link. I have all my fabrics on clearance 50% off and free shipping right now. So, check it out.  SHOP NOW!

Watched the video below. Please subscribe to my YouTube Channel to get the lastest Episode of Quilt Talk Tuesday.


Tina