Showing posts with label Square Squared Ruler. Show all posts

Saturday, April 28, 2018

April Showers Mystery Quilt: Week 4 Borders and Corners

Well, 4th and final week of the April Showers Mystery Quilt is here, Kari Schell and I will conclude this projects collaboration of by showing you how to design and piece the final part of the April Shower Mystery Quilt.

If you have missed any of my blog posts on how to piece, you can catch up with the series here:


Today, we will be finishing by adding some borders and corners to our assembled quilt top.


Over the past several weeks, we have been making some tricky blocks with our Studio 180 Design, Corner Beam® Tool.  With all the practice we have been doing with the tool you will find this week’s Corner Beams, that is used in the border corners, really easy. 


The borders consist of making green and red strip sets and trimmed to size. 

Be sure to check out how Kari designs the blocks in EQ8, Here. If you would like to learn how to develop these blocks in EQ8, visit her posts here, Week 1Week 2, and Week 3


Here is some sample of what others have made so far in this challenge.


Make sure you watch Week 4's video tutorial and download the pattern Here. The downloads will be available until May 15th!  After that, you will be able to purchase the patterns on my website.


Kari and Myself meeting for the first time at CABS

Thank you for joining myself and Kari Schell on this collaboration. It was a fun project to show you how to use the fantastic Studio 180 Design Tools and what they can do for you.  Be sure to check out my other patterns on my website also.

Don't forget to sign up for my newsletter and blog here, when you sign up you will get a Free Pattern.


For more Information, click HERE
                       
Join the Ramblin' Star Block of the Month Group! HERE

Saturday, April 21, 2018

April Showers Mystery Quilt: Week 3 Flowers

I think Spring and Summer have finally arrived here in the Maryland area.  Still many of you, especially in Minnesota, Mother Nature just wants you to stay in winter mode a little longer.  I hope the April Showers Mystery Quilt project is helping you out of those winter blues and help you start thinking about those spring flowers popping up everywhere.

Week 3 is here, Kari Schell and I continue the collaboration of showing you how to design and piece the April Shower Mystery Quilt.

If you have missed any of my blog posts on how to piece, you can catch up with the series here:


Week 1 Umbrellas
Week 2 Raindrops

Today, we will bring some color to your quilt top with some flowers and finish assembling our quilt top.

I have to omit that Kari Schell, On the Point Quilter, has been challenging me each week with all the blocks she has designed for this mystery quilt in EQ8.  Each of the blocks continues to work off the Studio 180 Design, Corner Beam® Tool.  You definitely will get lots of practice making the Corner Beam blocks.


Week 3 Flowers
The Flower blocks are very similar to last week's raindrop blocks, except how you make the center block for the Corner Beam, then the rest of the steps are identical.

Be sure to check out how Kari designs the blocks in EQ8, Here. If you would like to learn how to develop these blocks in EQ8, visit her posts here, Week 1 and Week 2.


Make sure you watch the video tutorial here and download the pattern Here.


Have a Great Week! Don't forget to sign up for my newsletter and blog here, when you sign up you will get a Free Pattern.

Tina

"Designing to Inspire"


For more Information, click HERE 
                       

Join the Ramblin' Star Block of the Month Group! HERE

Saturday, April 14, 2018

April Showers Mystery Quilt: Week 2 Raindrops

Welcome back for week 2 in the April Showers Mystery Quilt.  How are you doing on your umbrella blocks?  I know the Umbrella blocks were a little tricky, but this week, we are making easier blocks.

If you are new to the April Showers Mystery Quilt. Let me provide you with a quick background on this blog series. Kari Schell, On Point Quilter and myself, are collaborating on the April Showers Mystery blog series this month. Kari has developed the mystery quilt and will be providing the EQ8 (Electric Quilt) instructions and I will be providing the instructions on how to piece the quilt using the Studio 180 Design rulers. 

If you like to catch up on week one, then click on this link to the first week's post.


For week 2, we are making raindrop blocks and starting to put our blocks together. Did you read Kari's post on the how to design the blocks in EQ8? Check it out HERE.  

The blocks are a combination of the Corner Beam unit and set inside a square in a square unit.  The Studio 180 Design rulers used in this block are Corner Beam® and the Squared Square® 6" tools.  Again this week I have created a Video Tutorial and providing you a free pattern on how to make the blocks.

Watch the Week 2, tutorial now:


To get the Free Downloadable Pattern, click HERE!


Have a Great Week! Don't forget to sign up for my newsletter and blog here, when you sign up you will get a Free Pattern.


Tina

Friday, February 23, 2018

2018 Master the Rulers: Studio 180 Design Blockbuster 7

As you are reading this blog post I'm down in Hampton, Virginia enjoy some time with my husband at the Mid-Atlantic Quilt Show.  I love going to this show, it is one of the biggest shows in this area.

Blockbuster #7 -Whimsy Turndash is a fun block and I learned new tricks using the Square SquaredⓇ this week.  The Whimsy Turndash uses the Tucker TrimmerⓇ 1, Square SquaredⓇ, and the Little House technique sheet.

The block size I will be using this week is a 9" Block, we are making three units: the square in a square, little house, and half square triangles.  The little house technique is a fun unit and was a new technique for me.


So let's get started with making the Square in a Square unit.  They are just like the ones I showed you in last week’s blog post on Blockbuster #6. If you missed you can check it out Here.

The next unit requires the Little House Technique Sheet by Studio 180 Design and is a companion sheet for the Square SquaredⓇ ruler.  This technique was new to me but overall, it was straightforward and fun to make.  The technique sheet walks you through the cutting instructions and how to make the units.


You start with two small and one large square, cut to size for the unit you will be making.


You need to draw at least one line down the middle on the reverse side of the smaller squares.


Position one of the smaller squares on one of the corners of, the larger square making sure that right sides are together. 


Stitch on the marked lines down the middle of the smaller square. Trim away 1/4" away from the stitched line and press open.


Now, for the next side, I had a little fun and learned a cool trick to make some half square triangles at the same time.


On the remaining small squares for the other side of the house unit. I drew a secondary line 1/2" away from the center line, so we have two sewing lines.  


Place a small square in the corner next to the one you just stitched.  Stitch on the two drawn lines.


Trim down in the middle of the two stitched lines. Now press both of them open. 


You now have small half Square triangles to use for a something fun to create.  I needed to pick up the Tucker TrimmerⓇ II, this week at the Quilt Show to finish trimming my half square triangles.


Anyway, back to the house units you will then use the Square SquaredⓇ Ruler to trim the units to size.  The trimming is very similar to how you trim the Square in the Square units.


Now the units are made it is time to assemble the block.  Starting assembly of each of the rows first.


Now, the rows are stitched together it is time to sew the rows together.


Now Blockbuster #7 - Whimsey Turndash is now complete.  I love the colors in this block.  

Next week, I will be making Blockbuster # 8 - 54-50 or Fight block, which is using the V BlockⓇ Ruler.  I love making the V Block units so it will be fun.

Talk to you next week, and remember if you have missed the first six Blockbuster blocks you can catch up HERE.

Have a great weekend of Creating!

Tina
"Designing to Inspire"

Friday, February 16, 2018

2018 Master the Rulers: Studio 180 Design BlockBuster 6

Wow!  Today is blog post #6 in the Blockbuster Challenge Series.  I guess time does fly by when you are having fun making blocks and learning at the same time.


So let's get started on BlockBuster #6 Rolling Stone and starting with a new ruler, the Square Squared® Ruler.  The Rolling Stone block is much easier this week compared to last weeks, Whirligig block. 

I chose a 12" block, and I'm still using my Island Batik scraps. 

For this block, you make four Square in a Square unit, which will measure 4 1/2" unfinished.


When using the Square Squared® ruler, you will find the cutting measurements for the center square and the side triangles on the ruler.

Starting with the Center, I referred to the Center Square Section of the Square Squared® ruler to determine what size of the strip I need to cut to get the center squares. I found the 4" line and determined I needed a to cut a 3 1/2" strip for the center.


Once I had the strip cut, I lined up the Square Squared® ruler on top of the strip to the 4" mark and began sub cutting the strips until I had four squares.


Next, refer to the triangle cutting sizes on the other side of the ruler, and determined that I need to cut 8- 3 1/4" squares and then cut them in half to yield two triangles per square.


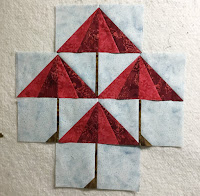
Now that everything was cut for the square in squares, I began stitching the top to the square, ensuring the triangle points match up with the center of the square. Repeating the same process with the bottom of the square. 


Once I was complete with the top and bottom, I then pressed the triangles away from the center square.


I repeated the same process of stitching the triangles the center square, but this time I was placing them on the sides.  Followed by pressing away from the center square again.


Once the unit was made, it was time to trim the unit to 4 1/2" using the Square Squared® ruler.  Placing the Trim down section of the ruler on the unit and assuring that you line up the 4" X's over the sewn seams. Once the ruler is aligned up, you will trim the side and top up.  


Rotating the unit, then line up the X's again and making sure the cleanup lines with the previously trimmed edges from the last step.  Trim up the remaining edges.


The 4 1/2" unfinished Square in a Square units are now complete; now it is time to cut out the remaining pieces for this block.


For the Green and Yellow, I need to cut out 6 - 2 1/2" square units of each color and 4  -  2 1/2" X 4 1/2" blue rectangles.


I then began stitching the green and yellow squares together, followed by pressing them to the side.


Now that all the squares were sewn together, I took two of the units and stitched them together to make a 4-patch unit.


With the remain units and the blue rectangles, I began stitching them together.


As I was stitching them together, I made sure that the green always on the top left side of the units. Pressing them open and toward blue when they were complete.


I was now time to lay all the completed units out to get ready to assemble the block.  Starting stitching all the units together in each row.


Then stitching all the row together to finish the block up.


This is my colorful Rolling Stone block is now complete.  

I'm now ready to start BlockBuster #7 next week.  

If you missed my first five blocks in this BlockBuster series make sure you check it out, HERE

Have a wonderful quilting weekend!

Tina
"Designing to Inspire"