In Part 2 of the Block Party Block #55, titled "Cross Road," we will cover Units B (Half Square Triangles) and Unit C (Square Squared).
If you missed Part 1 of the tutorial for this block, you can find it here
To download the block, click on this link.
When creating your block size, please consult your
pattern-cutting charts and tool instructions to determine the starting size for
the squares and strips.
Unit B
Begin with Unit B: Half Square Triangles. You will need 16 half-square triangles divided into two different color
combinations.
Using your Quilter's Magic Wand, mark two stitching lines on the reverse side of the background fabric.
Place the marked background square on top of the other square, aligning the right sides together. Stitch along the marked lines. Cut the units down in the middle. Press to the darker fabric.
 |
| Right-Handed |
 |
| Left-Handed |
Place the pressed Half Square Triangle unit on the cutting mat. Place the Tucker Trimmer on the unit using the Cutting Size listed on your block pattern, lining up the sizing line across the sewn seam and the common diagonal down the center along the other seam. Trim up and across the unit.
 |
| Right-Handed |
Rotate your unit 180 degrees, replace the Tucker Trimmer on the unit, realign the sizing line and the clean-up lines on the previously trimmed edges, and trim up and across the final two sides of the unit.
Repeat this for all the Half Square Triangle units.
Arrange your Half Square Triangle units as shown in the image above. Stitch the units together to form a square, pressing the seams to one side or keeping them open, according to your preference. Make 4 squares.
Unit C
Position the Center Square Section of the Square Squared® tool on the size according to your pattern instructions. Place the tool Center Square section on your starting center square, lining up the square with the center mark according to the size you are making. Trim up and across the unit.
Cut the side triangle squares into triangles.
Position the side triangles on opposite sides of the precisely trimmed center square. Stitch with the triangles on the bottom with a 1/4" seam allowance. Pressing away from the center.
Repeat for the opposite side.
Next, place the remaining side triangles on opposite sides of the center square. Stitch and press the seams away from the center.
 |
| Right-Handed |
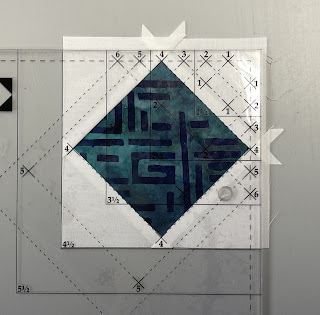
Use the trim size specified in your pattern instructions and position the Trim Down Section of the Square Squared® tool over the unit. Carefully align the "X" marks on the finished size with the sewn seams. Then, trim across and up the unit.
 |
| Right-Handed |
Rotate the unit. Reposition the Square Squared® tool, lining up the "X"s and then lining up the cleanup lines on the tool with the previously trimmed edges.


No comments:
Post a Comment