It's that time of the month in the Garden Enchantment BOM. Block 4 is now available to download and make. Only 2 more months left in this Block of the Month Program, time just goes by fast.
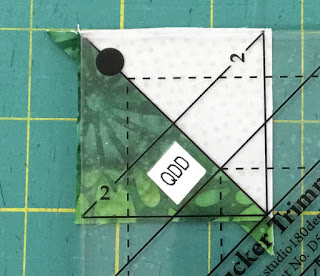
Block 4 is very similar to Block 1 in a lot of ways, except for the coloring. For this block, you will need your Tucker Trimmer® 1, V-Block® and Square Squared® tools. We will be making 4 blocks that have the following units: Half Square Triangles, SideKick & High/Low and Diamond in a Square unit.
Half Square Triangles
Let's start with a quick overview of the Half Square Triangles.
Start by marking the back of your white squares with stitching lines using your Quilter's Magic Wand to get the 1/4" on each side of the center diagonal.
Layer with right sides together with the white and green squares and stitch on the marked lines.
Trim down the middle of the stitched lines.
Yielding two triangles. Press toward the Green triangles.
 |
| Right Handed |
 |
| Left Handed |
 |
| Right Handed |
 |
| Left Handed |
Diamond in a Square
We have been making the Diamond in a Square the last couple months now. Please remember the following when you are making your 4 units.
Remember that you need to use your center square section of your tool to sub-cut your strips and get the accurate size for your center square.
Remember when stitching your triangles to your squares to stitch with the square on top of the triangles, so you get the best visibility.
Position your Square Squared tool with the 3" "X's" on the seam intersections and dashed lines on the center seams, and make sure you have the 3 1/2" trim lines are inside the edges of the unit and make you first trim.
Rotate the unit around 180° and repositioning again lining up the "X's" and the seams, along with the 3 1/2" trim down line and trim again.
Make 4 Diamond in a Square unit.
SideKick and High/Low Units.
Finally, we are going to make 4 SideKick and High/Low Units. Remember, we will be removing the left Side of the based Section Square and replacing it with a Side Triangle that is cut with your Studio 180 Design V-Block® Tool.
 |
| Right Handed |
 |
| Left Handed |
 |
| Right Handed |
 |
| Left Handed |
Position the Bold Solid line of you V Block® Trimmer on the edge of the trimmed end of the teal strip and make sure to line up the bottom of the finished size guideline along the raw edge of the strip. Cut along the slanted edge of the tool.
 |
| Right Handed |
 |
| Left Handed |
Repeat to make 4 Side Triangle Units. Do Not Trim at this point! Next, We need to add the Low unit.
Mark a diagonal line down the wrong side of your Dark Green Square, which will be your stitching line.
Position the Dark Green Square in the bottom right-hand corner of your SideKick with right sides together and the line going across the corner.
Stitch on the line, Trim the seams 1/4" from the stitching lines, and press away from the based unit.
 |
| Right Handed |
 |
| Left Handed |
 |
| Right Handed |
 |
| Left Handed |
You will make 16 SideKick & High/Low units.
Corner Units
Stitch together the Half Square Triangles and squares to make the corner units, pressing according to the directions in your pattern.
Layout your units and stitch together, pressing according to the directions in your pattern.
This completes Block 4, remember you will need to make 4 blocks. See you on August 15th for Block 5 release and tutorials.
Tina
"Designs to Inspire"


No comments:
Post a Comment