Showing posts with label Precision Block Academy. Show all posts

Tuesday, March 28, 2023

Day Two - Exuberance Blog Hop


It's my pleasure to have you on my blog today for day two of the Deb Tucker Studio 180 Design Exuberance Blog Hop. For those of you who haven't visited my site before, let me introduce myself. Hi! I'm Tina Dillard, the owner of Quilting Affection Designs and a Studio 180 Design Certified Instructor. I have recently joined forces with my friend, fellow Certified Instructor Diana Mann of Muragboo Quilts. I'm bringing you an improved Precision Block Academy, which I created in 2021.

Throughout this Blog Hop, a few of my fellow Certified Instructors are sharing projects they have done with precuts from the recently released Deb Tucker Studio 180 Design's Exuberance Fabric Collection Line for Island Batik Fabrics. Landing in your local quilt shops now.  

Here is the Blog Hop Schedule:

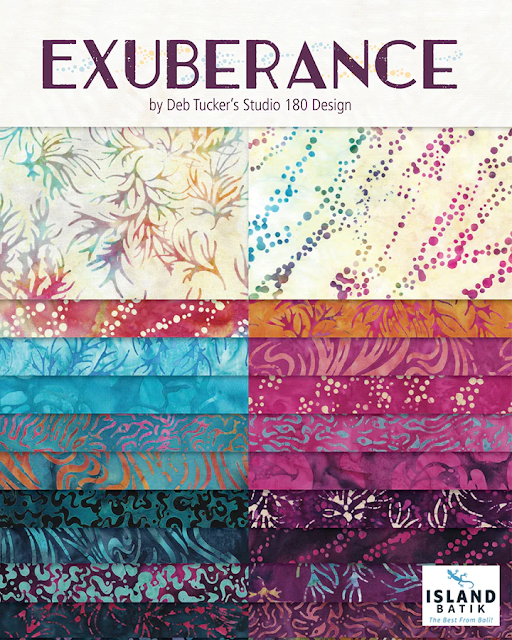
When the Studio 180 Design team named this new collection, they got it right. The colors are full of energy, excitement, and cheerfulness, which is what Exuberance means. They have really brought it together in this collection with the bold and rich colors that pop in any project you bring them into. 

For my project, I decided to do an original quilt that uses 10" squares to show off the colors. This is the first Star 60 project I have designed, and it utilizes one of the new Star 60 Technique Sheets, Power Strip 60. I'm in love with this creative technique that allows you to make multiple Star 60 units or Shaded 60 units. In this original project, I chose to make the Shaded 60 units using 10" squares and some Island Batik white fabric for my background.

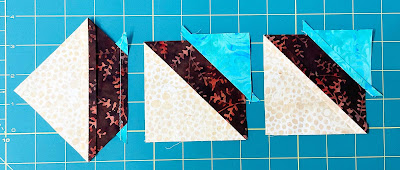
I started off with this project by selecting a variety of 14 different 10" squares; half of the 14 would be for the diamond tips of the unit, and the other half for the companion triangle. I also cut background strips for the side triangles and more companion triangles. 


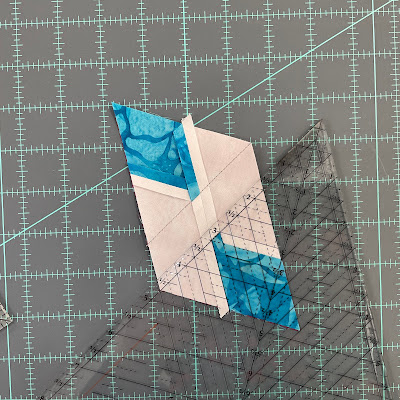
When making Shaded 60 units, they are very similar to Shaded Four Patches. However, you use the Star 60 tool for making 60-degree shapes and trimming. Using strip sets with bright, Exuberance colors for the diamonds and background fabric for the side triangles, a pieced Star 60 unit is created using these strip sets. Pieced Star 60 units can be added to a parallelogram unit cut from Exuberance and Background fabrics. On the pieced section, you can also mark stitching lines through the point diamonds. On the marked line, stitch a parallelogram right sides together with a pieced section. Press the seams toward the companion triangle and cut them apart 1/4" from the stitched lines. You now have some newly pieced diamonds ready to assemble.

It's time to add side triangles to those diamonds. Before I do that, I need to trim the sides that will have side triangles attached. Once I had the first trim done on the diamonds, it was time to add those side triangles.


Having assembled the units, I wanted to play with the quilt layout before trimming it down. I found the final layout to be the most challenging part of the whole process. Once I was happy with the layout, I did the final trim on the units. When I put the quilt together, I stitched the units into rows. At each row's end, I added half rectangle triangles to make the quilt square. Then I stitched all the rows together to finish the quilt top.

Once the quilt top was assembled, I added borders to each side to finish it.

This project was super fast and easy, thanks to the Power Strip 60 Technique. The bright, bold colors of the Exuberance fabric collection really make the pinwheel effect stand out. In the future, I'll make this a pattern. However, I'd like to tweak a few things to make it even easier for you if you want to try it out.

We're glad you're here for Day Two of the Studio 180 Design Exuberance Blog Hop. Please visit your local quilt shop and ask about the beautiful Exuberance Fabric Collection. This will bring energy and excitement to any quilt project you plan to make, just like it did for this project. I have more quilt patterns in this Exuberance collection in the works, so stay tuned for them.

Also, if you're interested in learning more about the Power Strip 60 technique or any of the Studio 180 Design Star 60 tools, check out Precision Block Academy. Registration opens in May.

Saturday, January 15, 2022

Block Party Block #21 - Flying Darts Tutorial

It's the first Block Party Block of 2022. Block Party Block #21 "Flying Darts" reminds me of playing lawn darts on camping trips or in the backyard. The Studio 180 Design Corner Beam®, Tucker Trimmer®, and Corner Pop® tools are used for this block. You can download your block, Here!

This tutorial is about making Popped Half Square Triangles for the Flying Darts Block Party Block.


Start by choosing your fabrics and deciding the size of your block. Then cut your squares out according to your size. See the Tucker Trimmer® tool instructions for how to make half-square triangles. Once you've made your Half Square Triangles, I recommend pressing the seams to open so the unit lays flat and won't bulk up when you put the block together. 

Right Handed Trim

Left Handed Trim

After that, you'll trim your units to size. Trimming must be done before popping the corner so that the unit is as straight as it can be. Place your unit on a cutting mat. Position the Tucker Trimmer over the unit, aligning the diagonal guidelines on the seam for the desired size. Trim the first two edges.

Right Handed Trim


Left Handed

Turn the unit 180 and position the clean-up lines on the unit edges that you trimmed and do the same with the diagonal lines on the seam. Now make the final cuts. 


Now that we've got our units trimmed and square, we want to use our Corner Pop® tool to trim off those dark corners. 

Replacement

Using the tool's cutting chart, we can figure out what the Replacement Triangle Square size needs to be based on the size of the Finished/Cut Away corners. To make your replacement triangles, cut your squares to size, then sub-cut them diagonally. 

Right Handed

Left Handed

Let's find the Cut Away lines size for the replacement triangle. Make sure the Cut Away lines are aligned in the dark corner of the Half Square Triangle. Cut across the diagonal.


Position the newly trimmed half-square triangle and the long diagonal edge of the triangle replacement with right sides together. Stitch in place with a 1/4" seam allowance, then press the seams open.

Right Handed


Left Handed

If you're right-handed, position the newly popped corner in your upper right-hand corner and if you're left-handed, place it in your upper left-hand corner. Lay the Finished Size Corner Trim Down line on the seam of the new corner. Keeping your unit straight is easy if you align it with the grid lines on the tool. Just trim the two sides. Do this for all 12 Half Square Triangles. 


It's really easy to make these units. All you have to do now is make 20 Corner Beams and assemble the block.

Block Assembly


It's best to make all four corners first and press the sections together.


Assembling the middle sections, again press your seams open.


Then stitch all the sections together into rows. Lastly, stitch all the rows together to finish the block. Make sure all seams are open. Have fun.


Friday, December 31, 2021

2021 Goal Review and 2022 Goals

Happy New Year, everybody! As I wind down the year, I'm looking back on my goals from last year and making some new ones. Then I join my technique pattern editor, Yvonne, who blogs at Quilting Jetgirl, for an Annual Planning Party link-up. 

Let's start with my 2021 goals. 

Looking back on my 2021 goals, I see they shifted a little bit during the year. I set three goals for 2021, the main goal, three secondary goals. Let's look at these goals and how they worked out this year. 

My main goal for the year was to develop an On-Demand Class Library for teaching my patterns and techniques. As the year carried on, it evolved into another approach. Instead of teaching my patterns in an On Demand library, I've developed some exciting and innovative ways to learn Studio 180 Design


In July, I launched Precision Block Academy. It's a monthly video-based class where you learn one Studio 180 Design tool and technique sheet every month. Besides videos, the Academy has more. The members of the program get at least two live coaching sessions, plus a private Facebook group where they can get support from each other. I was so blown away by the response of the first class, and I'm excited to see how many we'll have in the next class when registration opens this month (January) for Launch. Please click here if you want to be put on the next class waitlist. Over the next few weeks, we'll tell you more about the Precision Block Academy.


Blooming

My first secondary goal was to create a series of patterns that would let fans of Studio 180 Designs tools can practice and develop their skills. We have started working on this goal and will continue for a couple of years. As of this fall, I've launched the first two patterns, Forest Glade and Blooming (pictured) in my Skill Builder Series for the Studio 180 Design Tucker Trimmer. There are several more in the design phase waiting to be developed. 

Providence

Another secondary goal was to release more patterns throughout the year. That happened too. In addition to the Skill Builder Series patterns, I released three new patterns. Diamond Serenity, Providence, and a revision of Mountain Snowfall.


The last thing I wanted to do in 2021 was to write a sequel to
Poppin' with Wings book. When I developed Precision Block Academy, this goal just flew out of the window. Since books take so long to develop and write, I needed this time for the Academy and its members. Maybe one day. 

In 2021, I'll have many other accomplishments. They include a new website moving from a difficult and expensive platform to Shopify. It was easier to work with and cheaper in the end.   

This blog was also revived in 2021. On Fridays, I'll post about Studio 180 Design products, tools, and tutorials. And I changed how you get Block Party Blocks. Every month, they come out on the 15th, but you can get them by email through our Special Newsletter. No searching on Facebook.


I also got recertified as a Studio 180 Design Certified Instructor for 3 more years this year! 

2022 goals


I have set up my goals for 2022, many carry over from last year. 

My main goal is to continue with the Precision Block Academy, which will continue throughout the year with more classes starting. Plus, create a second-year course that covers Advanced Lemoyne Star, Wedge Star, and Star 60. 
 
Secondary goals will start off with more Studio 180 Design companion patterns to be released throughout the year. These patterns will continue my Skill Builder Series patterns. 


My last goal is more personal than business-related. To keep your mind fresh, especially in today's crazy world, this goal should be on everyone's list. It's my goal to take weekends off completely to relax and clear my head. This gives me more time to go camping on weekends. My husband and I are already planning a long-distance trip with our trailer for the fall. In addition, I'll be going on my first retreat next month, where I'll be sewing my heart out. Hopefully, there'll be more trips to come.

I'm going to keep writing my blog in the New Year. Plus, we're developing new Block Party Blocks every month, plus great tutorials on the blocks. 

Let's have a good and safe year in 2022 and take advantage of everything we can. It's not too late to set your goals for 2022. Comment below if your goals for 2022. 

Tina

Friday, December 10, 2021

Blockbuster 65 Twilight Zone and Geese of a Feather Technique!

Recently, Studio 180 Design released Twilight Zone, its newest blockbuster. This color play block is made with the Wing Clipper® and Square Squared® tools. The only thing else you'll need is the new Geese of a Feather Technique sheet, depending on how you place the flying geese units.  


As I was working on my Twilight Zone block, I decided to write a tutorial on how to make Geese of the Feather.

What is the Geese of a Feather technique

Have you ever wanted four flying geese with all one color on one side and all the other colors on the other side? Well, Deb Tucker has come up with an exciting way to make these flying geese, and it's easy to do. 

Making these units won't be a problem if you know Studio 180 Design's Non-Waste method. Starting with one large square and two small squares of one color and two small squares of color two. The Geese of the Feather Technique Sheet will give you the cut size for these units. Due to the small square sizes being slightly larger than the ones specified in the Wing Clipper® instructions. With them being a bit larger you don't have to worry about them nudging toward the center. 


As soon as you have your squares cut and ready, mark quarter-inch lines on each side of the center diagonal on each small square. Next, you'll cut down the middle of the center diagonal of the lines to make four triangles.


Place your large square right side up on your cutting mat or table. After that, you just need to pick what color you want on the left side of your flying geese. You'll label the left side Color 1 and the right side Color 2. 

Once you decide on your Color 1 and Color 2, we'll put them on the large square. You should start by placing a Color 1 triangle on the top right side with the long edge of the triangle. Next, add Color 2 on the opposite side to make it look like a square. Repeat the process on the bottom half of the square, but this time reverse your colors. Color 2 goes on the right, and Color 1 goes on the left. Once the triangles are lined up, pin them.

Stitch on the lines, cut down the middle, and press toward the small triangles.


Position your unit on the cutting mat or table again. Arrange the rest of the triangles. Pay attention to the colors on the left and right sides. If Color 1 is on your left, put Color 2 on your left. After that, put Color 1 on the left. Repeating the process for the other unit. 
Pin in place.


Then stitch on the lines and cut in the middle. Press towards the small triangles.


You have four flying goose units with all colors on one side. 


Trim the units with a Wing Clipper® tool, according to the instructions. Set up the unit so the point is facing you if you're right-handed, and to your right if you're left-handed. Make sure you line up the diagonal lines on the triangle seams. You should have plenty of space all around. Then trim the first two sides.


Turn the unit 180 degrees and align the previously trimmed edges of the cleaning guidelines and the "X" with the intersection of the seams. Trim the last two sides. You'll have 4 flying geese. You'll need 6 units to make this block.


You'll also need six Square Squared® units to complete this block. I had a lot of fun playing with the colors and how they should be positioned. Try it out and see what you can do with it.  

Also if you wish to learn more about Studio 180 Design, please check out my online classes, called the Precision Block Academy. The next set of classes will start on February 1st. If you sign up for the Waitlist you get priority registration.  

Friday, November 5, 2021

The Studio 180 Design Technique Sheets!


One thing I like about Studio 180 Design is how they expand the ways you can use your tools. Not only through their beautiful pattern but in their Technique Sheets.

Many of you are wondering what a Technique Sheet is? They are single laminated hole punch sheets. Each technique will expand your use of the tools and broaden your skills for more design creativity. Each of the Technique Sheets will provide you with detailed instructions, cutting charts, and drawings.

There are 31 Technical sheets for all Studio 180 Design tools, except for the Rapid Fire Hunter’s Star and the Diamond Rects.

Technique Sheet Header

Let's walk through how to read a Technique Sheet. Start at the top of the sheet, and you will see the name of the Technique Sheet. On the right-hand side of the name, you will see stars in a green ribbon. These stars indicate how difficult the technique will be. The stars range is 1 to 5; the more stars, the more complex the technique is. Next, you will see a purple ribbon. This section includes the name and image of the tool is related to that technique.

Instructions

Under the title section, you learn how to make that particular technique. Each sheet starts with a brief description of the Technique. Next, you find that there are two sections; Cutting and Process. The cutting section is where you find cutting charts and how to prepare your fabric pieces. The process section is where you will learn how to assemble and trim the units.

The trimming includes images showing you how to align your tool on your units. Note, these images are right-handed only due to space on the sheets.

Downloadable Left-Hand Technique Sheets Diagrams

Additional trimming diagrams for Left-Handers are available. They can be found on the Studio 180 Design Download page on their website.

If you are looking for a way to expand your use of the Studio 180 Design tools. Then check out the Studio 180 Design Technique Sheets. They are a way to learn and broaden your quilting skills.

If you need additional assistance with the Studio 180 Design tools and technique sheets. Then check out the Studio 180 Design YouTube Channel. In addition, you can ask a Certified Instructor in your local area. Finally, check out the Precision Block Academy. This academy is designed to teach you the Studio 180 Design tools and Technique Sheets each month.