Sunday, April 30, 2017

Adventurous Applique

I just finished my Island Batik project for April just in time.  This month's theme was "Adventurous Applique".  I started this project earlier this month and I finished quilting and binding this project this week.

In February, I picked up a new ruler set, with project book, for the Bloomin' Cogwheel Rulers. So I wanted to try something different this month to make a couple plates with the new rulers.  I had no real plan, just started looking at some of the plate designs in the book.  I knew I wanted to make something that was small, maybe something for a table.  After, deciding on a idea from the book, I needed to pick the fabric, which is very hard at times for me.  


Once my fabric was picked out I made a couple strip sets out of my Island Batik Stash builder rolls.
  

Using the grooves in the cogwheel rulers, I began cutting all my blades.  


Then I began to make the points on the alternating blades, and rounded the ends of the other blades. 


Once the points were made I started sewing all the blades together to make partial plates.  Which is a little different.  Each plate was made different, then placed on a piece of background fabric for the applique part.  


Using Superior Threads, Fantastico multi-color thread, I machine appliqued the plates and extra blades to the fabric.


The finished project looks like this, just little sample of what I can make from the Bloomin' Cogwheel Rulers.  I'm looking forward to getting away from applique, and getting back to piecing next month for May's Challenge.

Make sure you check out the other Island Batik Ambassadors fantastic projects for this month.

Turid from Den Syende Himmel
Stephanie from Quilt’n Party
Pamela from Pamela Quilts
Jessica from Desert Bloom Quilting
Kate from Seams Like a Dream
Jennifer from The Inquiring Quilter
Barb from Bejeweled Quilts
Jeanette from Inch Worm Fabrics
Connie from Kauffman Designs
Bernadine from Needle and Foot
Bea from Beaquilter
Cheryl from Cheryl Lynch Quilts
Maryellen from Mary Mack’s Blog
Joyce from Hearts Creations
Marlene from Kissed Quilts
Karen from The Quilt Rambler
Marian from Seam to be Sew
Laura from Slice of Pi Quilts
Linda from Inspired Layers
Carol from FunThreads Designs
Alison from Little Bunny Quilts
Jean-Sophie from Sophie Junction
Janet from Whispers of Yore 


Also, make sure you check out my first appearance in the QuiltMaker's 100 Blocks Vol 15, magazine due in the stores tomorrow May 1st. I have a cute little bear for you.  I will be blogging and giving away of one copy to one lucky person starting tomorrow.

Tina

#adventurousapplique #islandbatik

Friday, April 14, 2017

Furry Friday!

Furry Friday is here and it is brought to you to by Benartex Fabrics.  Each week, the Island Batik Ambassadors have been posting blogs about animals in need of Fur-ever homes.  We are getting some wonder help from industry sponsors from the Pieces for Sheltered Pets Initiative.


This weeks spotlights 2 seniors that need great homes.

Meet Chester 

Male domestic short hair
Black and White
 9 years old


Chester is a natural leader, he strongly desires a great home and is very affectionate.  This cute cat loves to lay in your lap, help with the laundry and so much more.   He is located at the Animal Refuge Center, Vine Grove, KY.  

Meet Ceasar

Male Boxer & Mixed Bread Mix
10 year old


This spunky 10 year old that weights about 50 lbs, doesn't let his age stop him.  He gets along with most other dogs and enjoys playing with toys.  He is smart and trained too, sit, down, shake and high 5 and wants to learn more.  He loves long strolls on a leash.  He is located at the Humane Society of Summit County, Twinsburg, OH.


Please help Chester and Ceasar find good homes they deserve a second chance of life.   

Kennel Quilts

If you can't provide a home for these guys, consider making Kennel Quilts for animals in need.  The TQPM Small Kennel Quilt Team is always looking for people to sew small kennel quilts to help animals when disaster strikes.  You can even just help by donating to your local animal shelter.  It is a great way to use that huge fabric piles.  

Make Kennel Quilts for our friends in need! Please

More Blogs Today

Be sure to check out other Island Batik Ambassadors blogs about Furry Fridays.


Monday, April 10, 2017

Simple and Precise Half Rectangle Triangle with Bloc_Loc Rulers!

I love working with Bloc_Loc® Rulers!  I have been using them for about 5 years now.  I first fell in love with the half square triangles and the flying geese rulers.  They have helped my piecing so much.  Last year, I began designing patterns using the rulers.  I have two more patterns getting ready to be released next month at Spring Market.  These patterns will feature the half-square triangles, flying geese and the half rectangle triangles Bloc_Loc® rulers.  

So with the preparation for their release, I decided to put this little tutorial together to show you how easy the rulers are to use by making half rectangle triangles (HRT).  

HRT A and B Rulers!
When you buy the half rectangle triangle (HRT) rulers you receive two ruler’s A (left) and B (right).


Get to know your ruler!


You will notice that all the Bloc Loc® Rulers have grooves on the backside of the rulers, these grooves lock on to your seams allowances. These grooves help keep your ruler from moving around and makes trim precise.  


Logo and Letter on opposite side of seam allowance.

With all Bloc Loc® Rulers, you can press your seams in either direction, but they will not work with open seams. When the ruler is placed on the seam allowance and locked into position the logo is always on the opposite from the seam. 

Once the Ruler is placed and locked on the seam allowance all you have to do is slide the ruler to you desired measurement.  No need to pick it up, just slide it along the seam allowance.


Prepare your rectangles


Start preparing by cutting all your rectangles to size.  For this tutorial, I cut all my rectangles to 3” x 6” to be trimmed to 2 1/2” x 4 1/2” units.  You will have oversized rectangles, this will be trimmed later.
       
Layer with right sides up!

 Layer each of the cut rectangles with right sides facing up.

Ruler A units

Cut diagonally bottom right to upper left corner!

One rectangle yields 2 triangle sets

For the A (Left) Ruler units the layered pair and cut diagonally from bottom right to the upper left corner.  Each pair of rectangles yields 2 triangles sets.


Re-arrange the triangle sets so they are laid-out how they will look when finished.

Offset by an 1/4"
Flip each of the orange triangle onto a purple triangle so that right sides are together and making sure orange is offset by a 1/4”.  Repeat for the other set.


Stitch a ¼” seam for each set for each set.


Press seams to one side or the other according to your pattern.

Trim using Ruler A
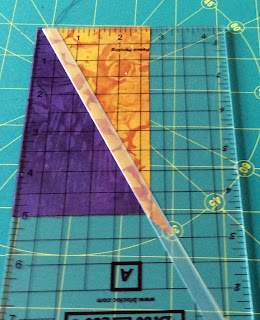
Trim by placing Bloc_Loc® Ruler A on top of the HRT units so that the units seams locks onto the grooves.  Once you have the ruler locked into the seams you can then slide the ruler along the seam allowance to get your desired measurement. 

Trimmed A units

Ruler B units

Ruler B is done the same way, with just a few things changed.

Cut diagonally from bottom left to upper right corner
Yield 2 triangle Sets
Cut the layer right sides up rectangles, diagonally from bottom left to upper right corner.  Yielding 2 triangle sets.


Re-Arrange the triangles sets so they layout how they look finished.

Offset by a 1/4"!
Flip each of the orange triangle onto a purple triangle so that right sides are together and making sure orange is offset by a ¼”.  Repeat for the other set.

Stitch 1/4" seam and press!
Stitch a ¼” seam for each set. Press seam to one side or the other.
Trim using Ruler B

Trim HRT units using the Bloc_Loc® Ruler B, and trim to the specified size.  
Repeat for the other units.


You now have made easy half rectangle rectangles that are precise.


The Bloc_Loc® Half Rectangle Rulers come in assorted sizes:

2:1 Mini (2.5 x 4.5) Industry Standard
2:1 Large (4.5 x 8.5) Industry Standard
3:1 Mini (2.5 x 5) * Specialty Ruler*
3:1 Large (3.5 x 9.5) *Specialty Ruler*
4:1 (3.5 x 12.5) *Specialty Ruler*

If you would like to download the directions and cutting chart, click HERE!

Also If you prefer to watch a video on how to make these units, click below


Check out the Bloc_Loc® website for all their cool rulers.  All the rulers have great videos for you to learn how to use them.  

To purchased the Bloc_Loc rulers go to their website or check your local quilt store.

Make sure you Sign Up for Quilting Affection Designs' for our blog and newsletter so you don't miss out on the release of our new patterns using these great rulers!!


Tina