Pages

Friday, November 30, 2012

California Planning

My husband and I are in beautiful sunny California until Saturday, but we have not seen the sun, only wind and rain. We are visiting family and doing a little quilting business at the same time. We have been here to visit in about 15 years and this week will be to short.


Sketch books full of quilting designs 
 On the business side, we have been talking and planning about developing quilting patterns individually and into books. My husband's step-mother Diane my new business partner is a wonderful quilter and artist.  She has a lot of sketchbooks, full of possible pattern designs.  I wish I could show everyone these ideas, but they are going to be quilt patterns in the near future. So everyone can see them as a finished product.

When we arrived the other day, I was able to see Diane's sewing room and stash, which takes up one entire room and part of the garage. I was in heaven.  She has two nice sewing machines, one is a Janome, the other which is her main machine is a Viking. both are great machines. We have been talking quilting and family nonstop including sharing ideas for the designs. She has also shown me some beautiful quilts she has made over the years. 

Over all this has been a great trip. I have been able to catch up with family and gain a design partner all at the same time.

Tina

Thursday, November 29, 2012

New Design Wall

 This past Saturday my husband and I went to Lowes and  picked up some supplies to make me a design wall for my sewing studio.  We picked up some screws, screw washers and 1/2" 4x8 insulation board.  

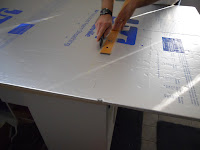
First we measured out how large we wanted to make the wall, and decided on 6ft x 8ft. So we cut down the two boards to 6ft lengths.
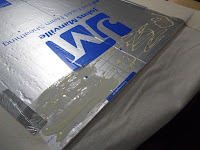
 Next we unrolled some cotton batting on my cutting table and trimmed it to down to size the size of each board plus 6 inches all the way around to allow it to be glue and tape to the the back of the board.  With the batting underneath the board, add glue to one of the sides of the board and pull the batting on top of the glue, and add a few pieces of duct tape on that side that was glued.  Continue on the opposite side, making sure that pull the batting tight before attaching it to the glue.
Then finish with the other tow sides. Remembering to pull the batting tight as you work your way around.  When you get done gluing all the ends down, tape all the sides down to reinforce the glue.

Now complete the other board in the same manner.  Once completed, hang them on the wall.  Since the boards were so lite we were not worried about hitting the studs on the walls.  We attached the boards with brass color wood screws and screw washers.  The washers make it so the screws would not pull through board. 
 This is great, no pins are needed to hold the fabric on the boards.  Now I have a place to put all my Block of the Month and other projects.   

           Tina
  

Tuesday, November 27, 2012

My Studio

The cutting table I was using is on the right!
In the last couple of weeks, my husband and I decided to move me into a bigger room in our house so I would have more additional space to work and store my sewing stuff.  So now have a complete room to myself for working on my quilts, just wish the room was a little bigger and then I could have my APQS Millennium (which arrives next week) in the room with me.  

Months before the move, we looked for ideas on the internet on how to build a bigger cutting table, that  I could layout a large quilt to piece or baste on. Plus I wanted more storage areas.   During our search we ran across a IKEA hackers website, where they put some smaller Expedit shelving units together to create a cutting table.  

So a couple of weeks ago we went to IKEA with my best friend and spent the afternoon looking around, and ended up picking two- 31x15x 58 and two - 31x15x31 Expedit shelving units,  Then we looked at table tops found several we liked, but by the time we down to the warehouse we found a lot of them were hallow inside.  So we found the Galant Table top and picked up two of them.  With in a hour and half after getting home from the IKEA we had the shelves built and laid out to the way we wanted with the tabletops on them.  Next we went to Lowes for some L brackets, screws, plywood and wheels.  My husband then cut the plywood to size of the layout we wanted and joined them together with bracelets on the underneath to secure the plywood together.  Then he added the wheels the wheels to it. We then flipped the plywood over and starting adding the shelving units to the plywood using the L brackets to lock everything in place.  Then we added the two table tops and securing them with the L brackets.The final layout has the two longer units on the opposite sides and the two smaller in the middle and measures right at 5 foot square.


Wow this table is great so much room to work and lots of storage space all around this thing.  I have more organizing to do over the next couple months, but I'm finally getting my own sewing studio and I love it.


Tina


Monday, November 26, 2012

Easy Street Mystery Part 1

One of my favorite quilting blog sites to visit is Quiltville Quip & Snips by Bonnie K. Hunter.  Bonnie is a Scrap Quilt Designer and teacher.  On some weekends and weekdays she turns on her QuiltCam and I watcher sew along with hundreds of people of other people, sometimes she will have 500-600 at a time watching her sew on projects on her on her antique machines.  Viewers also can comment on what they are sewing or ideas they have during QuiltCam.  Its like having someone in the room sewing with you.  I would love it someday to take a class or retreat with her, she is a very popular teacher and I can tell why by reading her blogs and watching her on QuiltCam.

Bonnie announced about a month ago Easy Street Mystery Quilt, so I decide to try it out (I have never worked on a mystery quilt before) She told us the colors to use, grey, white on black, Limey Apple greens, Cool Aqua and Turquoise, Assorted Purples, and the rulers you would need for this project, but we were welcome to change the colors as long as they were contrasting.  I decided I would stay with what colors she choose, not having a lot of the colors in my stash, I went down to JoAnne Fabrics and picked up what I needed.


Last Friday, she revealed the first clue of the mystery.  You needed to cut 2" strips from the grey and white on black fabric. Sew the white on black and grey strips together into one long strip then cut int 2" strip.  You need to have 384 of these subsets.

Last night, I finished with sewing all the  384  2" twosomes, so I put them in a bin for today.  

This morning, I began working on sewing them together into 192 4-Patches. After they were all sewn I ironed them open, then work on spinning the seams so they will lay flat.
Spinning the seams looks complicated but it is really  simple to do.  All you have to do is give a twist to the loosen the stitches, this allows you to move the seams so they lay down in the the opposite way. So it looks like you have a pinwheel in the middle. Once you lay them down, just press them open with your iron.

Well I just finished with the 192 4-Patches, so I can go get me rest of my house cleaning done for the day. Next week, I will have another part of the Mystery to report.

 Tina

Sunday, November 25, 2012

Welcome to Quilting Affections


Let me introduce myself, I am Tina Dillard originally from Post Falls, Idaho and currently living in Waldorf, Maryland.  We were transplanted here as an Air Force Family.  Previously the Air force  had us living our lives in Great Falls, Montana and Sembach AB, Germany before dropping us off here, in the Washington DC area. My husband is now retired from the Air Force and enjoying the civilian life.  I also have a two fantastic sons, Patrick who is in his early 20's, and lives with us due to health problems.  My youngest  son, Colton picked up where my husband left off and is now serving in the Air Force.  So Proud of being an Air Force Mom.  

My first quilt, Sampler
Quilting has become my escape and my creative outlet.  I have been quilting off and on again for the last 20 years.   My love of quilting runs in the family through my mom and my great-grandmother.  I grew-up  watching my mom piecing and quilt every afternoon when I got home from school.  However, myself i did not start quilting until after i was married. I took my first quilting class at a Northwest fabrics in Great Falls, Montana, " A Sampler Quilt".   For the first 19 years or so I quilted by hand, then  I finally switched to machine quilting over the last year.  I do love the hand quilting but it is a slow endeavor that eats up a lot of time. So i started machine quilting, which I really love the results  and especially how fast it goes.

My goal for this blog is give you my life's adventures in quilting.  I will show  my work, my life, and my love (affection) with quilting.  So I hope you will follow along with this adventure, maybe learn something new and even post a comment or idea yourself.