Showing posts with label Studio. Show all posts

Sunday, February 10, 2013

Busy Couple Days!

The last couple day, have been pretty busy.  Lets see where should we start.  Friday was my extra day off, but I found out that my husband was off also due to all the overtime he had been working that week, which was great.  So Friday, my oldest son, my husband and myself  went to lunch together.  Then my husband and I went to the county courthouses to get the last bit of paperwork we needed done for the getting Quilting Affections set up as a business. Just waiting on the application to be approved and we are done, Yeah!!!  Then we  went and did some errands at Target. After that we headed out to Michelle's Quilt Shop, to pick out fabric for a new pattern we are designing, more on that coming soon. When we finished at Michelle's we came home and I did some free motion practice on the longarm. The rest of the evening I sat watching t.v with my feet up working on finishing binding the Jelly Roll Quilt. I almost finished it that night just had a half a side to do, but my eyes were tired, so I went to bed.

On Saturday morning, we were planning to head to IKEA, but the wind was really strong. So we decided to stay home and get a few thing done around the house, and so glad we did.  I finished the Jelly Roll Race Quilt, another quilt done and off my list to finish.  Next, I started washing and ironing fabric that we got at Michelle's on Friday.  Then I started to clean my studio, but during the cleaning I ended up rearranging things in the room. In the mist of rearranging we moved the Embroidery Machine into that room so my husband and I can work together in the same room.  While working on that I finished washing some other material that need to made into quilts. So after I was done with all the rearranging I had lots of ironing to do, but I got it done.  I still have a few thing to put away from the rearranging but I like the new set up; much easier to get to things.  I ended the night by putting the binding on the Memory Quilt for my son, and I was starting to do the hand stitching by the time I went to bed. 


Today, I am hoping to get some practicing on the longarm done. I found an old quilt (UFO) yesterday that needed to be quilted and I will practice with it.  I think i will start with some designs on practice material to see If I like it or not before I load the quilt.  I may also work on some the new pattern designs.  Well will have to see what the day brings us. Hope you all have a great Sunday.

Tina

Thursday, November 29, 2012

New Design Wall

 This past Saturday my husband and I went to Lowes and  picked up some supplies to make me a design wall for my sewing studio.  We picked up some screws, screw washers and 1/2" 4x8 insulation board.  

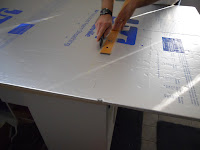
First we measured out how large we wanted to make the wall, and decided on 6ft x 8ft. So we cut down the two boards to 6ft lengths.
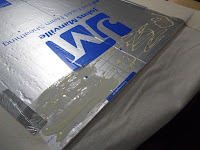
 Next we unrolled some cotton batting on my cutting table and trimmed it to down to size the size of each board plus 6 inches all the way around to allow it to be glue and tape to the the back of the board.  With the batting underneath the board, add glue to one of the sides of the board and pull the batting on top of the glue, and add a few pieces of duct tape on that side that was glued.  Continue on the opposite side, making sure that pull the batting tight before attaching it to the glue.
Then finish with the other tow sides. Remembering to pull the batting tight as you work your way around.  When you get done gluing all the ends down, tape all the sides down to reinforce the glue.

Now complete the other board in the same manner.  Once completed, hang them on the wall.  Since the boards were so lite we were not worried about hitting the studs on the walls.  We attached the boards with brass color wood screws and screw washers.  The washers make it so the screws would not pull through board. 
 This is great, no pins are needed to hold the fabric on the boards.  Now I have a place to put all my Block of the Month and other projects.   

           Tina
  

Tuesday, November 27, 2012

My Studio

The cutting table I was using is on the right!
In the last couple of weeks, my husband and I decided to move me into a bigger room in our house so I would have more additional space to work and store my sewing stuff.  So now have a complete room to myself for working on my quilts, just wish the room was a little bigger and then I could have my APQS Millennium (which arrives next week) in the room with me.  

Months before the move, we looked for ideas on the internet on how to build a bigger cutting table, that  I could layout a large quilt to piece or baste on. Plus I wanted more storage areas.   During our search we ran across a IKEA hackers website, where they put some smaller Expedit shelving units together to create a cutting table.  

So a couple of weeks ago we went to IKEA with my best friend and spent the afternoon looking around, and ended up picking two- 31x15x 58 and two - 31x15x31 Expedit shelving units,  Then we looked at table tops found several we liked, but by the time we down to the warehouse we found a lot of them were hallow inside.  So we found the Galant Table top and picked up two of them.  With in a hour and half after getting home from the IKEA we had the shelves built and laid out to the way we wanted with the tabletops on them.  Next we went to Lowes for some L brackets, screws, plywood and wheels.  My husband then cut the plywood to size of the layout we wanted and joined them together with bracelets on the underneath to secure the plywood together.  Then he added the wheels the wheels to it. We then flipped the plywood over and starting adding the shelving units to the plywood using the L brackets to lock everything in place.  Then we added the two table tops and securing them with the L brackets.The final layout has the two longer units on the opposite sides and the two smaller in the middle and measures right at 5 foot square.


Wow this table is great so much room to work and lots of storage space all around this thing.  I have more organizing to do over the next couple months, but I'm finally getting my own sewing studio and I love it.


Tina