Showing posts with label Quiltville. Show all posts

Monday, January 13, 2014

Celtic Solstice Part 5!

This weekend was a busy weekend here at the house, but we still found time with to finish Part 5 of the Celtic Solstice Mystery Quilt.  Yes, when I say we, that means that my husband helped me again.  He is really enjoying sewing, and wants to learn more.  And I really enjoy the company while sewing.

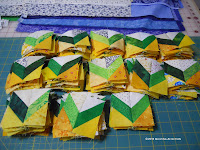
Saturday, we started with the first half of the squares. I cut the white/cream triangles to be sewn on the sides of the half square triangles made in Part 3.  Once I had a lot of the triangles cut, I showed my husband how to sew the first triangles on the triangles and he was off.  When he finished a bunch, I cut it off his chain and began to sew on the other side triangle.  It went that way.  When he finished he started cutting apart  all the ones I finished and ironed them open.  We then had all 244 half way finished.

Then on Sunday afternoon, I cut triangles from 3-1/2"  blue strips.  Once we got them all cut, I showed him how to sew on the triangles to the other half we made the day before.  Making sure that you sew right over the middle point so the points match up.  I gave him some of the stacks of blue and other side and he started in.  This was a little more of a challenge for him, but he took his time and got them done.  I did the rest of them and press them all open to the blue side. All 244 are now finished.


Now the next step will be to make the blocks, hoping to get started next Sunday, due to Friday and Saturday we will be attending a Floriani Embroidery Class in Fairfax, Va.


Hope you all have a great week!  Mine will be full of desk work and pattern designing.


Tina


Wednesday, January 8, 2014

Celtic Solstice Part 4!

Today, was full of business work at the desk top, so very little sewing was done today.  But we did finally get Celtic Solstice Part 4 Finished this morning.  As I stated on Monday's Blog Post for Celtic Solstice Part 3, my husband volunteered to work on Part 4 of the mystery quilt. 

So I started him off with cutting 2" strips of orange and green.  Then I sewed all the orange and green together with right sides together, making 3-1/2" strips. Then press open to the green side.  Then we cut all the strips into 2".  

I then showed him how to match up the seams on the cut 2" strips to make the 4-patches.  He sewed the first one together and press open and the seams match up great and the measures matched to 3-1/2" x 3-1/2".  He did great for the first one.  So he put a few more together then checked them and the same results.  So I left him to work on them as I worked on Part 3.


So, he continued, making all the 300 4-patches.   He even correct mistakes he would make, with  either seams not matching or uneven seams as checked them.  He finished the 4-patches this morning, even had to making a few strips sets on his own.  

It was great to have some one to sew with, especially someone you love.  I look forward to the next part of the mystery, which we will work on together.


Tina


Monday, January 6, 2014

Celtic Solstice Part 3

Since I have been working on quilting my moms beautiful quilt all last week and I still have more to quilt on it this week.  I decided this weekend will be devoted on working in my sewing room on the Celtic Solstice Part 3.  Bonnie Hunter of Quiltville did the reveal of the mystery on New Year's Day.  I was excited to see how the quilt will look.  I have been watching Facebook and seeing lots of people finishing their quilts and they look gorgeous.  So, this week was devoted to seeing how far I would get on Part 3.   

As I started cutting my triangles, my husband asked to help with the cutting.  He did all the cutting of the triangles of last years quilt on Easy Street.   It was great,  to have the help.  So I cut all the strips for him, as he cut the triangles.  I got ahead of him, so I started to cut the strips for Part 4.  He asked me what I was working on so, I should him how to make Part 4, 4-Patches.  So, after I showed how, he made a couple, and just kept going.  So he is working on Part 4 and I worked part 3.  I will blog more on Part 4 later in the week.


After getting him going, I started in on making half-square triangles out of all the triangles he cut.  Making 488 half-square triangles out of yellow/gold and oranges. After sewing all some of the half-square triangles together, I pressed to the yellow and trimmed the dog tails off.  

After they were all together, I then used the half-squared triangles to make 61 pinwheels.  Start with sewing half-squared triangles together, with the yellows opposite each other, right sides together.  This makes the half of the pinwheel, once you make a couple you need to press open to the right, making sure you press the same on all of them.  


Once press, take one the halves make sure they like this with the orange in the middle top, and take the other half you just made and turn it the opposite way so the orange outer is on the left hand corner and then lay them on top of one another with the right sides together.  Press them open, making sure you spin the seams so they will flat.  

The finished pinwheel looks like this, and I needed only 61 of these.


The rest of the half-square triangles, need to be set aside for Part 5 of the Celtic Solstice.  I finished all Part 3,  on Wednesday afternoon plan we plan on finishing Part 4.  

It was great having someone to sew with this weekend. Hope you all stayed warm and dry this weekend.  


Tina


Monday, December 30, 2013

Celtic Solstice Mystery Part 2

Hope everyone had a great Holiday and is ready to start to bring in the New Year.  Over the holiday week I spent most of my time working on Part 2 of the Celtic Solstice Mystery.  Making 244 chevrons.

You start by cutting:


488 2” X 3 1/2” green rectangles
488 2” neutral squares
488 2" yellow/gold squares

Divided the group up.  Sew all the neutral to one corner of the green rectangles, then sew the yellow/gold to the opposite side of the green rectangles. Trim leaving 1/4" seam allowance on neutral and yellow/golds and press one direction.  Then do the same for the other group but you will be reversing the direction you sew on the neutrals and yellow/gold squares. After trimming the seam allowance press the seams to the opposite direction. 

Then with the two different sides sew them together and press the seams open.  They will measure 3 1/2" square. 

Once I complete each part I put them in Ziploc bags to keep them together and clean. 

I think I'm going to catch up on a few block of months and quilting I have put on hold, then I will work on Part 3.


Tina


Friday, December 20, 2013

Celtic Solstice Mystery Part 1

Bonnie Hunter of Quiltville Started her yearly mystery quilt the day after Thanksgiving.  I was planning to start when we got home from Minnesota trip, but I have a customer waiting for 2 Kings Size T-shirt Quilts by December 16th.  So, now that the quilts are done and mailed.  I was able to get started on trying to catch up on the parts.  They started part 4 today, and I just finished part 1.  This year, the quilt is called Celtic Solstice and the colors are very Irish indeed.  We are using blues, greens, oranges, yellow and neutrals as the colors.  Also she gave you to different size choices, a large which is a (king) and small (full/double),  my choice was the King size.  Not sure that was a good choice!
 
Part 1 was made up of making 380 Triangle
units for the large quilt.  140 of the units are blue and orange and 240 are blue and neutrals.  
 
After you cut all the pieces out using the Tri- Rectangle rulers.  You start by sewing all the right side wing pieces on all the triangles.  That was lot of chain piecing.  Once all the right were on I then sewed all the left wing pieces on the opposite site of the triangles.  After cutting all the chains apart I then pressed all 380 open.  All measure unfinished at 3 1/2" square.

Now, I'm moving on to Part 2 which is making 244 chevron units.

Hope you all are enjoying preparing for your  Holiday's.

Sunday, January 13, 2013

Easy Street Part 8 Complete

Today, the weather was foggy all day, so it was a great day to get in the sewing room and work on finishing up Easy Street Part 8.  Yesterday, I completed Block A, so today I only had 9 blocks of Block B to complete.

Started the with center like I did with Block A, but these blocks were much easier to put together.


Then I worked on building the all the sides of the blocks and sewing them on.  The right and left sides we similar to the ones in the Block A, but the middle used a flying geese unit with the white on black brick.


The top and bottom used the solid green block on the ends of the three block units that are used on the sides.  Making sure when putting the side block units on that the purple flying geese are on the outside.


So after I added these blocks to the empty spots on the design wall, it was feeling like I was close to finishing.  So, I then started sewing on the longest row on point, and then worked outward from there. The rows sewed up straight in all direction. When finished I feel in love with it.


Now, I need to get the borders, and backing for the quilt, so I can finish this one completely.  Another project ready for the longarm.  I guess I need to start working on that aspect, along with finishing the designing of my next project.

Tina