Showing posts with label Sidekick&highlow units.. Show all posts

Wednesday, April 17, 2019

Garden Enchantment BOM Part 3


Today is the final tutorial on how to make the SideKick & High/Low Units of the Garden Enchantment BOM Block 1. If you missed the first couple of blog posts on how to assemble units in this block, you can catch up by clicking on these links:  Part One and Part Two.


For Block 1 we will be making 16 SideKick & High/Low units. If you are not familiar with this technique or want to get more information on this unit, I suggest you pick up the SideKick & Hight/Low Technique Sheet, which is now available on my website.

SideKick

For this section, we will be removing the left Side of the based Section Square and replacing it with a Side Triangle that is cut with your Studio 180 Design V-Block® Tool. 

Start off by gathering the White square (Base Sections), Purple Strip and Dark Purple Squares (Low Corner).  Read your pattern cutting instructions for the exacts sizes to cut.

Based Section Cutting
Right Handed


Left Handed
2.  Position the White based section square fabric FACE UP for cutting. 

3. Then you are going to place the Dotted line of you V Block® on the edge of the base section square and the bottom of the finished unit size guideline along the raw edge of the square.  Cut along the slanted edge of the tool.  

Repeat the steps above for all your remaining based sections.

Side Triangle Cutting

Please remember when cutting your Side Triangles this is the same process as when you make V-Block Units.


Right Handed

Left Handed
4.  Place your Purple Strip FACE UP for cutting. This will ensure we are getting the correct side triangle for the replacement.  

5.  Position the Bold Solid line of you V Block® Trimmer on the edge of the trimmed end of the Purple strip and make sure to line up the bottom of the finished size guideline along the raw edge of the strip.  Cut along the slanted edge of the tool.


Right Handed

Left Handed

6.  Rotate the V Block tool 180° and position the extended diagonal line against the previously trimmed slanted cut.


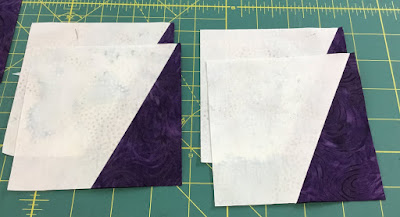
7.  Layout the Side Triangles and base section face up as they will be positioned in the final unit. Position a side triangle and base section with right sides facing together.  Align the edges and Stitch with a 1/4" seam allowance.

Repeat to make 16 Side Triangle Units.

Do Not Trim at this point!  We need to add the Low unit next.


8.  Mark a diagonal line down the wrong side of your Dark Purple Square.  This will be your stitching line.


9. Position the Dark Purple Square in the bottom right-hand corner of your SideKick with right sides together and the line going across the corner. 

10.  Stitch on the line, Trim the seams 1/4" from the stitching lines, and press away from the based unit.

Trim Down


Right Handed

Left Handed
11. Position the V-Block® trimmer tool on the unit.  Making sure to line up the side triangle seam with the guideline on the tool and to Position the intersection of the two seamlines where the guidelines on the tool intersect.  Note the seam on the folded corner will not line up with the guideline of the tool. Align the Finished size measurement with the seam lines.  Trim the first two sizes.    


Right Handed

Left Handed

12. Rotate your SideKick & High/Low unit 180° and line up the V Block® tool again. Aligning the cut size stated in your instructions with the previously trimmed edges and the "X" lines with the sewn seam line intersections.  Trim the last two remaining sides. 

You will make 16 SideKick & High/Low units.

Now we have all your units made for this block, refer to your pattern instructions and complete the assembly of your blocks. Please read the instructions thoroughly.

See you on May 15th for Block 2 release and tutorials.

Thursday, May 31, 2018

Island Batik Ambassadors Playful Pillows and Studio 180 Design Blockbuster #18


The challenge for the Island Batik Ambassadors was Playful Pillows. We asked to make a pillow of any shape and size.  I decided to make this take my next block in my Studio 180 Design BlockBuster Challenge and make it into a pillow.


So BlockBuster #18, "A Popped V" uses the Studio 180 Design Corner Pop and V Block Tools to complete this block.  The block size I chose was the 12" block, and for the Island Batik Fabrics I used were from their basic fabric collection.


To start you need to make the (4) V Blocks trimmed to size using the V Block Tool.


Now that they are made its time to use the Corner Pop tool remove the bottom corners (one at a time) and replace them with triangle piece.


Once you have the corner piece trimmed away, stitch a triangle in the corner, press and trim to size.


Then repeat on the other side for all four V Blocks.


Next, you need to make a (4) Sidekick Right units for the corners of the block.


Finally, now you need to make the center.  You start by taking a large square and removing all the corners with the corners pop tool and replacing them with triangles of another color.  Trimming the corners to size. 


Now all the units are made it is time to sew the block together.


Once I had the block together, I add borders around the block to make the front of the pillow to size need for the pillow form.


Now that front of the pillow was now made I quilted the top and made a pocket backing for the pillow.


My 16" x 16" pillow is now complete.  This was a fun and easy project to make. 

You can check out my completed Blockbuster blocks HERE, that I have made from other Island Batik Fabrics.
You may want to check out the new techniques projects that the other Island Batik Ambassador have made this month. 


Don't forget to sign up for my newsletter and blog here, when you sign up you will get a Free Pattern.

Tina

"Designing to Inspire"


For more Information, click HERE
                       
Join the Ramblin' Star Block of the Month Group! HERE

Friday, April 27, 2018

2018 Master the Rulers: Studio 180 Design Blockbuster #16

Well, today we return to start the Blockbuster series 2, blocks #15-25 that means we will be done with series 2 in ten weeks and I have a feeling they will go fast just like the first series did.

Blockbuster #16, Peaks & Valleys uses the combination of the Studio 180 Design Diamond Rect® tool and the SideKick/High-Low Technique Sheet to make this block.  I again used the same Island Batik Fabrics that were used in Blockbuster #15, just adding coordinating fabric to the mix.


I began with making the four diamond rectangles, by cutting out the centers and the side triangles with my Diamond Rect® tool. Once they were all cut out, I sew them together, just as I did in blockbuster #15.


My diamond rectangles were now complete.  Time to get started on the next step the High-Low Units. 


I have made the High-Low units in blockbuster #10 the twisted pinwheel block. Making the High-Low units are relatively simple, you just need to pay attention to the direction your slant must go. These units use the "V" Block® trimmer.  I need to make a total of four units that slanted to the right.


Finally, I completed the units by making some four sidekick units, followed by cutting some large and small squares for the corners and the center of the block. 


 Now I was ready to layout the units to begin the assembly.


I started with the center block assembly first.  To do this, I need to sew a partial seam using the small center square and one of the sides of the Diamond Rectangles. This is very similar to how we put the Shuriken blockbuster #14 together.


Then I continued to work, sewing the diamond rectangles together. The last step was to stitch the partial seam to the last diamond rectangle.


The center is complete, now I can finish it by stitching all the pieces together and assembling them to the center block.


Blockbuster #16, Peaks and Valleys is finished.  This was another fun, block to make due to it helped me reinforce everything I have learned in the first series of blocks fresh in my mind.  

Tina

"Designing to Inspire"

You can check out my completed Blockbuster blocks HERE.

Have a Great Week! Don't forget to sign up for my newsletter and blog here, when you sign up you will get a Free Pattern.


For more Information, click HERE 
                       
Join the Ramblin' Star Block of the Month Group! HERE


Friday, March 16, 2018

2018 Master the Rulers: Studio 180 Design Blockbuster 10


Today, I am showing you something new for Blockbuster #10 Twisted Pinwheel.  Still using the Studio 180 Design V Block® tool, but in a whole new twist, making Sidekick & High/Low units.  So, I needed refered the Studio 180 Design Sidekick/High-Low Technique Sheet.  

The Sidekick & High/low units can be tricky, so make sure you read all the directions on the technique sheet throughly before starting.  The trickies part of the making the units is the position and orientation of the colors.

To start off, you make the Sidekick units.  Referring to the V-Block tool, to get the size of the strips you will need for the base units and side triangles. Once you have the base unit strip cut out, you will then subcut into squares.  


Then you need to determine where the sidekick is going to be place in your unit, left or right. When you have figured it out you will use the center cutting line on the V-Block Tool to cut out the based units.


Next, you will need to cut out the side pieces using the cut line for side triangle on the V-Block® trimmer.


Once you have all the pieces cut out you start sewing them together and press open. This is the same process as when we make V-Blocks. Trim down four of the Sidekick units using your V-Block trimmer.


Next, we will take the rest of the Sidekick units that were not trimmed, and make High/Low units.  Start by cutting out the squares according to the chart on the Technique Sheet. Draw a diagonal line across the square on the wrong side of the fabric. Then layer the squares on the opposite side of the sidekick piece and stitch.  Trim the excess fabric 1/4" away from the stitch line and press open.


Trim the High/Low units using the V Block® Trimmer.  Remember to refer to the technique sheet before trimming to read how to trim the units correctly.

Now the Sidekick & High/Low Units are made I need to make one 4-Path unit.  So I tried out my new Four Patch Square Up Ruler by Studio 180 Designs.  This is one of the newest rulers they put out and I fell in love with it.


To Start off the four patch unit, refer to the instructions on the ruler to get the width size of the strips you will need to make patch units.  I only need two pieces so I made mine short.  


Then sew the two strips together, and press open to one side.


Trim the strip to the size of the strips you started out with. Stitch the units together and press open.


The units will be oversized, so using the Four Patch Square Up trimmer, line up the ruler on the four patch unit and cut according to size.


You get a clean crisp four patch.  


Now it is time to assemble the units. 


Here is the completed Twisted Pinwheel, Blockbuster #10. 

Next week, I will be making Blockbuster #11 Search Light using the Corner Beam® Trimmer.  I will be making them live at 2:30pm EST on Quilting Affection Designs Facebook page.  I will make a second with with pictures also for this post. So next week will be a fun.

Have a great weekend.  I will have another blog on Monday, for the Quilt Qwazy Blog Hop.  So remember to watch for the Blog on Monday.


Tina
"Designs to Inspire"