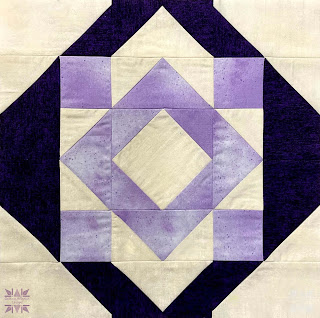
It’s fun to look at different blocks and see different shapes and dimensions. This month's Block Party Block #18, "Pointed Square," does just that; you will find that it looks like it is two blocks, but it really is one block.
Did you know that starting this month you can have these blocks delivered to your email box? All you have to do is to sign up for my newsletter and on the 15th of the month, you will receive an email with the Free Block inside.
You only need the Studio 180 Design Wing Clipper® I and the Square Squared® tools to make this block. The Square Squared® will make the Diamond Square unit that is in the center of the block.
The Wing Clipper® I will make the flying geese using the No Waste Method. The No Waste Method makes flying geese fast and easy, creating 4 geese at one time with just 5 squares pieces. I will be covering these units in next week's blog post. The funny thing is that we are also working on these units in the current Module in the Precision Blocks Academy and in the Studio 180 Design Certified Instructor Block Exploration on Instagram. So you can follow us on Instagram to see the weekly Thursday Sneek Peaks.
In this tutorial, I want to cover how to make the Quickets in this block. The Quickets are part of the Pickets and Quickets Technique Sheet that uses the Wing Clipper® tools to trim these oversized units.
 |
| Pickets |
Pickets are also called Picket Fence units. They use slightly oversized rectangles and stitching a slightly oversized square on one of the ends to make a folded corner and Trimming them down using the Wing Clipper tools. This method only makes one at a time.
Quickets, you will use the piecing method similar to making fast flying geese that will end up with slightly oversized units that will mirror image units simultaneously.
Let me show you how to make these fast and easy units. I recommend purchasing the Pickets and Quickets Technique Sheet for this, so you can follow the directions each time.
The first thing you need to do is determine the finished size of the units you wish to make. Then you will need to refer to your Wing Clipper® Tool instructions to find the size of the squares you need to cut based on the finished size. Once you have determined your square sizes, you will need to cut one small and one large square to make two mirrored Picket Fences units. Then on the reverse side of the small square, you will mark two stitching lined a 1/4" from the center diagonal.
Position the small square on top of the larger square in a corner and nudging toward the center 3-4 thread between the raw edges. Then carefully stitch on the stitching lines you created. Finally, cut down the center diagonal of both fabric squares.
Press toward the small triangle. Now we can trim the units. Please remember these are mirrored image units, so you will be aligning on one diagonal one unit and the other diagonal on the other unit.
Position the Wing Clipper over your unit. Aligning the diagonal ruler guides on the diagonal seams. Make sure that your ruler trim down lines is contained within the raw edges. Trim the first two sides.
Rotate the unit so that the trim downs are facing you. Align the trim down ruler lines on the trimmed raw edges. The X on the ruler should also align with the sewn seam. Trim the final two sides.
Once you have your Quickets, Flying Geese, and Diamond Square units ready, it is time to assemble this unit. Start with assembling the center of the block first. I recommend pressing all your seams open to reduce the bulk on this block.
Now, assemble the top and bottom, and sides pieces. Then finish your block by sewing the side pieces onto the center block first, then adding the top and bottoms to complete your block.