Wednesday, January 15, 2025

Block Party Block #54 - Compass Twist Tutorial Part 1


Block Party Block 54 – Compass Twist uses the Studio 180 Design Corner Pop III and Tucker Trimmer tools. This block utilizes the Corner Pop III tool to add an additional style to the units in this block. You will find the link to the Block Party Block below. 

I am excited to announce that, starting this month, I will add tutorials to the block party blocks. These tutorials can be used as a sew-along. After each block is released, I will provide a multi-part tutorial published weekly to guide you through each unit.

This month's block will be a two-part tutorial. We will cover Units A and B this week, and you will receive Units C and D next Wednesday, January 22, 2025.

To get started, Download your Block Party Block #54: https://bit.ly/BPB54CompassTwist

Remember to choose the block size you wish to create. Next, refer to the cutting charts in the tool instructions to determine the starting sizes for the necessary squares and strips for your block.


For this block, I used six fabrics from Deb Tucker Studio 180 DeDesign'sewest original Collection, Bubble, Curves, and Corner for Island Batik, plus a white background fabric by Island Batik. Feel free to change the colors to make it yours. Depending on which size you choose, you will need Fat Eight or less of the colors to make this block. 

Unit A and B Half Square Triangles


For this first step, gather your half-square triangles. I will use (4) white as my background and (4) light fabric for my Half-Square Triangles.


Using your QuQuilter'sagic Wand, mark the background fabric with two diagonal lines ¼” from the center diagonal.


Place this background fabric on top of the other fabric, right sides together. Stitch on the drawn lines.


Cut down the middle of the stitched lines to make two triangles. Press toward the darker fabric.

Right-Handed


Left-Handed

Place the square on the cutting mat. Place the Tucker Trimmer on the unit using the Cutting Size listed on your block pattern, lining up the sizing line across the sewn seam and the common diagonal down the center. Trim up and across the unit.

Right-Handed

Left-Handed

Rotate your unit 180 degrees, replace the Tucker Trimmer on the unit, realign the sizing line and the clean-up lines on the previously trimmed edges, and trim up and across the final two sides of the unit.


You will repeat this for the four Unit A and B Half-Square Triangles. Set aside the Unit A units.

Cutting Type 1 Replacement Triangles


Consult the Cutting Chart in the instructions for your Corner Pop III tool to determine the strip size needed based on the finished size of the unit you are popping. Gather your fabric strips for the replacement triangles; I will use red and blue fabrics.

Right-Handed

Left-Handed

Lay the strip flat on the cutting mat with the right sides facing up. For right-handed cutters, place the strip horizontally. For left-handed cutters, place the strip Vertically. Clean up the short edge of the strip. Find the bold Replacement Triangle line on your Corner Pop III tool. Place the Replacement Triangle line on the trimmed edge of the strip and position the Cut Away Corner line that corresponds with your width size along the long edge of the strip. See the above images. Trim across the angle of the tool.

Right-Handed

Left-Handed

To make the next cut, you will need to perform a straight cut. Begin by aligning the top edge of the tool with the top of the strip. Position the ½” dashed line on the tool approximately 1/8” from the corner edge. Then, trim across the tool.

Repeat this process for the number of replacement triangles needed for your block. You will need four Type 1 Replacement Triangles. I cut two red and two blue replacement triangles in my block.

Popping Unit B Half Square Triangles

Right-Handed

Left-Handed

Position Unit B Half Square Triangles right side up on the cutting mat. For right-handers, place Unit B with the darker fabric in the top right-hand corner. For left-handers, place the darker fabric in the top left-hand corner. Use the Unit Cut Away Size indicated on the cutting instructions for the block pattern to align the Corner Pop III tool Cut Away Corner tool lines on the unit, as shown above. Position the Trim along the angle to remove the triangle.


Place the Replacement Triangles on the left side of the trimmed unit.


Place the trimmed half-square triangle unit on top of the replacement triangle and sew a ¼” seam allowance. Ensure the half-square triangle unit is on top of the replacement triangle. After stitching, press the seams open. Repeat for all four Unit B units.

Right-Handed

Left-Handed

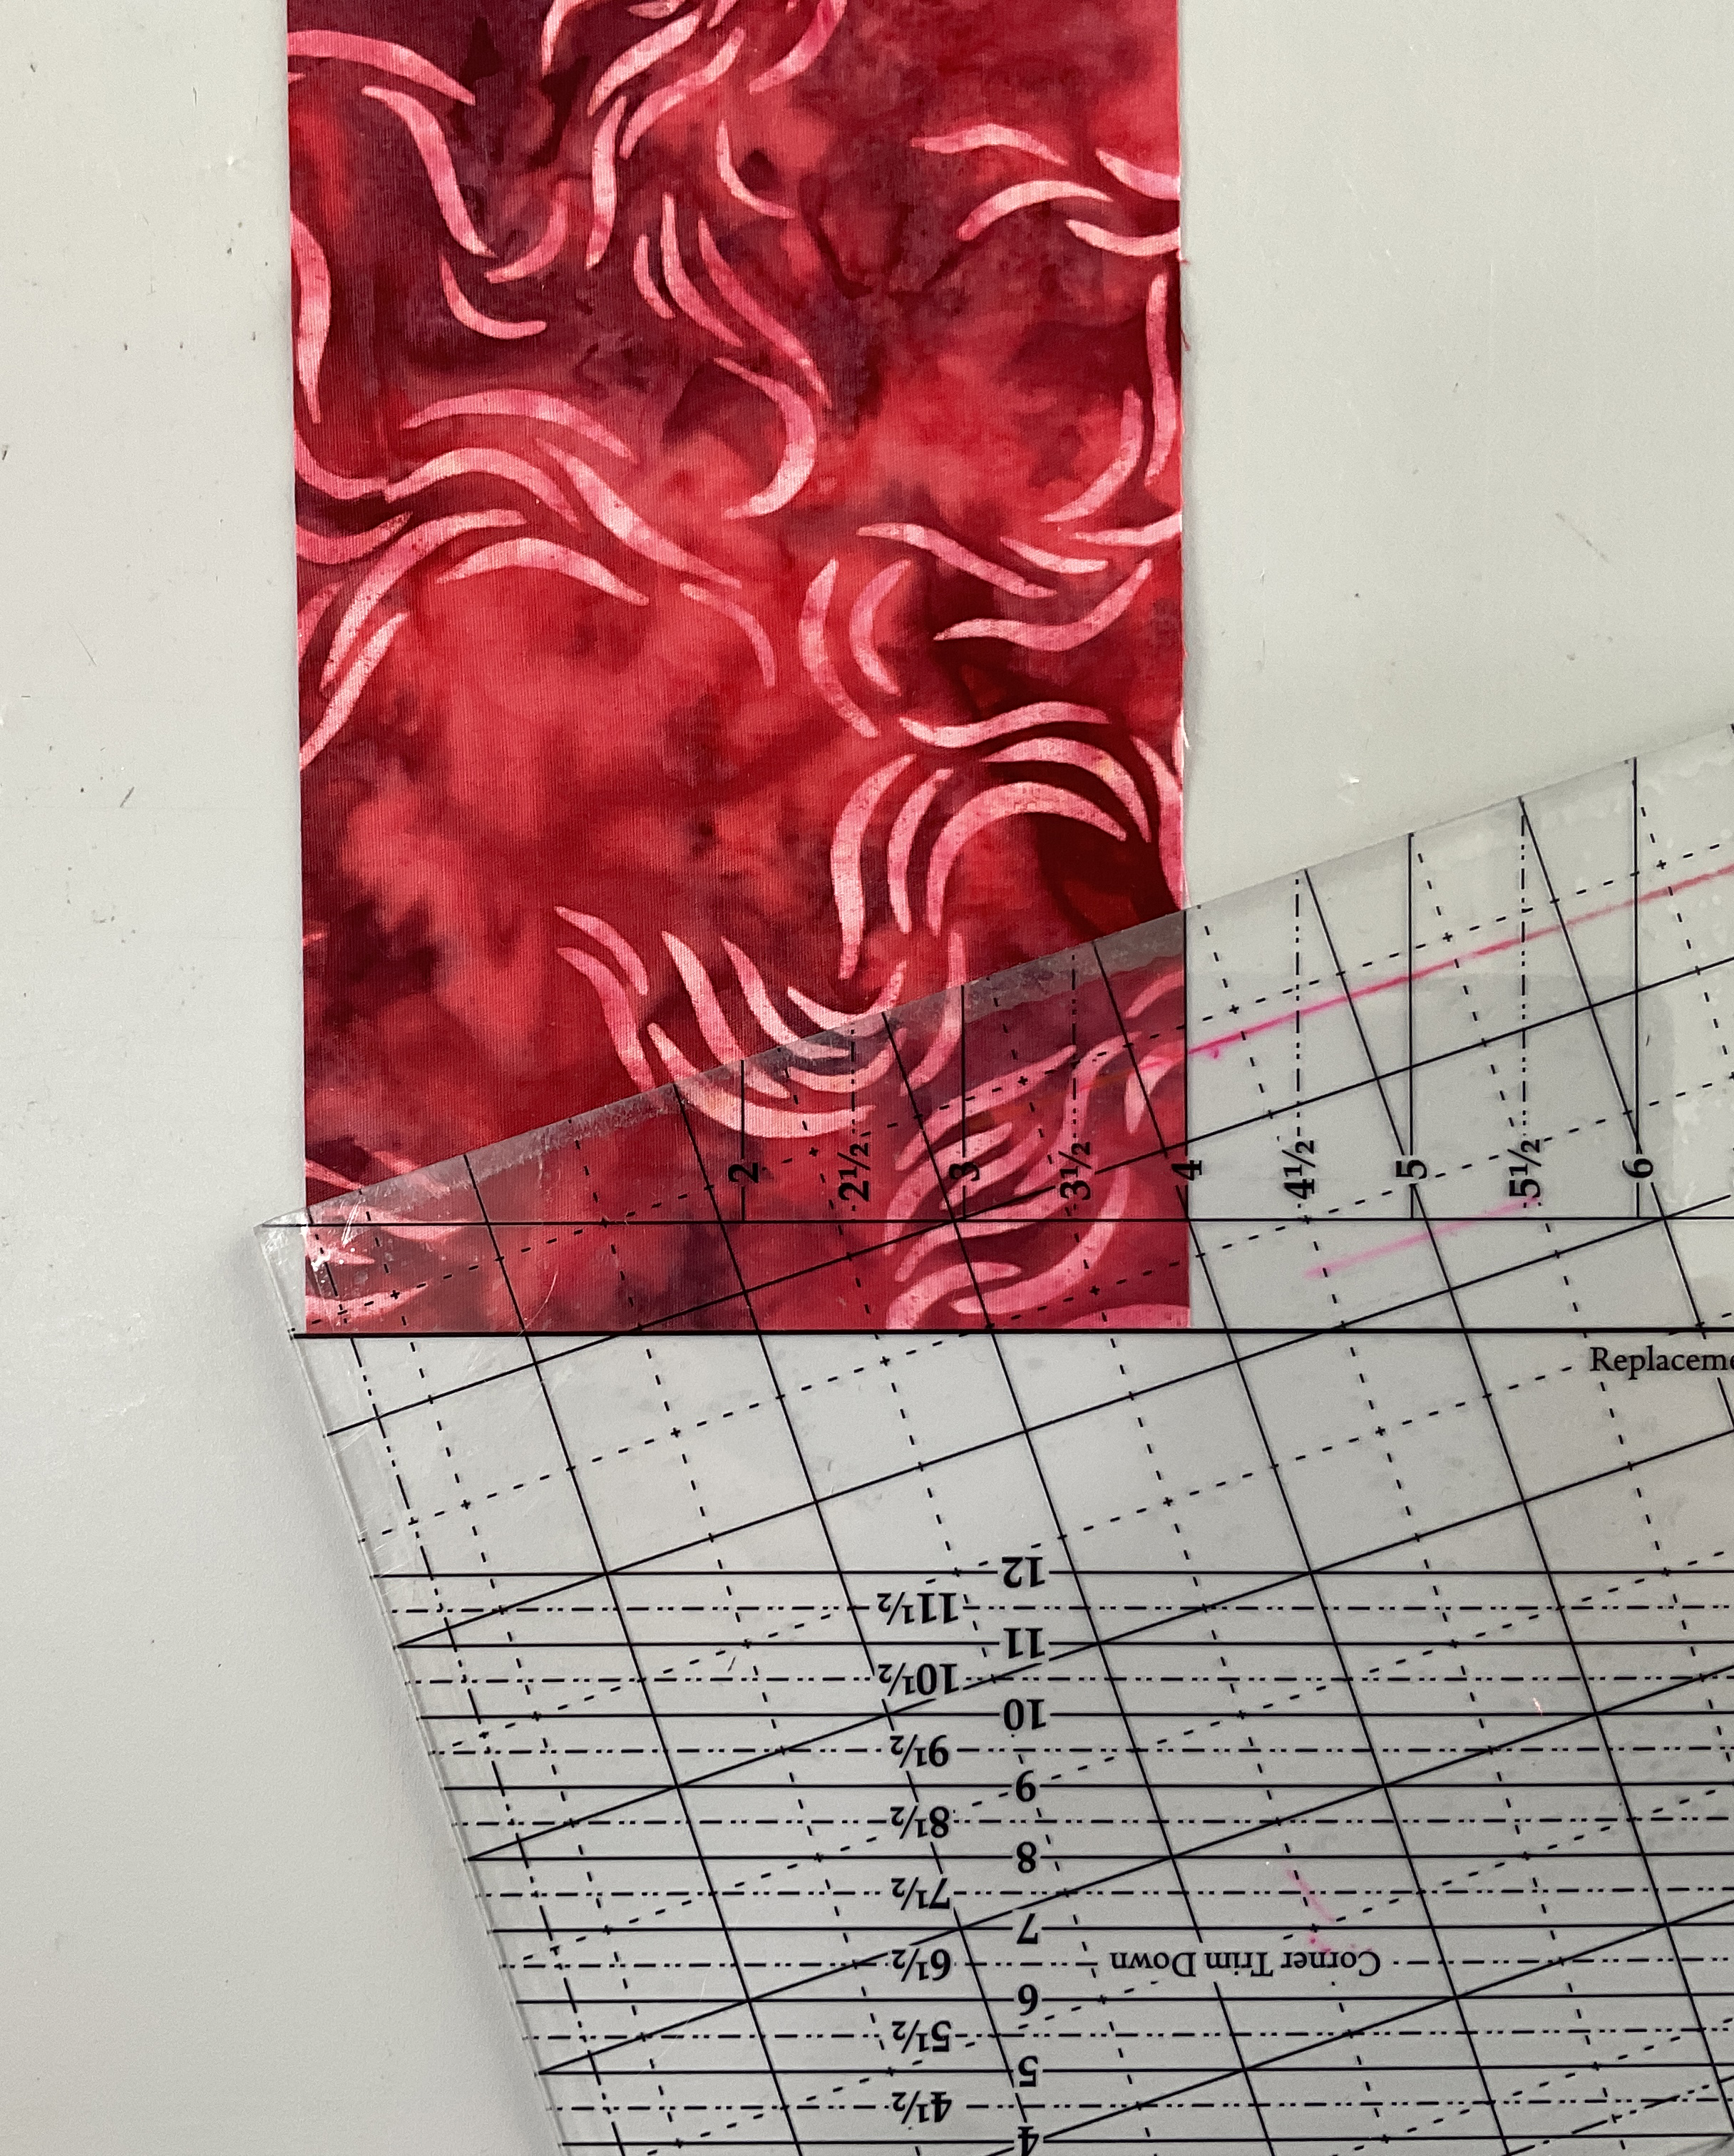
Place the unit's wrong sides up on the cutting mat. For right-handers, place the replacement triangle across the top; for Left-Handers, place the replacement triangles on the left side. Locate the Corner Trim Down section on your Corner Pop III tool. Place the diagonal line that indicates the unit size you are making on the seam line; see the images above. Trim away the access. Repeat for all your units.

Unit A and B

You will now have completed four Units, A and B. The next tutorial for Units C and D will be next Wednesday, January 22, 2025.

Friday, January 10, 2025

Island Batik 2025 Ambassador Unboxing Video Part 1


I’m delighted to finally announce that I was selected for the 2025 Island Batik Ambassador program. I will be one of 25 creative ambassadors in this program. I will return to the program after a considerable time; I was an ambassador from 2016 to 2019. I am thrilled to return to the program and pursue my passion for creating and sharing designs with you. The biggest plus is that I will be working with my favorite batik company, Island Batik. 

As an Island Batik Ambassador, one of the perks is receiving two boxes each year from Island Batik and its program sponsors. These boxes are filled with items that help us complete our monthly challenges and participate in blog hops. The challenges will begin in February, while January will focus on Unboxing Videos and Blog Posts. Below is Part 1 of my first unboxing video, and we can expect another delivery to arrive sometime next week. I will share a new blog post and video about it soon.


As promised in the video, I have included images of the fabrics and products I received in my first box.


This bright and bold collection, Cosmic by Jackie Kunkel of Canton Village Quilt Works, will be the first Fall 2024 collection I work with for the Studio 180 Design Blog Hop in February. I can't wait to get started!


I also received Stash Busters containing five rolls of 4-5” x WOF strips. These are very fun to work with.


The gradient precuts are stunning! Glorious Greens are the 2½” strip pack, and “Ravishing Red” is the 10” stack.


Sunlit Garden perfectly names this Fall 2024 precut collection. I need to start planning what to create with this collection and the coordinates that came with it.


Island Batik also included a couple of fat quarter collections. The first is Misty Morning by Kate Colleran, which features a beautiful array of colors.


Next is Floral Fun by Kathy Engle for Lizard Creek Quilting. I absolutely love this collection! It will be released in May or June 2025 and showcases bright, bold green, teal, purple, and blue colors.

I enjoy working with Island Batik Solids and Neutrals in my quilt designs. I received 3 to 4 yards each of Dark Gray, Black, and White solids.

Additionally, I received 6 yards of the neutral color named Ceramic.


Additionally, I received ½-yard cuts of beautiful Foundations that will coordinate with the Fall and Winter bundles. 

Surprise! I received one more bundle but cannot open it until May's blog hop.

We also receive products from our sponsors, including AccuQuilt, Schmetz Needles, Aurifil Thread, and Oliso.


AccuQuilt sent us the Irish Chain Die and cutting mat for our May blog hop, which could be a fun challenge.


Schmetz Needles gave us three different needle collections for our projects, an ABC Pocket Guide, a luggage tag, and a handy reference card.


One of my favorite thread companies for my sewing machine is Aurifil Thread. They provided me with four different colors that coordinate with my fabric collections.


Oliso sent all the Ambassadors these fantastic M3 Pro Irons. I received the Raspberry color version. I love having these small irons next to my sewing machine! They come with a silicone resting pad and a front light that illuminates your work area while ironing. Plus, they included a travel bag!


We received a fantastic box from Island Batik and our sponsors this year! Thank you to everyone who contributed to making this program possible. Just a reminder: The ambassadors will receive another box soon, so please stay tuned for that.


Below is the list of the 2025 Ambassadors:

Brenda Alburl- https://songbirddesigns.blog

Renee Atkinson- https://wordpress.com/posts/pinktulipquilting.studio

Susan Deshensky- www.ladybluequilts.com/blog

Tina Dillard- https://quiltingaffection.blogspot.com/

Brittany Fisher- www.bobbinwithbrittany.com

Kimberly Flannagan- https://www.kimberlysquilts.com/blog

Preeti Harris- https://sewpreetiquilts.blogspot.com

Mania Hatziioannidi- www.maniaforquilts.com

Kim Jamieson-Hirst- https://www.chatterboxquilts.com/blog

Connie Kauffman- Kauffmandesigns.blogspot.com

Connie Kresin Campbell- https://conniekresin.com/

Emily Leachman- https://thedarlingdogwood.blogspot.com/

Denise Looney- https://quiltery.com

Leah Malasky- www.quilteddelights.com

Susan Michaels-https://dragonflyfiberart.blogspot.com/

Lisa Pickering- https://lisasquiltingpassion.blog/

Sarah Pitcher- www.pitchersboutique.com/blog-1

Gail Sheppard- https://quiltinggail.com/

Carol Stanek- stitchwithcolor.blogspot.com

Solomae Stoycoff- https://cuddlecatquiltworks.com

Jennifer Thomas- https://curlicuecreations.com

Suzy Webster- www.websterquilt.com

Friday, November 15, 2024

Block Party Block 52 – Patched Up


Block Party Block #52 – Patched Up introduces a new technique recently released by Studio 180 Design. This fun and easy technique is perfect for use with the Four Patch Square Up tool. In this tutorial, I will guide you through creating the Time Out units for the Patched Up block. You will need your Four Patch Square Up tool, Wing Clipper tool and instructions, and Offset Four Patch and Time Out Technique Sheets from Studio 180 Design.

Download your free block now: Block Party Block #52 - Patched Up

I use three fabrics from Deb Tucker Studio 180 Design's newest collection Bubbles, Curves and Corners by Island Batiks, plus a white background fabric. This block would look fantastic with just three colors, but you could add a few more if you want to be adventurous.

Time Out Technique

This unit utilizes strip piecing to create a modified four-patch unit. Refer to the Time Out Technique Sheet to determine the appropriate strip sizes for your units. You will need three strips: one for Strip A (your first color) and two for Strips B and C (your second color).

Start by stitching Strips A and B together lengthwise with a ¼” seam allowance. Press the seam toward Strip A. 


After that, sub-cut the units into sections based on your strip size.


Next, gather Strip C and place the sub-cuts right side down on the strip, ensuring that Strip A is at the top so that the needle enters the strip first. Stitch with a ¼” seam allowance.


Roughly cut the units apart to create oversized units and press the seams toward Strip C fabric.


Now, you are ready to trim the units down using your FourPatch Square Up tool. Locate the circle for your finished unit size on the tool and place the circle in the center of the sewn seam intersection, aligning the dashed line radiating from the center circle with the seams. Trim the first two sides. Note: I'm trimming and cutting my left hand. Check out the Technique Sheet to see the right-handed layout.


Rotate the unit 180 degrees on the cutting mat. Realign the Finished Size Circle with the center seam and ensure the dashed lines align with the seams. Ensure the previously trimmed edges align with the Cut Size of Units lines and trim the final two sides.

Your units are now ready for the block or quilt you are making. 

Finishing

For the Patched Up block, you must create Unit B, which consists of eight Flying Geese units, and Unit C, which consists of four Offset Four Patch units, according to the tool and technique instructions.


Once all units are assembled for block assembly, lay them on your cutting mat or design board. Stitch the units together, and it is recommended to press the seams open as you construct the block to help manage bulk in certain areas.


This block is a great way to practice your skills and try this new technique.  If you want to play with another block using the Time Out Technique, check out the Studio 180 Design Free BlockBuster #96 Fireflies

You can check out my other Free Block Party Blocks by checking out my website.

Saturday, October 19, 2024

Day Seven - Bubbles, Curves and Corners Blog Hop

Blockbuster #86 - What's Your Angle

Welcome to the final day of the Bubbles, Curves and Corners Blog Hop. 

I hope you have enjoyed the projects shared by the Studio 180 Design Certified Instructors, who have used the new Deb Tucker Studio 180 DesignBubbles, Curves and Corner Fabric Collection for Island Batik, and Blockbuster Blocks. It's been great to see the different projects that each participant has created. One thing I love about the Studio 180 Design Fabric Collection is the vibrant array of colors in each new collection they release. 

If you missed any of the other blogs, please check the list below to read and see the beautiful projects by Studio 180 Design Certified Instructors in this block hop.

Saturday, October 12 - Studio 180 kick-off

Monday, Oct. 14 - Allison Spence

Tuesday, Oct. 15 Sue Adams

Wednesday, Oct. 16 Tracy Stinger

Thursday, Oct. 17 Diana Mann 

Friday, Oct. 18 Kathy Tucker

Saturday, Oct. 19 Tina Dillard (Today)

Monday, October 21 - Studio 180 wrap-up 

Hello, everyone. I’m Tina Dillard. I am a Certified Instructor, Author, Teacher, and Designer at Quilting Affection Designs. I love designing companion patterns for the Studio 180 Design tools, and I have two helpers who assist me in my studio and office daily. In fact, I had the pleasure of creating a new pattern that includes Bubbles, Curves, and the Corner Fabric Line. Keep reading for more information.

Today, I want to showcase my Bubbles, Curves and Corner project, which was made with Blockbuster #86, What’s Your Angle Block. This block utilizes the Studio 180 Design Corner Pop® III and Tucker Trimmer® tools. If you follow me on social media and my patterns, you know that I enjoy working with the Corner Pop tools, so I couldn't resist making this block. Using these beautiful fabrics for this block was genuinely delightful.

Bench Pillow made from Blockbuster #86

For my project, I chose to make a bench pillow instead of a regular table runner or wall hanging. I selected four different fabrics from a collection that included cool and warm colors. For the background fabric, I selected an Island Batik neutral called "Almond," which perfectly complemented the collection. I designed two blocks with different red and blue stars alternating between them.

My Fabrics

Let me walk you through the four units needed to make this block. Before that, let’s talk about how I used the four colors in this collection. I used warm red and blue colors for the center stars and corner diamonds to make them stand out. For everything else, I used cool teal, lilac, and background fabrics to create a subtle background.

Removing a Corner with Corner Pop® III

This block consists of four units that need to be "popped." When we say "pop," we use the Corner Pop® III tool to remove a portion of the starting unit, which can be either a half-square triangle or just a square, as in this block. Then, you will replace it with a replacement triangle of a different fabric color and trim it down using the tool.

Units A and B

Units A and B are Single-Pop Half-Square Triangles. Unit A consists of Type #1, which replaces the right side of the Half-Square Triangles, and Unit B will be Type #2, which replaces the left side of the Half-Square Triangles. 

Unit C

Unit C, a Double Popped Half-Square Triangle, replaces two opposite sides of a Half-Square Triangle. 

Unit D Final Trim

Unit D, Popped Corner Squares, will pop all four square corners, making the center diamond pop at the end. You will need four units for all the units in this block.

Little Ruler Work with Q16

After assembling my blocks, I arranged them in a row and added a subtle border around the edges. To complete the project, I used my Q16 sit-down machine for quilting and to enhance the units in the blocks. The final step was adding an envelope pillow backing to turn it into a pillow. 

Bed Pillow

The finished pillow measured 36” x 16” and looks beautiful!  So, if you are considering a project other than the typical table runner, why not make a bench pillow or individual pillows instead?

Let me introduce another project you can create using the Bubble, Curves and Corners fabric collection. Every time Studio 180 Design launches a new collection, they release new patterns and update some older ones. They also invite a couple of Certified Instructor pattern designers to create patterns using their latest collection. I am always thrilled to be asked to design patterns for their collections.

Collaboration

Introducing my latest pattern, "Collaboration," which elevates your Wedge Star® tool by integrating fundamental Wedge Star techniques with the Diamond Four Patch Technique Sheet. This pattern incorporates four unique fabrics from the Bubbles, Curves and Corners Collection. With the Studio 180 Design Wedge Star® tool, straight piecing, and no Y-seams, this pattern enables you to create this elegant 67" x 67" quilt.

Pattern Cover

You can purchase this pattern through my website, and the fabrics, which are arriving now, can be found at your local quilt shop.

If you're interested in learning how to make this elegant pattern, I'm teaming up with Amy's Quilt Room to teach it in person at a 2 ½ day Quiltapaloosa Special Event Workshop from June 5th to 8th, 2025, in Uniontown, PA. If interested, click HERE to learn more and register. Only a few spots are available. Amy's Quilt Room also has kits available for preorder. I hope to see you there.

Thank you for allowing me to present different projects you can do with this new and exciting fabric line by Studio 180 Design. Please make sure to check out Monday’s Wrap-Up Blog by Studio 180 Design for the Bubble, Curves and Corners blog hop.

Monday, March 11, 2024

Day One - Squiggles, Dots and Lines Blog Hop


Welcome to Day One of the Squiggle, Dots, and Lines Blog Hop. This week, five Studio 180 Design Certified Instructors will share beautiful and creative projects they have made with Deb Tucker's Studio 180 Design's newest collection, "Squiggles, Dots, and Lines," with Island Batik. The blog hop will include small projects that feature one of Studio 180's design tools and techniques.

Let me start by introducing myself to all the newcomers to my blog. My name is Tina Dillard; I'm a Certified Instructor, author, and designer under Quilting Affection Designs. My two partners in crime in the image above are my sewing buddies, Anna and Lucy. I'm so happy you are here, and I can show you my project. Additionally, I have an announcement later in this blog.


I am very excited to be part of this blog hop again because I love this newest collection, Squiggle, Dots, and Lines. The fabric collection is one of my new favorites because it features bold and bright colors, including various greens, blues, and purples.

Just days before being asked to participate in this blog hop, I was playing with a new design for a table topper that uses the Star 60 Tool and Techniques. When Studio 180 Design asked for volunteers for this Blog Hop, I knew I wanted to make this design to test it out with these fabrics. This was not the first time I had played with the Squiggle, Dots, and Lines fabric collection since I designed a pattern around this collection; more about that later in this blog. 


I used the fabrics I had left from that project: four different values of blues, two greens, and one purple. For the white background, I used an Island Batik neutral called Glaze.

The small hexagon project, which I called Radiant Light Table Topper, features the Star 60 and Capped 60 units, measuring about 23" inches. However, I'm using the Capped 60 units differently in this project. I'm not using them as regular units; I made them as side triangles for the Star 60 units instead of the regular solid piece side triangles. This adds some interest to the block, and depending on how you place your fabric colors, it adds some separation between blocks. I want to highlight the center of the table topper and the six partial hexagon blocks on the outer edges.

As I worked on the fabric placement in the project, I knew I wanted to use dark purple and a variety of blues as the borders. The center diamond flowers were created using two different greens: the lighter color in the center of the project and then the darker green on the outer edges. The white and light blue background added highlights and outer borders for the hexagon project.


I finished the quilt using some straight-line quilting on my sewing machine. Which shows off the shape of the project.

Now that this project is complete, I love how it turned out. I have a good feeling that it will become a pattern later this year. What do you think?

Special Announcement


As I told you earlier in this blog, this was not my first time using the Squiggle, Dots, and Line Fabric Collection. In early 2023, the Studio180 Design team and other designers asked me to create a pattern for this new collection. Today, after lots of hard work behind the scenes, I would like to announce I'm releasing this new pattern called "Midnight Snowflake."

This pattern allows you to enjoy the beauty of "Midnight Snowflakes" as they twist and turn on the ground. It uses the Studio 180Design Wedge Star to make twisted wedge blocks and combines them with other fundamental tools to create secondary blocks. Combine them with this new fabric collection to produce a stunning quilt top.


This pattern is now available as a physical or digital copy on my website, quiltingaffection.com. If you are a shop owner and wish to purchase the pattern for your shop, please check out the wholesale page on my website.

Thank you for stopping by my blog today. Check your local quilt shop for the "Squiggle, Dots, and Lines" fabric collection, which is arriving now. If they don't have it, ask if they can order it. 

Please return tomorrow as the blog hop continues with my fellow CI Jackie O'Brien from If These Threads Could Talk. The schedule of featured Certified Instructor bloggers is below; click on the links below.

Friday, March 8 - Welcome on the Studio 180 Design Blog

Monday, March 11 – Tina (me) of Quilting Affection Designs

Tuesday, March 12 – Jackie O'Brien of If These Threads Could Talk

Wednesday, March 13 – Phyllis Fay of Tucker University 

Thursday, March 14 – Diana Mann of Murgaboo Quilts

Friday, March 15 – Toni Reynolds of Love Pieced Perfection

Saturday, March 16 – Wrap Up on the  Studio 180 Design blog