

As a Studio 180 Design Certified Instructor, I am asked many
questions about the Studio 180 Design tools.
The number one question I’m asked is What Studio 180 Design Tools should
I start with?
My response to this question is you should start with the essential
tools. These tools are the Tucker
Trimmer I, Wing Clipper I, and Square Squared tool. The three tools will get you started with
basic units that you will see in many quilt patterns and start most quilt
projects.
Each tool is multisized with fine lines for accuracy. The tools come with detailed step-by-step instructions
with illustrations that cover both Right and Left-Handed cutting and trimming. Additionally,
there are cutting charts for all the units they make, so you need a specific
finished size. This allows you to refer to the cutting chart to get the size of
squares or strips you will need to make each unit.
Let me introduce you to these tools, starting with the Tucker Trimmer.

The Tucker Trimmer, I feel, is one of the universal tools in the Studio 180 Design toolbox. This tool allows you to make precision Half Square Triangles, Combination Units, and Quarter Square units. There are three different Tucker Trimmers to choose from that will enable you to create various units.

Tucker Trimmer III trims 22
different unit sizes from 1” to 12 1/2”.
Recommend for anything over 6 1/2” in size. I love using this tool for squaring up blocks
and working with the larger Lemoyne Star blocks.
Now, if you have some oddball
sizes, you may want to try the Tucker Trimmer II trims with ten different unit
sizes from 3/4” to 5 3/4”; this is great for those special projects.
Now, not only can you trim your units with the Tucker
Trimmer, you can use the Tucker Trimmer for Sub cutting units as well. Again, the
thin lines and marking on the tools make it easy.

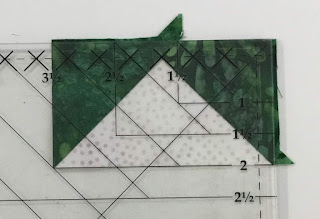
There are two different Wing Clipper tools Wing Clipper I
and II.
Wing Clipper I trims ten units’
sizes from ½” x 1” to 5” x 10” finished size units, and the heights increase in
half-inch increments.
Wing Clipper II is an in-between
tool. Trimming down 9 additional sizes not covered in the Wing Clipper I. Size Options ¾” x 1 ½” finished size units to
4 ¾” x 9 1/2" finished size units.

The final tool I consider an essential tool is the SquareSquared tool. This tool was designed to
simplify the construction process of the Diamond Square unit without using the
paper piecing method. We all know that
the Diamond Square unit can be tricky to be accurate. But using the Square
Squared tool, making each of the units oversized, and then trimming them down,
you will have a perfect unit every time.
The Square Squared tool is an all-in-one tool that allows you to trim
down those center squares to the ideal size, so you don’t have to do all the
complex math.

The Square Squared tool is also available in the two other
sizes.
Square Squared Half Inch is a new
addition to the Square Squared Family. Provides you eight different size units from
1 1/2” to 8 ½” finished units in 1” increments finished diamond square units.
Large Square Squared has 12
different sized units, from 1” to 12” finished units.
These tools will give you proper grain lines on Unit Edges,
with Minimal Waste in the Trash Can.
So, if you are just starting out with the Studio 180 Design
tools, or even a beginning quilter, I recommend starting with one or all of
these three tools first. The TuckerTrimmer, Wing Clipper, and Square Squared tools will get you started on the
right track in your quilting perfection.
If you are looking for more information on these tools,
please check out the Studio 180 Design YouTube Channel for a
Demonstration. I also teach these tools
in my Precision Block Academy, an On-demand Video Course that will teach you
how to use the Studio 180 Design tools.
No comments:
Post a Comment