Pages

Sunday, September 15, 2019

Steam Engine Whistle Stop Tour Blog Stop


Welcome to my stop on the Steam Engine Whistle Stop Tour.  This week, my fellow Studio 180 Design Certified Instructors and I are having the pleasure of showing off the Deb Tucker's  Island Batik "Steam Engine" Fabric collection.

If you have not been to my page before, let me introduce myself, my name is Tina Dillard, the proud owner of Quilting Affections Designs. I specialize in Block of the Month as well as individual patterns that expand the use of your favorite Deb Tucker Studio 180 tools with fresh innovated designs.  I also love teaching Studio 180 Design tools.  Additionally, I am a Sue Pelland Design certified Instructor.  I have some exciting new patterns coming soon that will combine the raw edge applique and piecing together using the tools.  You can view my patterns HERE.


Union Station
That enough about me, let's talk about this Whistle Stop Tour.  I hope you have been following this blog hop and downloading the free pattern on each of the Certified Instructor's blog pages.  If you are just starting out, let's get you caught up with the following list of participating Certified Instructors, and the link stops so you can make your "Union Station" quilt. 


Tina Dillard – Quilting Affection Design - Your Here


Sarah Furrer - Studio 180 Design
- Finishing Instructions

If you are looking for the "Steam Engine" Fabric Collection, you can find it at the following shops owned by Certified Instructors.  But check with your local Quilt Shop to see if they are getting it in as well.
Whistle Stop Tour - Hidden Blooms


Hidden Blooms is BlockBuster #35.  Hidden Blooms is a Technique based block that uses the Sliver (Corner Beam®), and Shaded Four Patch (Tucker Trimmer®) to make this 12" finished block. 

One thing I love about the Studio 180 Design Technique Sheets is that they expand your use of the Corner Beam® and Tucker Trimmer® tools.

Now it's time to Download "Hidden Blooms," gather our fabrics and tools.  Start by cutting out all your pieces and laying them out on paper plates to get organized.


Cutting Tip:  


When sub cutting your strips into squares, I use my Tucker Trimmer® I and II.  Tucker Trimmer® II will give you the 1/4" increments you need for your patterns. 


Ok, its time to have some fun! Ready, Set, Sew!

Sliver Units. 

For this block, we will be making both (4) Left and (4) Right Slivers units.


No matter type Slant you want in your unit "Slant Left" or "Slant Right," we start by making an oversized Half Square Triangles.  Using your Quilter's Magic Wand draw two diagonal lines on the reverse side of the white fabric. 

Next layer one white and one darker fabric right sides facing, stitch on the drawn lines and cut down the middle between the stitched lines.  Did you know that most of the Studio 180 Design tools have 1/4" dashed lines around the edge of the tool?  In the picture above, I used my Corner Beam® tool trimming down this center of the Half Square Triangles.


I recommend pressed away from the fabric I was slivering since we will be slivering the darker value fabrics we will press toward the white.  We will not be trimming our units at this time.


Are you making a Slant Left unit? Then you will want to place your HST unit on your cutting mat facing right Side up. (Left image)

Slant Right unit? Place your HST with the wrong side facing up.

For removing the slanted corner, you will want to place your Corner Beam® lining up the guidelines for the finished size line along the bottom and the Dashed line labeled "Center Beam Trim #1" on the side of the of section and the bottom of the unit on the Half Square Triangle unit. Note there will be a small gap between the edge of the ruler and the sewn seam. Trim along the slant.  Your unit finish size is 3".


The cutting of the Side Triangles is cut from strips in the same manner as we would for cutting for Side Triangles for Corner Beam units.


Trim the units to 3 1/2" cut size using your Corner Beam® tool. You will need to make sure to align one of the “Seam Line Placement” guidelines with the sewn seam between the sliver and added side triangle, ensuring the crosshairs are at the seam intersection, and the  “V” for your finished size units are on the other sewn seam. Trim the first sides of your pieced unit.  


Rotate the unit 180° and trim the remaining side of the unit. Make sure that you align up the 3 1/2″ guidelines and making sure the seam intersection nestles in the 3″ “V” and the corner to corner diagonal seams falls right along with the points of the “V”s.


Make 4 Slanted Left and 4 - Slanted Right Units.


Shaded Four Patch

For this block, we will be making 3 different color units that will measure 3" finished, 3 1/2" unfinished.


Remember to press toward the Wide Strip.  


Sub-cut the pieced strip the width of the narrow strip 2 1/4".  You will need two sub-cut per unit.  Pair the cut pieces assuring the narrow end facing the opposite direction from one another.  Stitch along the long side.  Snip the seam allowance at the center between the two squares all the way to the seam.  Press each half seams way from the square.  

Layer the pressed unit over a large rectangle.  

Using your Tucker Trimmer align the Common Diagonal Line long a side of the unit and draw a 45° sewing line, ensuring this line goes through the corner of the square.  Repeat on the opposite side. 

Stitch on each of the marked lines and cut them apart 1/4" from each of the stitched lines. Press toward the large triangles.


Now you are ready to trim the units, to 3 1/2" size using your Tucker Trimmer® tool.


Time to gather all your pieces, and stitched them together.


Following the Block Layout Instructions on Page 2 of the Hidden Blooms pattern.  Making sure your press according to the directions to nest the seam together.


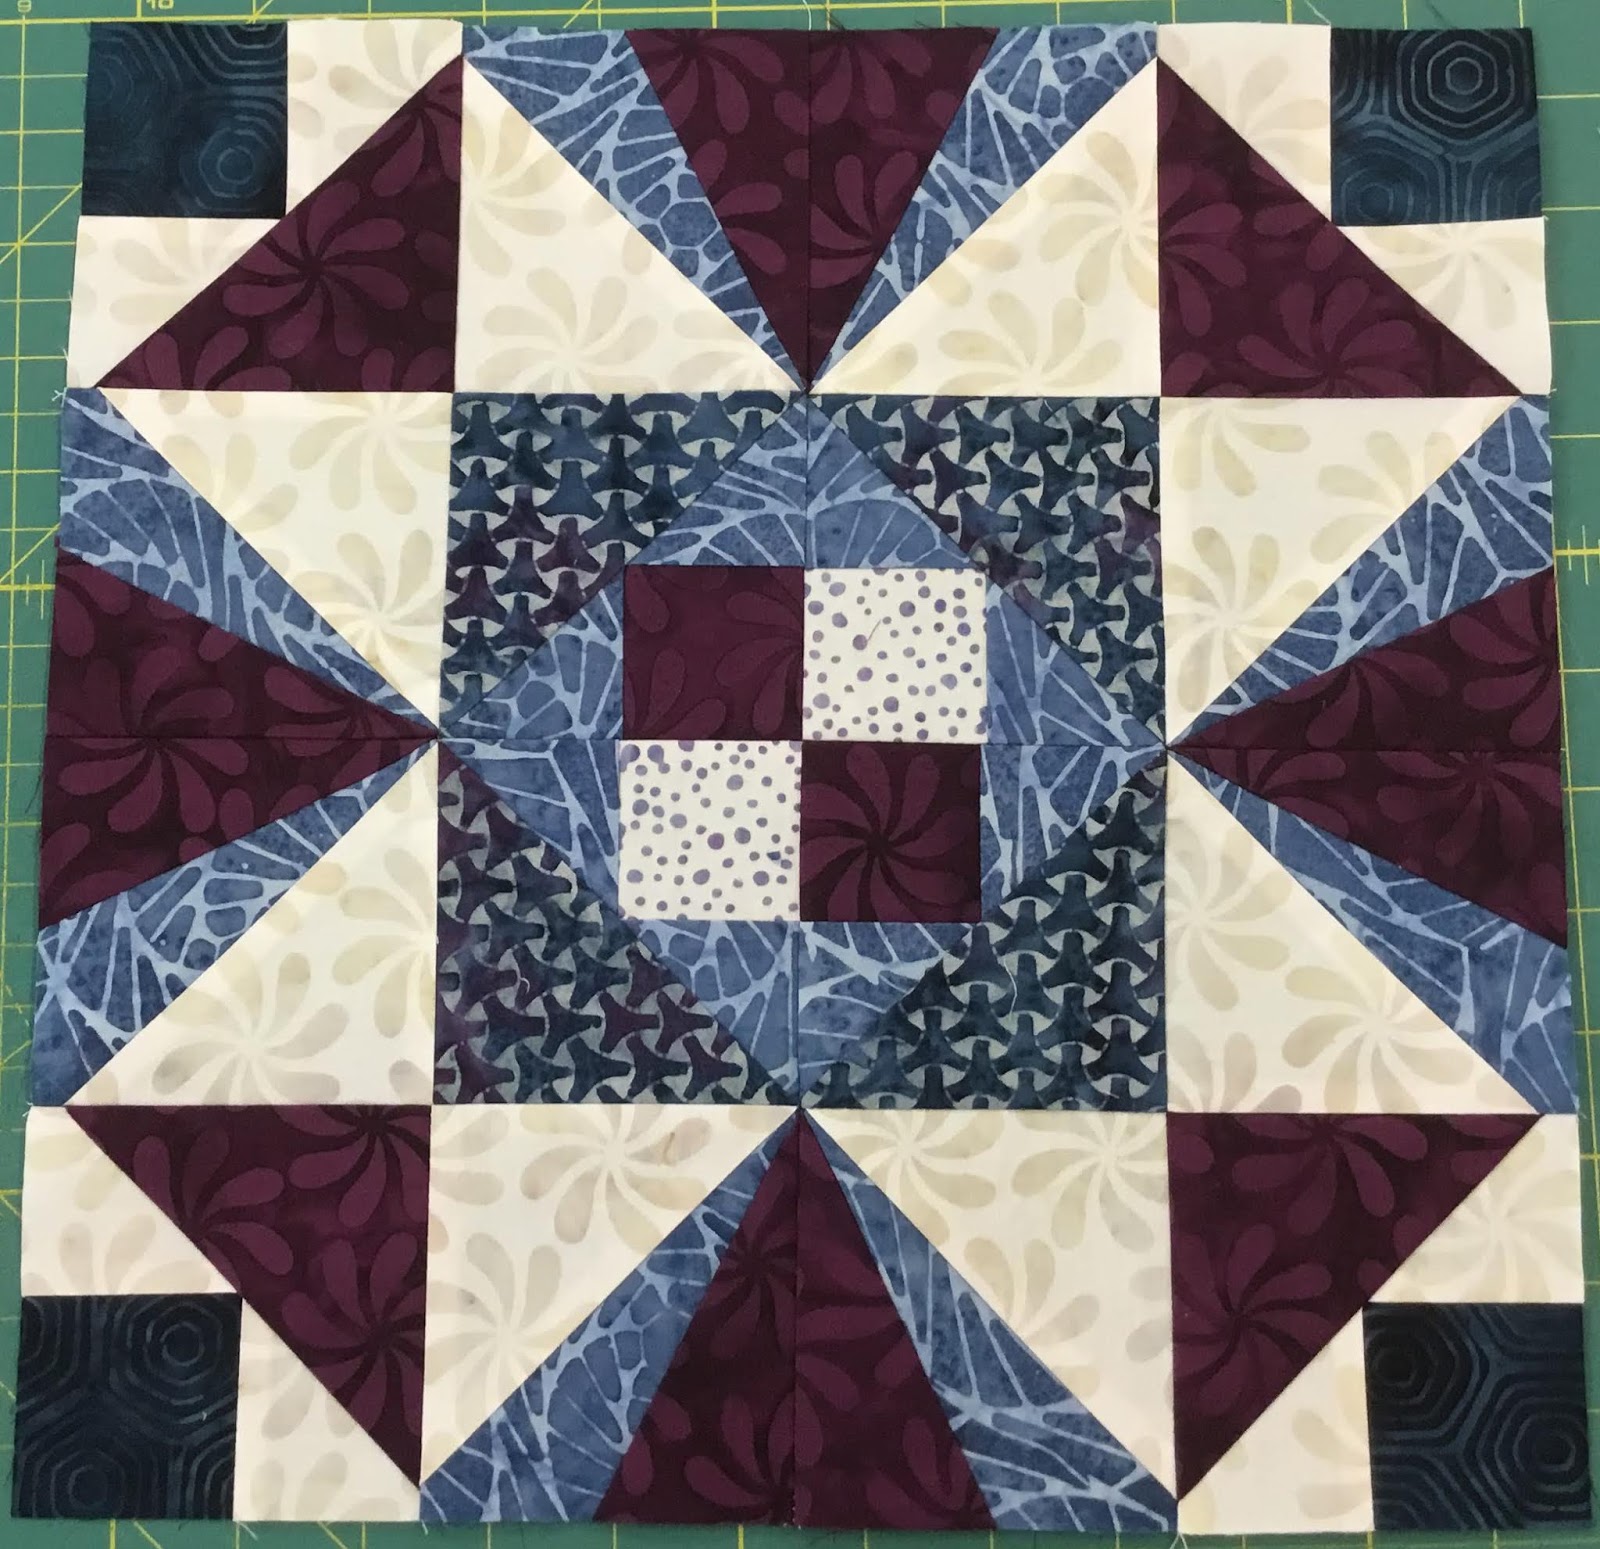
Your "Hidden Blooms" Block is now complete and ready to add to your "Union Station" quilt.

Thank you for stopping by the station stop.  I hope you enjoyed yourselves and I hope you will stop by again. 

I sure hope you will sign up for my monthly newsletter and blog post, to get the latest information about upcoming pattern releases and events.  Sign Up Here!

Also, Make Sure you follow me on the following Social Media Channels:


Have fun quilting,

Tina
"Designing to Inspire"

Saturday, September 14, 2019

Garden Enchantment Block 6, the final block.


Today is a release day for the final block 6 and finishing instructions for the Garden Enchantment BOM.  This Block of the Month has gone really fast when you are as busy as I am right now.  Purchase Block 6/Finishing Instructions HERE!


Block 6 consist of making units that are made from Half Square Triangles, Diamond in a Square and Picket units.


Since we have been making Half Square Triangles and Diamond in a Square unit throughout this quilt, we will be really concentrating on how to make the Picket units in this block post.


Picket units are easy to make.  Let's start with 2 small white squares, Dark Green and Turquoise Rectangles. 

Mark a sewing line corner to corner on the diagonal on the wrong sides of the small squares.   Place the small square on each of the rectangles with right sides together.  Assuring the diagonal for the dark green rectangle starts in the upper left and for the turquoise the diagonal start in the upper right-hand corner. 


Stitch on the drawn lines, trim 1/4" away from the sewn line.


Pressing the Dark Green Picket toward the small triangle, and the Turquoise Picket you will press toward the turquoise.


To trim up the units, position your Wing Clipper® over the unit, aligning one of the long diagonal guidelines on the ruler with a single diagonal seam.  Assuring the appropriate size trim down lines on the tool is inside the oversized unit.  Trim up the first two sides.


Rotate your Picket unit 180° and reposition the Wing Clipper® to align the trimmed raw edge with the unit size and "X" at the top with the sewn seam.  Trim again, up the side and across the top.


For the other Picket unit, position the Wing Clipper®, aligning the "X" at the top with the sewn seam.  Assuring the appropriate size trim down lines on the tool is inside the oversized unit.  Trim the first two sides,  then rotate, align, and trim the second two sides.


See that's how easy the Pickets units are to make. You can now assemble your units together.


To assemble, you will start by sewing the corners and the Pickets together into units.  Once you have units, you need to Layout your block and Stitch the units together.


Your Block is now complete.  You are now ready to assemble your Garden Enchantment Quilt Top together.  Have fun with your assembly as the quilt comes along. 

I look forward to seeing your finished quilt, and I hope you will share your photos on Facebook and Instagram using the #quiltingaffectiondesigns and #gardenenchantmentbom.

Tina
"Designs to Inspire"


Saturday, September 7, 2019

Goodbye old friend!


7 years ago, I purchased a brand new APQS Millennium longarm, intending to start a longarming business from my home. "Millie," which I called her, and I had many adventures of quilting several customers' and my own quilts.


"Tulip" quilt was one of the first quilts I designed and quilted on "Millie," this quilt won "Best of Show at the Charles County Maryland Fair that year.

While waiting for a few customers to come in, I added a T-shirt and custom quilt making in the midst of my longarming business. For several of my customers' quilts, they would be custom-designed, then quilted on the longarm. It was about this time, I discovered I really enjoyed designing quilts for people.
Crossing Swords (First Quilt Pattern)
Over the next couple of years, I discovered a real passion and talent for Quilt Pattern Designing. My longarming business was transforming into a Quilt Pattern design business. Although, every Quilt Pattern I designed eventually went on "Millie."

GetAway
Over the last couple of years, "Millie" had become very lonely sitting idle in her room, due to I was spending more time on new pattern designs. The only time she would be used was for finishing a display quilt. Also, I was starting to discover that the quilting was eating up my time and taking away from the designing process.

This past year, I had to hire other longarm quilters to do my quilting for me, because I was short on time with all my deadlines to meet. Which led to my husband and me to have a heart to heart about what we should do to free up more time for developing my patterns. First I want to talk with a good friend who has quilted a couple of my quilts in the past, to make sure that she could do my quilts for me, I made my decision to sell "Millie."


Two weeks ago, she went on the market, and we had several people come and look at her, but no real reasonable offers. Then, yesterday we had a lady come who really want to start a longarming business, and "Millie" went home with her a couple hours later.

I wish the new owner the best and hope she has great success in her new business.

After "Millie" left, I had really mixed emotions, and it was almost overwhelming to see the machine that got my business started to go. Moving forward, I know I will have more time to develop quilt patterns and hopefully more personal time which has been missing for a while.

GoodBye, Millie, you will be missed, but I hope you will not be as lonely in your new home!

Tina,
Designing to Inspire